Este é um projeto de sistema de agendamento desenvolvido como parte de estudos anteriores. O sistema permite que os usuários cadastrem e visualizem agendamentos em um calendário, vejam detalhes de agendamentos individuais e recebam notificações por e-mail quando uma consulta está próxima.
Visão Geral
O Sistema de Agendamento é uma aplicação web que oferece as seguintes funcionalidades:
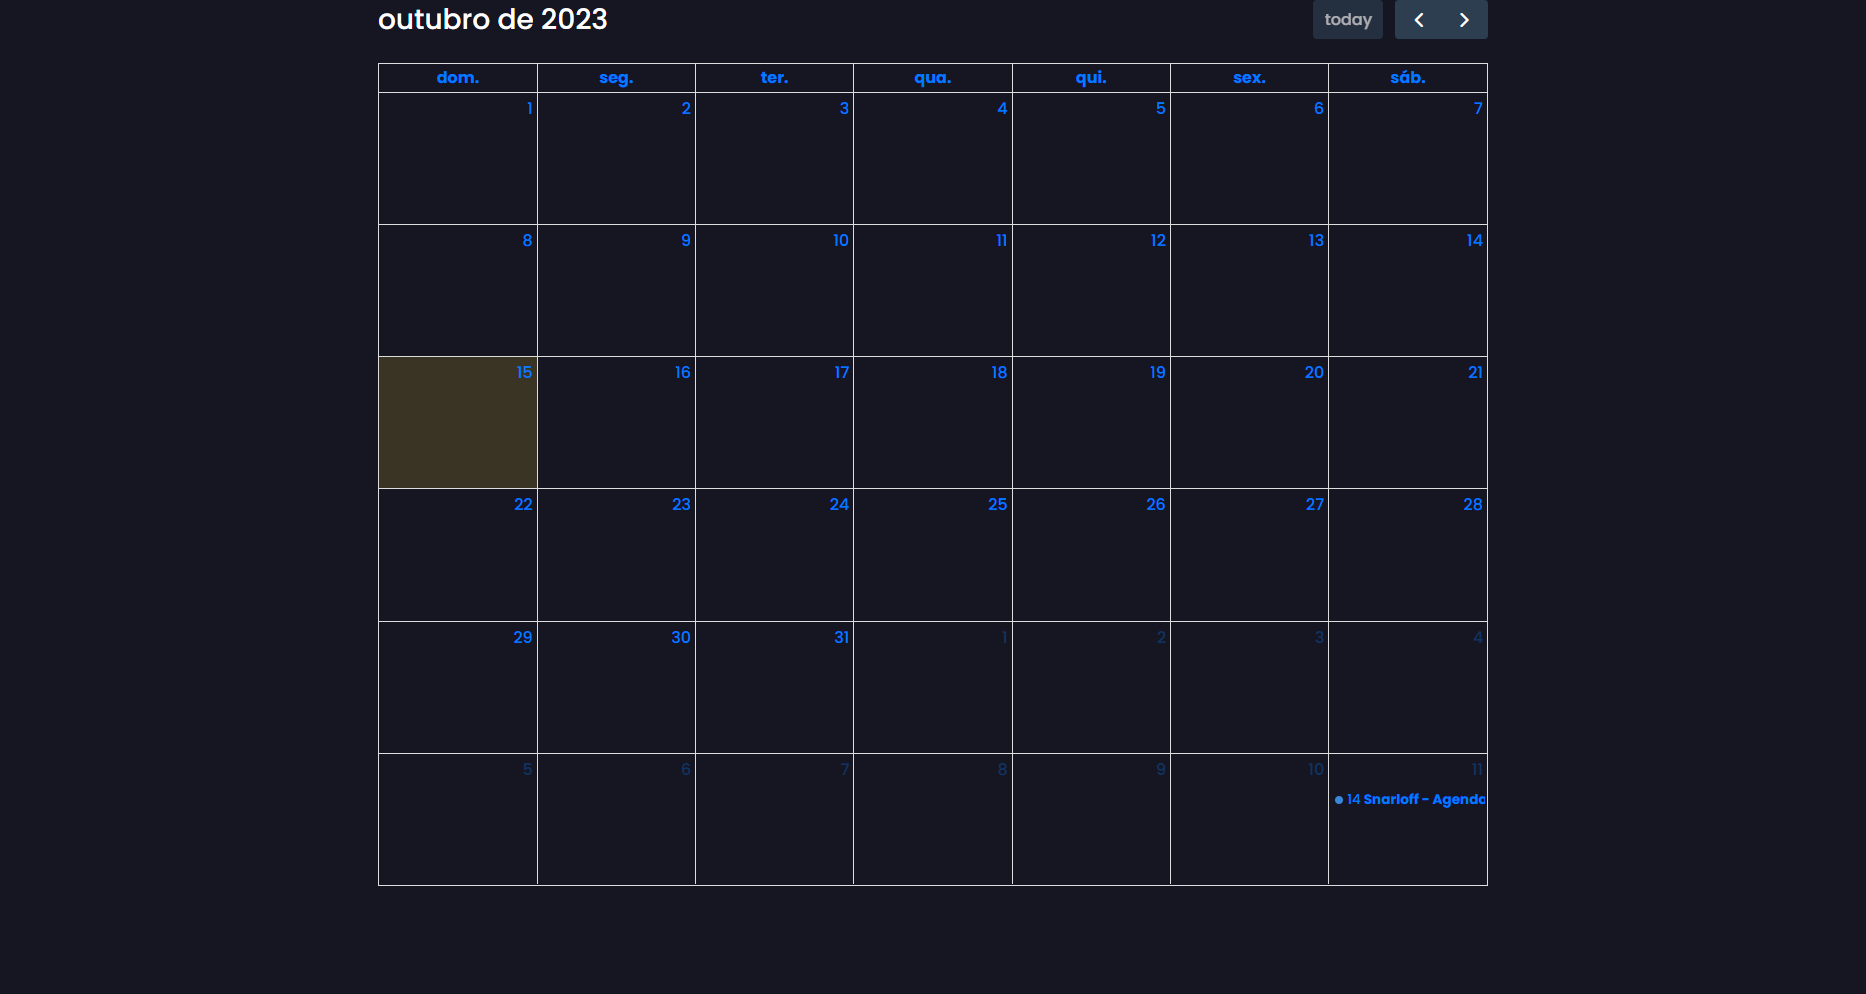
Visualização de um calendário completo usando FullCalendar.js.
Exibição de agendamentos nas datas do calendário.
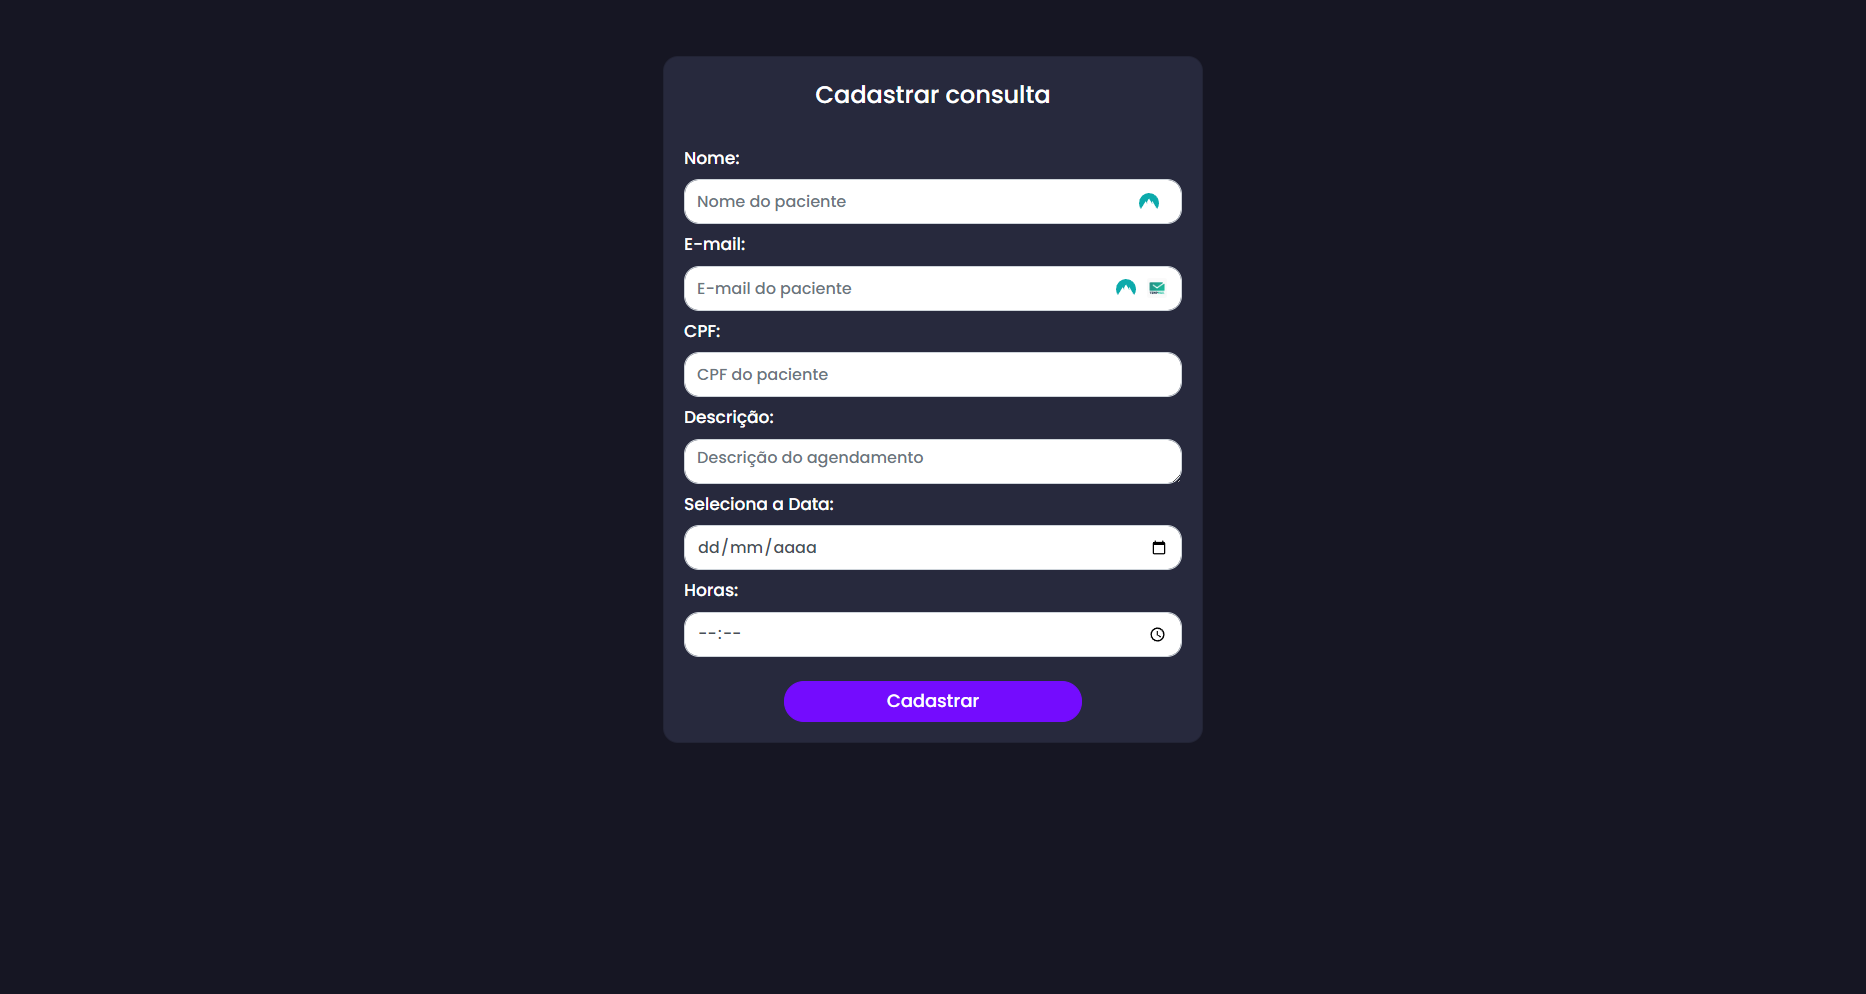
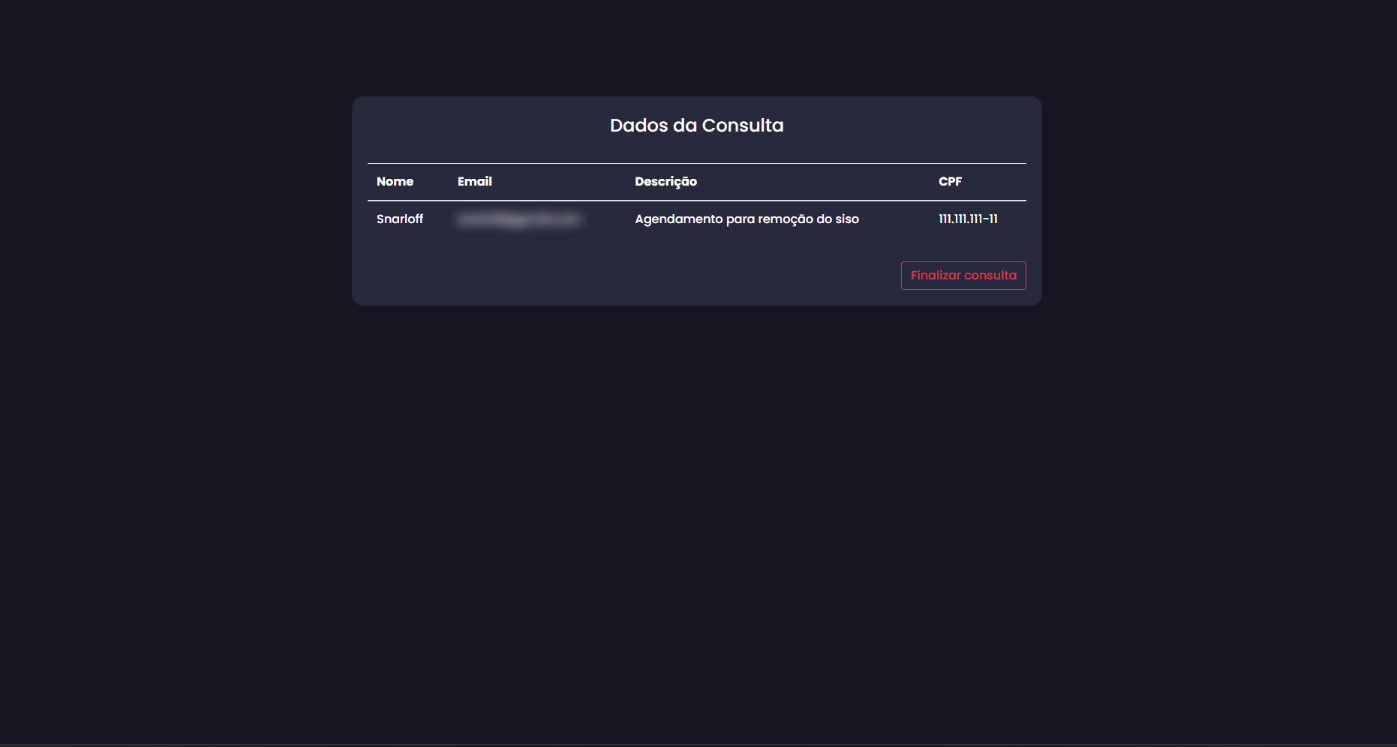
Detalhes de agendamentos individuais, incluindo descrição, nome, CPF, data e horário.
Finalização de consultas por meio de um botão.
Rota de cadastro (/cadastrar) para criar novos agendamentos.
Envio automático de notificações por e-mail quando a consulta está próxima de acontecer, usando Nodemailer.
Utilização de EJS, CSS e Bootstrap para o frontend.
Utilização de Express para o servidor.
Integração com o MongoDB usando Mongoose.
Tecnologias Utilizadas
O projeto faz uso das seguintes tecnologias e pacotes:
FullCalendar.js: Uma biblioteca JavaScript para criação de calendários interativos.
EJS: Uma linguagem de modelagem embutida para gerar HTML com JavaScript.
CSS: Linguagem de estilo para a aparência do aplicativo.
A aplicação estará disponível em http://localhost:3000.
Certifique-se de configurar corretamente a conexão com o MongoDB e as configurações do Nodemailer.
Abaixo estão algumas prints do projeto:
Contribuições
Este projeto é destinado a fins de estudo e não está mais em desenvolvimento ativo. Contribuições são bem-vindas, mas esteja ciente de que o projeto pode não atender a todos os padrões de produção.
Problemas e Sugestões
Se você encontrar problemas ou tiver sugestões para melhorar este projeto, por favor, abra uma issue neste repositório.
This is an agile DuckDB extension that provides Java-based connectivity
with network access and multiprocess support.
What we can do:
Based on the description, this extension can do following:
Enables remote access to DuckDB via TCP/IP from network, instead of
local connect only restriction.
Supports multiprocess access to DuckDB instead of single-process
restriction.
Provides PostgreSQL wire protocol compatibility (JDBC, ODBC, etc.),
allowing DuckDB to serve as a PostgreSQL database.
Offers a dedicated access client, which has:
Advanced features
Comprehensive data dictionary access support
You can use COPY syntax to import data with high performence, this
compatible with PG CopyManager.
Provides self-managed data services and API.
You have multiple ways to connect to this extension:
Directly connect to the server with jdbc, odbc, …
Connect through a connection gateway which multiple servers(can on
different host or different process) are behinds it.
Embed the compiled jar package into your own application.
Register a data service and access data through REST API.
Usage
Build from source:
    # make sure you have JDK17 and maven 3.6+ ready.
    # Download source code
    git clone ...
    # compile it
    cd slackerdb
    mvn clean compile package

    # All compiled results will be placed in the dist directory.
    #    compiled Jar packages,
    #    default configuration files.
java -jar dbproxy/target/slackerdb-dbproxy-0.1.8-standalone.jar status
Server configuration file template
# Database name, default is none.
data=

# Path where data files are saved
# ":memory:" indicates in-memory mode (data will be lost after restart)
data_dir=:memory:

# Temporary files directory during operations
# Disk mode:   Defaults to data_dir if not specified
# Memory mode: Defaults to system temp directory if not specified
# Recommended: Use high-performance storage for temp_dir
temp_dir=

# Directory for extension plugins
# Default: $HOME/.duckdb/extensions
extension_dir=

# Run as background daemon (true/false)
daemon=

# PID file location
# - Locks exclusively during server operation
# - Startup aborts if file is locked by another process
# - No file created if not configured, and no lock.
pid=

# Log output destinations (comma-separated)
# "CONSOLE" for stdout, file paths for file logging
log=CONSOLE,logs/slackerdb.log

# Log verbosity level
log_level=INFO

# Main service port
# 0 = random port assignment
# -1 = disable network interface
# Default: 0 (disabled)
port=

# Data service API port
# 0 = random port assignment
# -1 = disable interface (default)
port_x=

# Network binding address
bind=0.0.0.0

# Client connection idle timeout (seconds)
client_timeout=600

# External remote listener registry endpoint
# Format: IP:PORT
# Default: none (disabled)
remote_listener=

# Database opening mode.
# Default: READ_WRITE
access_mode=READ_WRITE

# Maximum concurrent connections
# Default: 256
max_connections=

# Maximum worker threads
# Default: CPU core count
max_workers=

# Database engine threads
# Default: 50% of CPU cores
# Recommendation: 5-10GB RAM per thread
threads=

# Memory usage limit (K/M/G suffix)
# Default: 60% of available memory
# -1 = unlimited (memory mode only)
memory_limit=

# Database template file
template=

# Initialization script(s)
# Executes only on first launch
# Accepts: .sql file or directory
init_script=

# Startup script(s)
# Executes on every launch
# Accepts: .sql file or directory
startup_script=

# System locale
# Default: OS setting
locale=

# SQL command history
# ON = enable tracking
# OFF = disable (default)
sql_history=OFF

# Minimum idle connections in pool
connection_pool_minimum_idle=3

# Maximum idle connections in pool
connection_pool_maximum_idle=10

# Connection lifetime (milliseconds)
connection_pool_maximum_lifecycle_time=900000

# Query result cache configuration (in bytes)
# - Only caches API request results (JDBC queries unaffected)
# - Default: 1GB (1073741824 bytes)
# - Set to 0 to disable caching
query_result_cache_size=

# Data service schema initialization
# - Accepts:
#   * JSON file path (single schema)
#   * Directory path (loads all *.service files)
# - Schema files should contain service definitions in JSON format
data_service_schema=
Proxy configuration file template
# PID file location
# - Locks exclusively during server operation
# - Startup aborts if file is locked by another process
# - No file created if not configured, and no lock.
pid=

# Log output destinations (comma-separated)
# "CONSOLE" for stdout, file paths for file logging
log=CONSOLE,logs/slackerdb-proxy.log

# Log level
log_level=INFO

# Run as background daemon (true/false)
daemon=

# Main service port
# 0 = random port assignment
# -1 = disable network interface
# Default: 0 (disabled)
port=0

# Data service API port
# 0 = random port assignment
# -1 = disable interface (default)
port_x=0

# Network binding address
bind=0.0.0.0

# Client connection idle timeout (seconds)
client_timeout=600

# Maximum worker threads
# Default: CPU core count
max_workers=

# System locale
# Default: OS setting
locale=
Note: All parameters are optional.
You can keep only the parameters you need to modify.
For parameters that are not configured, default values will be used.
Data Service
Data service work with port x, please make sure you have enabled it in
server configuration or from command parameter. It’s important to note
that we have no consider on data security. This means data services must
work in a trusted environment.
user login
User login (note: this is optional). After success, a token will be
provided.
Context operations or SQL access that requires context variables will
require token.
If your program does not involve context feature, you can ignore this
login.
Put it simplify, the token is currently used as the user ID.
Optional. used to overwrite service definition. 0 means
no result cache
The token information here is obtained when call /login.
The token is optional, if you use context in your sql statement, you
must set it.
snapshotLimit format: 3 hours / 30 minutes / 45 seconds
GET Request example:
GET /api/1.0/queryApi?context1=xxx&context2=yyy
POST Request example:
  POST /api/1.0/queryApi

  {
    "context1": "xxx",
    "context2": "yyy",
  }
SQL REPL Server provides an asynchronous WebSocket interface for executing SQL queries and fetching results in pages.
It is useful for long-running queries where you want to avoid blocking the client, and aligns with the MCP (Model Context Protocol) philosophy of using WebSocket for bidirectional communication.
To use it, ensure the data service API port (port_x) is enabled in server configuration.
WebSocket Endpoint
Connect to the WebSocket endpoint:
Attribute
Value
Protocol
WebSocket (ws:// or wss://)
Path
/sql/ws
Once connected, you can send JSON messages with the following general format:
{
  "id": "unique-request-id",   // used to match responses
  "type": "message-type",      // one of: start, exec, fetch, cancel, close
  "data": { ... }              // payload specific to the message type
}
The server will respond with a JSON message that mirrors the request id and includes a retCode (0 for success, non‑zero for error) and relevant data.
Session Management
A session is created by sending a start message. The server returns a sessionId that must be included in subsequent messages for the same session.
{
  "id": "2",
  "retCode": 0,
  "retMsg": "Task submitted",
  "taskId": "550e8400-e29b-41d4-a716-446655440000",
  "status": "running"   // or "completed" if result fits in first page
}
If the SQL execution fails immediately (e.g., syntax error), the response will contain retCode != 0 and an error message.
Fetch Results
Retrieves a page of results for a given task ID. The endpoint returns a fixed number of rows (up to maxRows specified in execute) and indicates whether more rows are available.
{
  "id": "3",
  "retCode": 0,
  "retMsg": "Success",
  "taskId": "550e8400-e29b-41d4-a716-446655440000",
  "status": "completed",   // "running", "completed", or "error"
  "hasMore": false,        // true if there are more rows to fetch
  "columnNames": ["id", "name"],
  "columnTypes": ["INTEGER", "VARCHAR"],
  "dataset": [
    [1, "Alice"],
    [2, "Bob"]
  ]
}
If the task is still running (status = “running”), dataset may be empty and hasMore will be true.
If the task has completed and all rows have been fetched, status becomes “completed” and hasMore false.
If an error occurs during execution, status becomes “error” and retMsg contains the error details.
You can send multiple fetch messages until hasMore becomes false. Each call returns the next page of rows.
Cancel Task
Cancels an ongoing SQL task. If no taskId is provided, cancels the current session’s active task.
Message:
{
  "id": "4",
  "type": "cancel",
  "data": {
    "sessionId": "session-123",
    "taskId": "550e8400-e29b-41d4-a716-446655440000"   // optional, omit to cancel the session's active task
  }
}
Note: The examples above assume you handle incoming messages asynchronously. In a real client you would match responses by their id.
Basic Services
The following HTTP endpoints provide basic administrative functions, such as backup, file upload/download, log viewing, and status monitoring. These endpoints are available when the Data Services API port (port_x) is enabled.
/backup (POST)
Performs a database backup. The backup file is saved in the backup/ directory with the naming pattern {database}_{backupTag}.db.
Request body (JSON):
{
  "backupTag": "mybackup"
}
Response example (success):
{
  "retCode": 0,
  "retMsg": "Successful. Backup file has placed to [C:\\Work\\slackerdb\\backup\\mydb_mybackup.db]."
}
/download (GET)
Downloads a file from the server’s working directory.
Query parameters:
filename (required) – relative path to the file.
Example:
GET /download?filename=logs/slackerdb.log
The endpoint supports Range requests for partial downloads.
/upload (POST)
Uploads a file to the server’s working directory.
Query parameters:
filename (required) – target file path.
Form data:
file (required) – the file to upload.
Example using curl:
curl -X POST -F "file=@local.txt""http://localhost:8080/upload?filename=uploads/remote.txt"
lines (optional) – number of lines to return (default 100, max 10000).
Example:
GET /viewLog?filename=logs/slackerdb.log&lines=50
Response (JSON array of strings):
[
  "2025-12-04 10:00:00 INFO  Server started",
  "2025-12-04 10:00:01 INFO  Listening on port 8080"
]
/status (GET)
Returns comprehensive server status information, including server details, database metrics, configuration parameters, usage statistics, installed extensions, and active sessions.
Note: The web console is not a production‑ready feature. It is a demonstration tool designed to help you understand and verify the backend services (Data Service, MCP Tool, and MCP Resource) in a visual, interactive way.
SlackerDB includes a web‑based SQL console that provides an interactive interface for executing SQL queries, viewing results, and performing administrative tasks directly from your browser. In addition to the core SQL REPL, the console offers dedicated panels for managing Data Service, MCP Tool, and MCP Resource – three key extension mechanisms of the SlackerDB ecosystem.
Interactive SQL Shell: Type SQL statements at the prompt and execute them with Enter. Command history is available with up/down arrows.
WebSocket Connection: The console automatically connects to the SQL REPL server via WebSocket (/sql/ws) and manages sessions.
Tabular Results: Query results are displayed as formatted tables with column names and types.
Sidebar Tools Panel: Provides quick access to:
Server Status – detailed modal with server metrics, database parameters, usage statistics, extensions, and active sessions.
Backup Database – modal to create a backup with optional download of the resulting file.
Log Viewer – modal to inspect server logs in real time.
Connection Indicator: Visual indicator shows whether the console is connected to the server.
Asynchronous Execution: Long‑running queries are executed asynchronously; results can be fetched in pages.
Data Service Management Panel: Register, list, load, save, and unregister data services. You can also download the service definitions as a JSON file (the download will prompt you to choose a save location via the browser’s file‑picker dialog).
MCP Tool Management Panel: List, load, save, and unregister MCP (Model Context Protocol) tools. Download the tool definitions as JSON (with file‑picker dialog).
MCP Resource Management Panel: List, load, save, and unregister MCP resources. Download the resource definitions as JSON (with file‑picker dialog).
Usage:
Ensure the server is running with port_x configured (e.g., port_x=8080).
The console will attempt to connect automatically. Once connected, you can start typing SQL.
Use the left‑sidebar buttons to switch between the Console, Data Service, MCP Tool, and MCP Resource views.
In each management panel you can:
Refresh the list of registered items.
Select items with checkboxes and perform batch operations (unregister, download).
Load definitions from a JSON file.
Save definitions to the server’s configuration directory.
Download definitions as a JSON file – the browser will show a file‑save dialog, allowing you to choose the location and filename.
Use the right‑sidebar buttons to open status, backup, or log modals.
The console is built with plain HTML/JavaScript and requires no additional installation. It is intended for development, testing, and administrative purposes in trusted environments. Its primary goal is to demonstrate how the backend services work and to provide a convenient way to experiment with the Data Service, MCP Tool, and MCP Resource subsystems.
Embed the db server in your code
  // create configuration,  and update as your need
  ServerConfiguration serverConfiguration = new ServerConfiguration();
  serverConfiguration1.setPort(4309);
  serverConfiguration1.setData("data1");

  // init database
  DBInstance dbInstance= new DBInstance(serverConfiguration1);

  // startup database
  dbInstance1.start();

  // shutdown database
  dbInstance.stop();

  // We currently supports starting multiple instances running at the same time.
  // But each instance must have his own port and instance name.
Embed the db proxy in your code
    ServerConfiguration proxyConfiguration = new ServerConfiguration();
    proxyConfiguration.setPort(dbPort);
    ProxyInstance proxyInstance = new ProxyInstance(proxyConfiguration);
    proxyInstance.start();

    // Waiting for server ready
    while (!proxyInstance.instanceState.equalsIgnoreCase("RUNNING")) {
        Sleeper.sleep(1000);
    }
Jdbc program example with postgres client
    // "db1" is your database name in your configuration file.
    // 3175  is your database port in your configuration file.
    // If you are connecting for the first time, there will be no other users except the default main
    String  connectURL = "jdbc:postgresql://127.0.0.1:3175/db1";
    Connection pgConn = DriverManager.getConnection(connectURL, "main", "");
    pgConn.setAutoCommit(false);

    // .... Now you can execute your business logic.
Jdbc program example with slackerdb client
    // "db1" is your database name in your configuration file.
    // 3175  is your database port in your configuration file.
    // If you are connecting for the first time, there will be no other users except the default main
    String  connectURL = "jdbc:slackerdb://127.0.0.1:3175/db1";
    Connection pgConn = DriverManager.getConnection(connectURL, "main", "");
    pgConn.setAutoCommit(false);

    // .... Now you can execute your business logic.
Odbc and python program
It also supports ODBC and Python connection.
Use IDE tools to connect to the database
Since native Postgres clients often use some data dictionary information
that duckdb doesn’t have,
We do not recommend that you use the PG client to connect to this
database(That works, but has limited functionality).
Instead, we suggest use the dedicated client provided in this project.
Dbeaver:
Database -> Driver Manager -> New
   Database type: generic database.
   Class name:    org.slackerdb.jdbc.Driver
   URL template:  jdbc:slackerdb://{host}:{port}/[{database}]
Data Security
Based on DuckDB’s secure encryption mechanism, we support data encryption.
To use this feature, you need to:
Set the parameter data_encrypt to true.
Set the database key through any of the following three methods:
Environment variable: SLACKERDB_<dbName>_KEY (where <dbName> is replaced with the name of your database instance).
Java property: Specify it when starting the program as -DSLACKERDB_<dbName>_KEY=….
After startup, specify it via the statement: ALTER DATABASE <dbName> SET Encrypt Key <key>.
Known Issues
1. User and password authorization
We do not support user password authentication, just for compatibility,
keep these two options.
you can fill anything as you like, it doesn’t make sense.
2. Limited support for duckdb datatype
Only some duckdb data types are supported, mainly simple types, such as
int, number, double, varchar, … For complex types, some are still under
development, and some are not supported by the PG protocol, such as
blob, list, map… You can refer to sanity01.java to see what we currently
support.
3. postgresql-fdw
fdw will use “Declare CURSOR” to fetch remote data, while duck doesn’t
support this.
In this example we demonstrate how to create a Kubernetes cluster and to bind a GCP service account to a GKE service account giving your Kubernetes service account GCP level permissions.
Workload identity is a way to securely provide access to Google cloud services within your Kubernetes cluster.
This is accomplished by creating a Google cloud service account, then granting the roles and/or permissions required. Now you create a Kubernetes service account and you add the annotation to the service account referencing the GCP service account which has the required roles and/or permissions to be able to access the Google cloud services within your cluster.
Example Architecture
The following diagrams will demonstrate workload identity and how it binds a GCP service account with Pub/Sub permissions to a GKE service account allowing the pod running your application to have the correct GCP permissions outside your Kubernetes cluster to access Pub/Sub correctly.
Setup
In this repository there are several key things that must be mentioned.
Firstly, we’ve created a Google cloud service account for our terraform user which has access to create all the required resources within our Google project. This will need to be done before being able to use this repository. To be able to set this account up I’d highly recommend following the official Google documentation provided HERE.
Assuming you have your terraform service account setup correctly, you should now have the ability to run the terraform init command and it will create the relevant state file in your remote state location – ideally stored in Google cloud storage.
Note: Setting up the remote state should have been done as part of the Google documentation.
The following are some basic instructions to be able to create the terraform resources we’ve created in this project.
Update the _backend.tf and _providers.tf files and ensure the credentials location matches where you have stored your terraform service account json file.
Apply the terraform IaC to your Google cloud project using the following command:
$ terraform apply -auto-approve
Note: You may wish to first see what resources will be created in your project before applying this IaC, this can be done using the following command:
$ terraform plan
Congratulations! you have successfully started a Kubernetes cluster with workload identity working.
Test
This will confirm that our GCP and GKE service accounts have been bound correctly and our GKE service account can indeed use IAM permissions bound to the GCP service account.
Firstly, you will need to authenticate your kubectl command, this can be done using the following commands:
This will deploy a pod with a image that contains the google cloud SDK, it will use the GKE service account to deploy the pod – Once the pod is healthy it will become an intereractive shell that we can begin testing permissions from within the container running in the pod.
Once the shell is available you should be able to run the following command:
$ gcloud auth list
Running gcloud auth list will result in displaying the email addresses that can be used to auth. If this is successful you should see something like the following output in your terminal:
ACTIVE  ACCOUNT
*       gcp-sa@gke-terraform-cluster-demo.iam.gserviceaccount.com
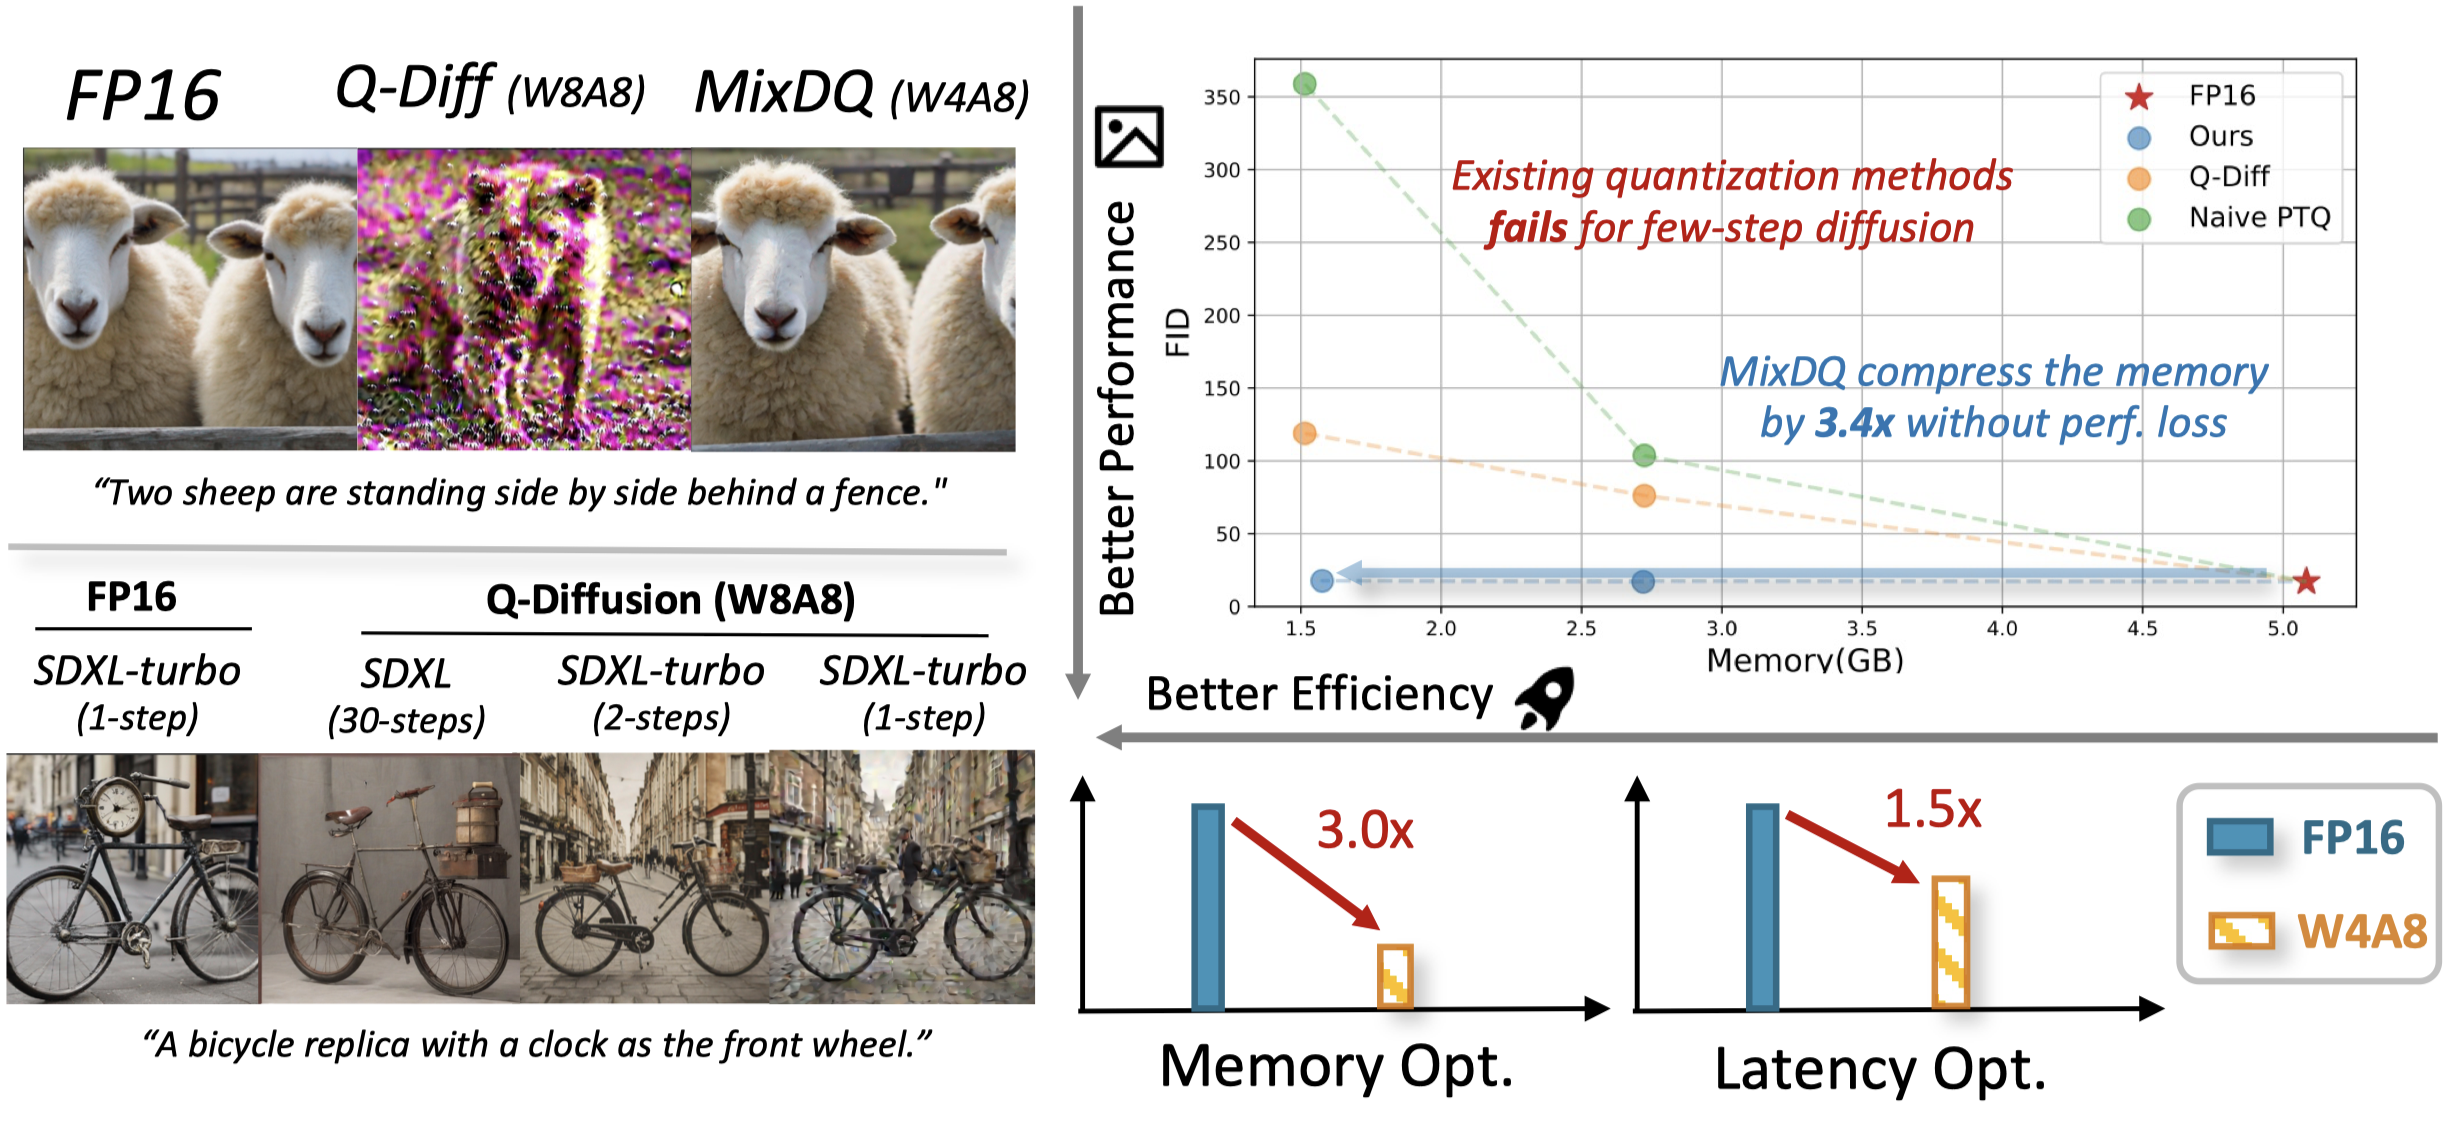
We design MixDQ, a mixed-precision quantization framework that successfully tackles the challenging few-step text-to-image diffusion model quantization. With negligible visual quality degradation and content change, MixDQ could achieve W4A8, with equivalent 3.4x memory compression and 1.5x latency speedup.
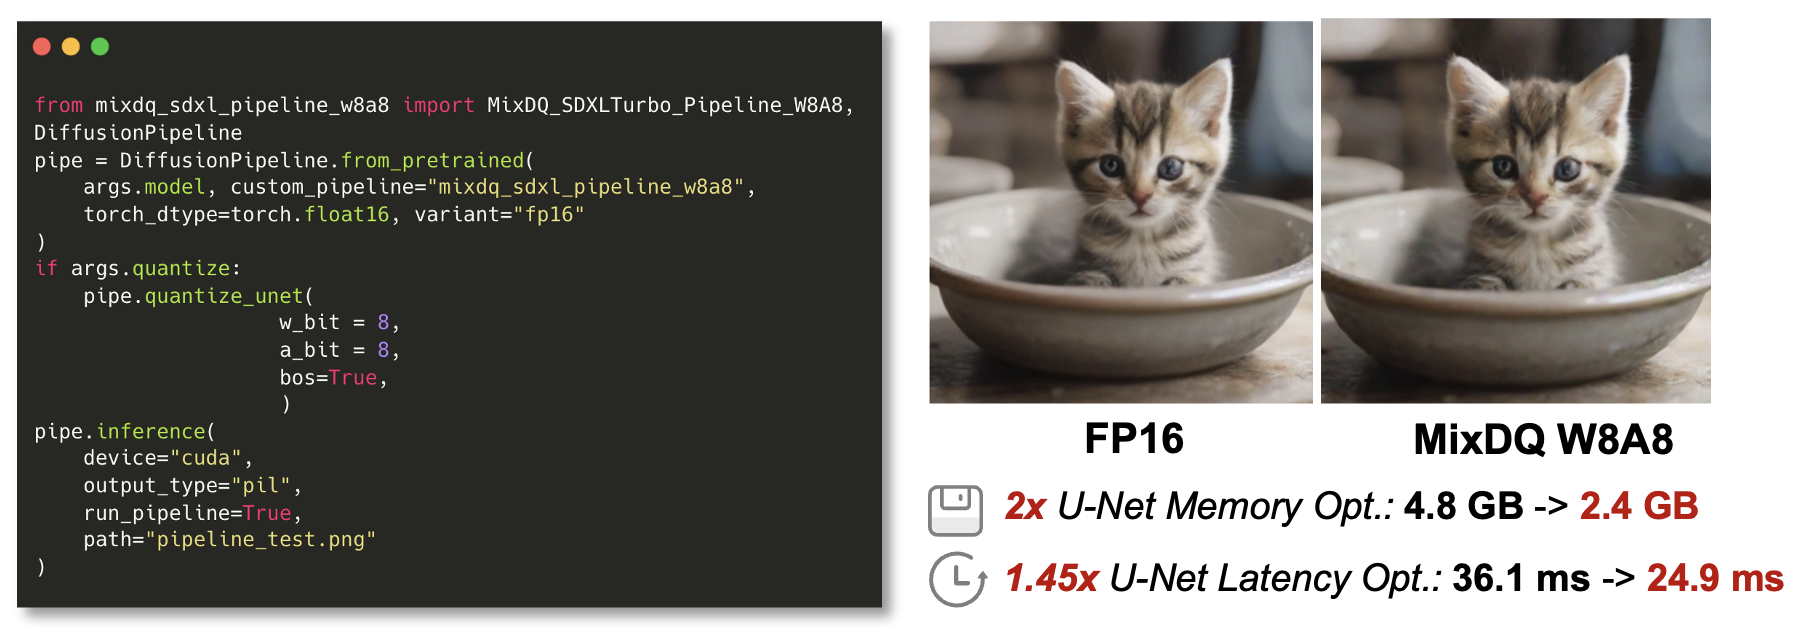
🤗 Open-Source Huggingface Pipeline 🤗: We implement efficient INT8 GPU kernel to achieve actual GPU acceleration (1.45x) and memory savings (2x) for W8A8. The pipeline is released at: https://huggingface.co/nics-efc/MixDQ. It could be easily implemented with just a few lines of code.
Open-source CUDA Kernels: We provide open-sourced CUDA kernels for practical hardware savings in ./kernels, for more details for the CUDA development, please refer to the ./kernels/README.md
The stable diffusion checkpoints are automatically downloaded with the diffusers pipeline, we also provide manual download scripts in ./scripts/utils/download_huggingface_model.py. For text-to-image generation on COCO annotations, we provide the captions_val2014.json with Google Drive, please put it in the ./scripts/utils.
0. FP text-to-image generation
Run the main_fp_infer.sh to generate images based on coco annotation or given prompt. (When deleting --prompt xxx, using coco annotations as the default prompts.) The images could be found in $BASE_PATH/generated_images.
## SDXL_Turbo FP Inference
config_name='sdxl_turbo.yaml' # quant config, but only model names are used
BASE_PATH='./logs/debug_fp'   # save image path

CUDA_VISIBLE_DEVICES=$1 python scripts/txt2img.py \
		--config ./configs/stable-diffusion/$config_name \
		--base_path $BASE_PATH --batch_size 2 --num_imgs 8  --prompt  "a vanilla and chocolate mixing icecream cone, ice background" \
		--fp16
1. Normal Quantization
We provide the shell script main.sh for the whole quantization process. The quantization process consists of 3 steps: (1) generating the calibration data. (2) conduct PTQ process. (3) conduct quantized model inference. We also provide the scripts for each of the 3 processes (main_calib_data.sh,main_ptq.sh,main_quant_infer.sh). You could run the main.sh to finish the whole quantization process, or run three steps respectively.
1.1 Generate Calibration Data
Run the main_calib_data.sh $GPU_ID to generate the FP activation calibration data. The output path of calib data is specified in the quant config.yaml. the --save_image_path saves the FP generated reference images. (We provide the pre-generated calib data at Google Drive, you could replace it with "/share/public/diffusion_quant/calib_dataset/bs1024_t1_sdxl.pt" in mixdq_open_source/MixDQ/configs/stable-diffusion/sdxl_turbo.yaml. Noted that the calib_data in the google drive contains 1024 samples, so you may increase the n_samples in the sdxl_turbo.yaml up to 1024.)
Run the main_ptq.sh $LOG_NAME $GPU_ID to conduct PTQ to determine quant parameters, the quant parameters are saved as ckpt.pth in the log path. (We provide the ckpt.pth quant_params checkpoint for sdxl_turbo at Google Drive, you may put it under the ./logs/$log_name folder. It contains the quant_parmas for 2/4/8 bit, so you could use it with differnt mixed-precision configurations. )
We provide the quantized inference example in the latter part of main.sh, and the main_quant_infer.sh (the commented part). The --num_imgs denotes how many images to generate, when no --prompt is given, the COCO annotations are used as the default prompts. By default, 1 image is generated for each prompt. When a user-defined prompt is given, “#num_imgs” of images are generated following this prompt.
For simplicity, we provide MixDQ acquired mixed precision configurations in ./mixed_precision_scripts/mixed_percision_config/sdxl_turbo/final_config/, the example of mixed precision inference is shown in main_quant_infer.sh. The “act protect” represents layers that are preserved as FP16. (It’s also worth noting that the mixed_precision_scripts/quant_inference_mp.py are used for mixed precision search, for infering the mixed precision quant model, use scripts/quant_txt2img.py)
If you find our work helpful, please consider citing:
@misc{zhao2024mixdq,
      title={MixDQ: Memory-Efficient Few-Step Text-to-Image Diffusion Models with Metric-Decoupled Mixed Precision Quantization},
      author={Tianchen Zhao and Xuefei Ning and Tongcheng Fang and Enshu Liu and Guyue Huang and Zinan Lin and Shengen Yan and Guohao Dai and Yu Wang},
      year={2024},
      eprint={2405.17873},
      archivePrefix={arXiv},
      primaryClass={cs.CV}
    }
TODOs
the evaluation scripts (FID, ClipScore, ImageReward)
zof uses a separate oftr process to terminate OpenFlow connections and translate OpenFlow messages to JSON.
Architecture: The oftr process translates OpenFlow to JSON.
You construct OpenFlow messages via YAML strings or Python dictionaries. Incoming OpenFlow messages are generic Python objects. Special OpenFlow constants such as ‘NO_BUFFER’ appear as strings.
The basic building block of zof is an app. An app is associated with various message and event handlers.
You create an app object using the zof.Application class. Then, you associate handlers using the app’s message decorator.
Place the above text in a file named demo.py and run it with python demo.py. This app handles OpenFlow ‘PACKET_IN’ messages using the packet_in function. All other messages are dispatched to the other function. The app does not do anything; it just logs events.
To compose the demo.py program with the layer2 demo:
As part of our project ‘Data Scores as
Governance’ we have developed a tool to map and investigate the uses of data
analytics and algorithms in public services in the UK. Little is still known
about the implementation of data-driven systems and algorithmic processes in
public services and how citizens are increasingly ‘scored’ based on the
collection and combination of data.
This repository handles all aspects of the data collection and analysis.
The Sugarcube tool set is used for all data acquisition processes. Those processes can be repeated at any time.
bin/import-ddg-scrapes.sh
The initial data scrape from DuckDuckGo was done outside of this repository, but still using Sugarcube. This script imports extracts the contents of the search results of the initial data set and imports it into the database. The imported data can be found in materials/ddg-scrapes-clean.csv.
bin/search-ddg-gov.sh
Scrape DuckDuckGo for search results on government websites (site:.gov.uk) based on the initial set of search queries.
bin/search-ddg-auxiliary.sh
Scrape DuckDuckGo for search results for auxiliary websites based on the initial set of search queries. The list of auxiliary domains is maintained in queries/aux-sites.txt.
bin/import-foi-requests.sh
Import the contents of the FOI requests into the database. The requests themselves are found in materials/foi-requests.
bin/search-media-ddg.sh
Scrape DuckDuckGo for articles from media websites. This scripts works slightly different due to the amount of possible scrapes. Those scrape need to run on multiple servers in parallel to reduce the time it takes to scrape.
Use the ./scripts/british_newspapers.clj to create the list of media domains.
Split the domains into chunks. On every server run (adopt -n r/4 to the right amount of servers).
Post processing of data is done using a the following collection of scripts. They are idempotent and can be rerun at any time.
scripts/update_companies.clj
Tag all documents in the data base mentioning any company that is defined in queries/companies.txt.
scripts/update_systems.clj
Tag all documents in the data base mentioning any system that is defined in queries/systems.txt.
scripts/update_authorities.clj
Tag all documents in the data base mentioning any authority name in combination with any company or system. The lists of data are defined in queries/authorities.txt, queries/companies.txt and queries/systems.txt. This script also matches authority locations that are managed in [queries/coordinates.json]. If any location is missing, the script will halt. Add to the list of known coordinates to continue.
Flag a set of documents as blacklisted. They will be excluded from any further analysis or by the data-scores-map application. The list of blacklisted ID’s is collected in [queries/blacklist.txt].
scripts/generate-media-sites-queries.js
scripts/stats_for_companies.clj
Generate statistics about the occurrences of companies in the existing data set. It will print a sorted CSV data set to the screen.
scripts/stats_for_systems.clj
Generate statistics about the occurrences of systems in the existing data set. It will print a sorted CSV data set to the screen.
scripts/stats_for_departments.clj
Generate statistics about the occurrences of departments in the existing data set. It will print a sorted CSV data set to the screen.
scripts/stats_for_authorities.clj
Generate statistics about the occurrences of authorities in the existing data set. It will print a sorted CSV data set to the screen.
scripts/clean_gov_uk_domain_names.clj
scripts/british_newspapers.clj
This script scrapes a list of all news media from https://www.britishpapers.co.uk/. The resulting newspaper domains are printed to the screen. Use the script like this:
./scripts/british_newspapers.clj | tee ./queries/british-papers-domains.txt
scripts/reindex_data.clj
This script is a helper to create a new local index and reindex an existing data set. This was helpful during development to be able to experiment on a data set. Run the script like this:
I used Libreoffice to remove line breaks in the original rawresults.csv and
exported the file again in materials/ddg-scraoes.csv. Then I did more
cleaning using the following command:
curl --proto '=https' --tlsv1.2 -sSf https://sh.rustup.rs | sh
2. Run Mandelbrot by Jort using cargo run in the root of the repository
cargo run --release
Usage
__  __                 _      _ _               _
|  \/  |               | |    | | |             | |
| \  / | __ _ _ __   __| | ___| | |__  _ __ ___ | |_
| |\/| |/ _` | '_ \ / _` |/ _ \ | '_ \| '__/ _ \| __|
| |  | | (_| | | | | (_| |  __/ | |_) | | | (_) | |_
|_|  |_|\__,_|_| |_|\__,_|\___|_|_.__/|_|  \___/ \__|
   __             __         __
  / /  __ __  __ / /__  ____/ /_
 / _ \/ // / / // / _ \/ __/ __/
/_.__/\_, /  \___/\___/_/  \__/
     /___/                      v1.4
Run Mandelbrot using:
cargo run --release -- <width> <height> <max_iterations> <supersampling_amount> <window_scale>
where <arg> means substitute with the value of arg
use '-' to use the default value of arg
KeyBindings {
Up -> Move up translation_amount pixels,
Down -> Move down translation_amount pixels,
Left -> Move left translation_amount pixels,
Right -> Move right translation_amount pixels,
R -> Reset the Mandelbrot set view to the starting view,
NumPadPlus -> Increment translation_amount,
NumPadMinus -> Decrement translation amount,
NumPadAsterisk -> Increment scale_numerator,
NumPadSlash -> Decrement scale_numerator,
LeftBracket -> Scale the view by scaling_factor, effectively zooming in,
RightBracket -> Scale the view by inverse_scaling_factor, effectively zooming out,
V -> Prints the current Mandelbrot set view; the center and scale,
Key1 -> Renders VIEW_1,
Key2 -> Renders VIEW_2,
Key3 -> Renders VIEW_3,
Key4 -> Renders VIEW_4,
Key5 -> Renders VIEW_5,
Key6 -> Renders VIEW_6,
Key7 -> Renders VIEW_7,
Key8 -> Renders VIEW_8,
Key9 -> Renders VIEW_9,
Key0 -> Renders VIEW_0,
K -> Prints the keybindings,
S -> Saves the current Mandelbrot set view as an image in the saved folder,
I -> Manually input a Mandelbrot set view,
A -> Pick an algorithm to color the Mandelbrot set view,
M -> Change the Mandelbrot set view max_iterations,
O -> Change the Mandelbrot set view color channel mapping, xyz -> RGB, where x,y,z ∈ {{'R','G','B'}} (case-insensitive),
Q -> Change the window and image quality of the Mandelbrot set rendering by setting the SSAA multiplier, clamped from 1x to 64x,
X -> Change the image quality of the Mandelbrot set rendering by setting the SSAA multiplier, clamped from 1x to 64x,
C -> Prints the configuration variables,
}
Controls
Keys
Action
↑, ↓, ←, →
Move up, down, left, or right
R
Reset the Mandelbrot set view to the starting view
[
Zoom in
]
Zoom out
V
Prints the current Mandelbrot set view; the center and scale
0, …, 9
Render a preconfigured view
K
Print the keybindings
S
Saves the current Mandelbrot set view as an image
I
Manually input a Mandelbrot set view
A
Pick an algorithm to color the Mandelbrot set view
M
Change the Mandelbrot set view max_iterations
O
Change the Mandelbrot set view color channel mapping
Q
Change the window and image quality of the Mandelbrot set rendering by setting the SSAA multiplier
X
Change the image quality of the Mandelbrot set rendering by setting the SSAA multiplier
Vfdctl was built so that when programmatic interaction is needed with a VFD, you do not need to be aware of the specific I/O, registers or even protocol of your device in order to read or write to it. Instead, a user wanting to update a setting needs to send a command with the knowledge of the device name, the value requested and a parameter name that is consistent across every single VFD device. A user wanting the runtime telemetry just needs to specify topics they care to receive updates for in an MQTT client.
With this decoupling, there are numerous tangible benefits. While running Vfdctl, if a VFD is replaced with a different brand or changes to a different protocol it does not force your controllers, HMI or web app to be updated also. So in this scenario if the VFD is not working after you’ve replaced it, you can safely assume that the issue occurred while performing the setup of the new VFD because you did not have to re-download to all of your devices with potentially unintended changes. During system downtime, minimizing complexity is key to ensuring the quickest recovery.
Another advantage is that you are not tied to a single brand, make or model of VFD. For consistency, most users will opt to use the same VFD when using multiple in their system, but what if that device isn’t available for another 20 weeks during a new project? What if this is a 20 year old system and that device is end of life, so there is no drop-in replacement? Imagine if we only needed to change a single config file for our Vfdctl app with the new brand and desired protocol of the new hardware and we didn’t need to download to every 20 year old device on the network! This is the role that Vfdctl serves.
This page describes what’s possible to build with the different tools and APIs that are available on the platform, and how to get the access and information that you need to get started.
How do I get started with Vfdctl?
Hardware requirements
Across the platform, there are different controller devices capable of various protocols. This section helps to describe what you need to successfully use our APIs.
In addition to the controllers below, you will need tools and cables to communicate with them such as ethernet cables, micro usb cables, power cables and a micro SD card (1GB or greater).
Supported Controllers
Make
Model
MQTT Support
Modbus Support
Automation Direct
P1AM-100ETH w/ MKR485
3.1.1
RTU
API Documentation
APIs
API
Vfdctl Version
MQTT Version Supported
Requires Cloud Connectivity?
R/W
Runtime telemetry
v0.1.0beta
3.1.1
No
Read Only
Settings Configuration
v0.1.0beta
3.1.1
No
Write
Last Will & Testament
v0.3.0
3.1.1
No
Read Only
Get started with the Vfdctl APIs
To get started using the Vfdctl endpoints there are a few steps of setup before the endpoints will be monitored.
Setup the connected devices
Prepare the configuration file
Download a copy of the config.txt from the application’s repo on GitHub to use as a template
Place the config.txt at the root of a micro SD card
Setup an MQTT Broker (via Docker)
Install Docker
Ensure the Docker daemon is running the Docker desktop app
Open a terminal / command prompt
Run the command docker run -it --name mqtt --restart unless-stopped -p 1883:1883 eclipse-mosquitto mosquitto -c /mosquitto-no-auth.conf
Find the ip address of your device, this is the IP address of your MQTT Broker
Within config.txt update the broker_url to the IP address of your MQTT Broker
Network the devices
Using a managed switch or router, connect the controller via ethernet
On the same network, connect your machine running the MQTT broker
Assign a static IP address to the controller on the same subnet as your MQTT Broker
Set up the Vfdctl controller device
P1AM-100ETH
Load the image onto the P1AM-100ETH
Power up the P1AM-100ETH controller via 24V
Clone the git repo to a machine running Arduino IDE
Connect to the P1AM-100ETH controller via micro usb on the machine
Open the app.ino project in Arduino IDE
Select your connected device and download the app to the controller
Load the configuration onto the controller
Within config.txt update the device_mac to your controller’s ethernet MAC address (this can be usually be found on a sticker on the controller or its packaging)
Ensure config.txt is located at the root of the micro SD card
Insert the micro SD card into the controller
Power cycle the controller
Monitoring Telemetry and Sending Commands
Vfdctl’s public communications uses MQTT for flexibly communicating to an IOT ingestion engine. Any MQTT 3.1.1 capable client on the network is able to speak to the Vfdctl app. For ease of use, I recommend installing MQTT Explorer to browse topics, publish commands and setup basic data traces. For those unfamiliar with MQTT there is reference material shared within the “Important Resources” section.
Monitoring device telemetry
Telemetry is reported as a read-only stream on a topic beginning with dt (device telemetry). It is up to the topic’s consumer to determine the most appropriate way to handle subscribing to topics.
Telemetry topics follow the pattern below:
dt/[app]/[device]/[parameter-measured]
As an example, the topic below is expected to report the values of the current drawn by VFD 1:
dt/vfdctl/vfd1/amps
Some possible examples of determining your subscription are:
dt/vfdctl/vfd1/+
You are creating an engineering dashboard page per device for a web app, you only care about the currently selected “vfd1” device and want to display all messages in a historian table view
dt/vfdtl/vfd1/amps ; you’re now on revision 2 of your engineering dashboard page and have added React components with a line chart where you want to display current draw specifically
dt/vfdctl/+/amps
You want to use ai to predict your billing costs, so you create a trend of mean current draw across all devices on the network by setting up a listener in Node Red that every minute will reset its value, sum every incoming value and at the end of the next interval divide by the number of samples received before publishing the mean on a new topic called dt/facility1/vfd/amps and inserting the data into a database ; a conveyor you are driving can bind if it gets too worn, so you implement a Node Red listener to send a text message to a technician that VFD1’s conveyor needs maintenance performed before irreversible damage occurs when the value passes an alarm setpoint
Publishing commands
Commands are requests for action to occur on another client.
Command topics follow the pattern below:
The controller’s config file contains settings for the controller hardware connection, vfd hardware and MQTT topic mapping. This file is plain text and any notepad or command line software can edit it easily.
After making edits, see “Setting up the Vfdctl controller device” for load instructions. Example of the config.txt, being viewed with VSCode.
Important Resources
Platform updates
Please make sure to bookmark the following pages, as they will provide you with important details on API outages, updates, and other news relevant to developers on the platform.
Check out our releases to see find the latest or a history of all released binaries
Visit the Tulsa Software Repositories to find related open-source codebases
In case of any document conflicts, assume the Vfdctl readme is most accurate
MQTT reference material
MQTT is extremely flexible and not as rigidly enforced as communications such as RPC or REST communications. This leaves lots of room for one-off implementations if systems are not intentionally designed. For our communications architecture, we have based our topic and payload structures off of the AWS best practices to ensure ultimate usability.
A good client GUI like MQTT Explorer makes troubleshooting your system much easier but any app supporting MQTT 3.1.1 communications will suffice
Using a IoT Rules Engine such as Node Red, AWS IoT Core, etc is essential to utilizing data with minimal coupling and maximal scalability
Still have questions?
For the questions not covered here or to learn what we’re currently working on, visit the Tulsa Software slack channel to review topics, ask questions, and learn from others.
Linksy is an open-source bookmark and link manager that enables users to organize and manage their social media posts and other links. It allows for the creation of folders to store links, the ability to share collections with others, and a search feature to quickly find links. With its seamless integration with various social media platforms, Linksy provides an easy and efficient way to manage links.
Features
Create folders and organize links from different social media platforms
Search through your links with ease
Share your link collections with others
Embed social media posts from platforms like Twitter, Instagram, and more
Easy-to-use UI with animations for an enhanced user experience
Tech Stack
This project uses the following technologies:
Next.js: Framework for both frontend and backend
TypeScript: Programming language
Better Auth: Authentication library
Prisma: ORM for database interactions
PostgreSQL: Database management system
ShadCN: UI component library
Framer Motion: Animation library for smooth transitions
React Hot Toast: Toast notifications library
Zod: Schema and validation library
Zustand: State management library
TanStack Query: Data fetching and caching library
Axios: HTTP client for making requests
Tailwind CSS: Utility-first CSS framework
LogLib: Analytics tool for monitoring
Ludide React: Icon collection
React Icons: Icon collection
React Social Media Embed: Embedding library for social media posts
Use-Debounce: Debouncing library for improved performance
Getting Started
To get started with the project locally, follow these steps:
Prerequisites
Node.js
PostgreSQL database
GitHub credentials for OAuth authentication
Setup
Fork the repository to your GitHub account.
Clone the repository
git clone https://github.com/your-username/linksy.git
cd linksy
Install dependencies
npm install
Set up environment variables: Create a .env file at the root of the project and add the following variables:
A simple experience about RESTful API with Django.
If you want to have an experience on RESTful API with Django. This is a full guide for you.First you need to know, I did this project using a youtube video on this link. Also, you can follow steps here and use the code in the repository.
Download Django web framework from www.djangoproject.com, or using pip (Python built-in package installer).
Create the virtual environment using Terminal: $ python3 -m venv [name]
Goninto the virtual environment using Terminal: $ source [name]/bin/activate
Install Django using Terminal: $ pip install django
Create a project using Terminal: $ django-admin startproject [name]
Go into the folder using Terminal: $ cd [project-name]
Run django using Terminal: $ python manage.py runserver
Create an app in teh project folder using Terminal: $ django-admin startapp [name]
Go to python_api/python_api/setting.py, add the app-name in INSTALLED_APPS. (e.g. ‘myapp’)
In python_api/myapp/models.py add our model. you can copy from this repo.
Convert the model that you made, into a SQL table using Terminal: $ python manage.py makemigrations
Do the same convertation for the app too, using Terminal: $ python manage.py makemigrations myapp
Finish the previous step by run this command on terminal: $ python manage.py migrate
In python_api/python_api/urls.py add our api urls. you can copy from this repo.
In python_api/myapp/views.py add our logic API and codes. you can copy from this repo.
Now, you can test your APIs, just don’t forget to run this command before testing: $ python manage.py runserver
Notes
At the end you will have two folder. the folder that hold our projects code titled as the name that choose for the project, and a folder as virtual environment to hold all of dependencies.