Author: cajqdtgnbhc9

  • vfdctl

    Vfdctl Use Case

    Vfdctl was built so that when programmatic interaction is needed with a VFD, you do not need to be aware of the specific I/O, registers or even protocol of your device in order to read or write to it. Instead, a user wanting to update a setting needs to send a command with the knowledge of the device name, the value requested and a parameter name that is consistent across every single VFD device. A user wanting the runtime telemetry just needs to specify topics they care to receive updates for in an MQTT client.

    With this decoupling, there are numerous tangible benefits. While running Vfdctl, if a VFD is replaced with a different brand or changes to a different protocol it does not force your controllers, HMI or web app to be updated also. So in this scenario if the VFD is not working after you’ve replaced it, you can safely assume that the issue occurred while performing the setup of the new VFD because you did not have to re-download to all of your devices with potentially unintended changes. During system downtime, minimizing complexity is key to ensuring the quickest recovery.

    Another advantage is that you are not tied to a single brand, make or model of VFD. For consistency, most users will opt to use the same VFD when using multiple in their system, but what if that device isn’t available for another 20 weeks during a new project? What if this is a 20 year old system and that device is end of life, so there is no drop-in replacement? Imagine if we only needed to change a single config file for our Vfdctl app with the new brand and desired protocol of the new hardware and we didn’t need to download to every 20 year old device on the network! This is the role that Vfdctl serves.

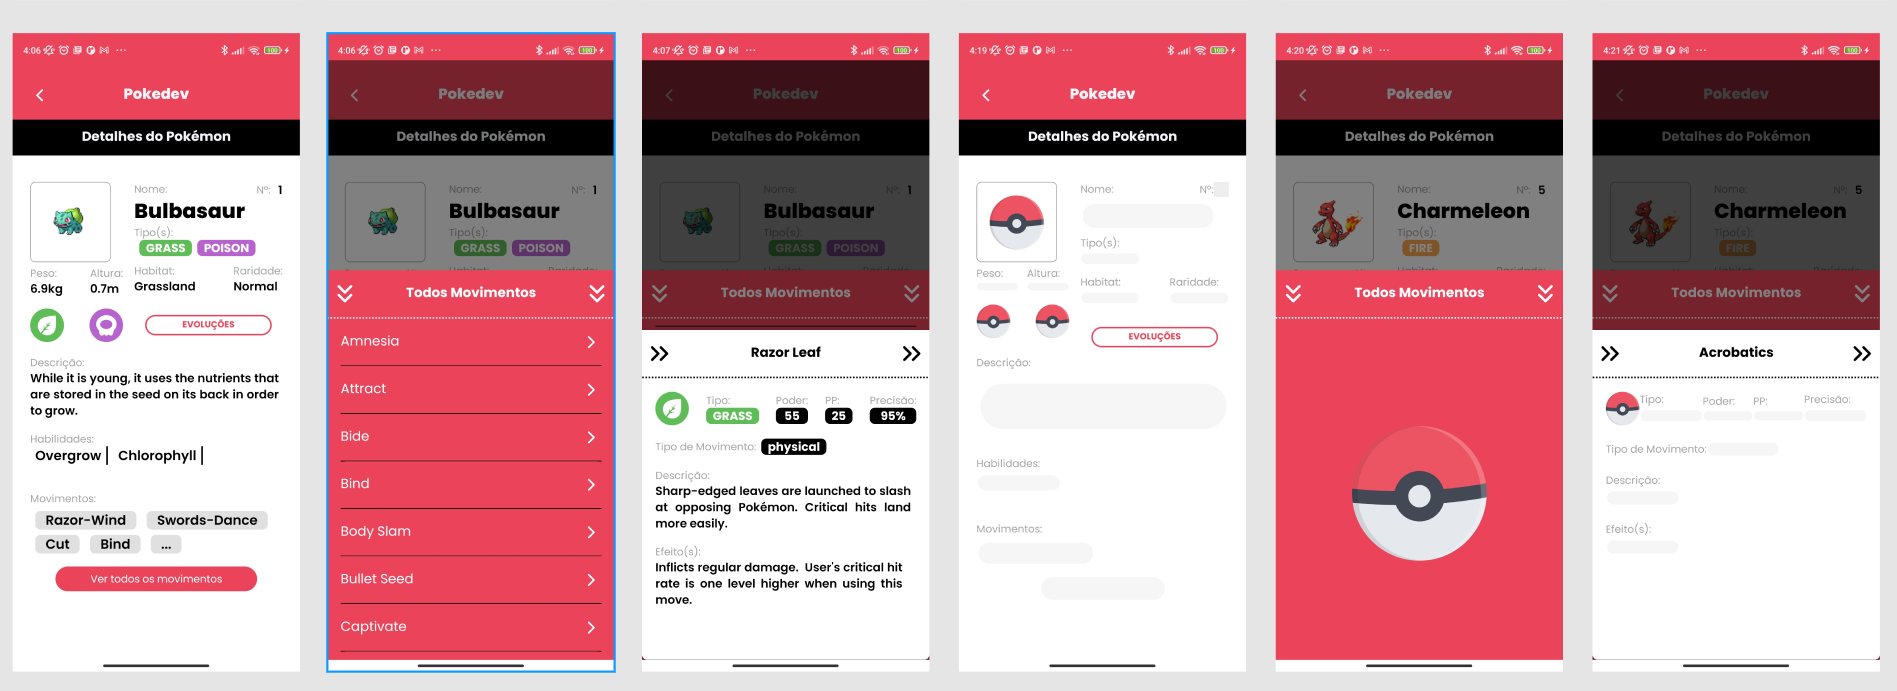
    This page describes what’s possible to build with the different tools and APIs that are available on the platform, and how to get the access and information that you need to get started.

    How do I get started with Vfdctl?

    Hardware requirements

    Across the platform, there are different controller devices capable of various protocols. This section helps to describe what you need to successfully use our APIs.
    In addition to the controllers below, you will need tools and cables to communicate with them such as ethernet cables, micro usb cables, power cables and a micro SD card (1GB or greater).

    Supported Controllers

    Make Model MQTT Support Modbus Support
    Automation Direct P1AM-100ETH w/ MKR485 3.1.1 RTU

    API Documentation

    APIs

    API Vfdctl Version MQTT Version Supported Requires Cloud Connectivity? R/W
    Runtime telemetry v0.1.0beta 3.1.1 No Read Only
    Settings Configuration v0.1.0beta 3.1.1 No Write
    Last Will & Testament v0.3.0 3.1.1 No Read Only

    Get started with the Vfdctl APIs

    To get started using the Vfdctl endpoints there are a few steps of setup before the endpoints will be monitored.

    Setup the connected devices

    1. Prepare the configuration file
    2. Download a copy of the config.txt from the application’s repo on GitHub to use as a template
    3. Place the config.txt at the root of a micro SD card
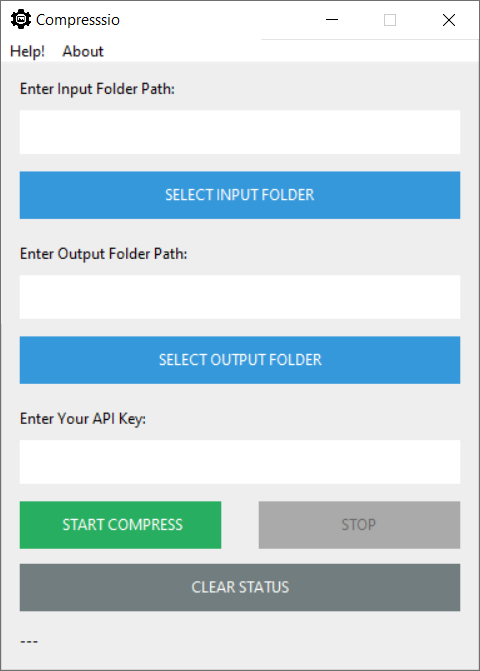
    4. Setup an MQTT Broker (via Docker)
    5. Install Docker
    6. Ensure the Docker daemon is running the Docker desktop app
    7. Open a terminal / command prompt
    8. Run the command docker run -it --name mqtt --restart unless-stopped -p 1883:1883 eclipse-mosquitto mosquitto -c /mosquitto-no-auth.conf
    9. Find the ip address of your device, this is the IP address of your MQTT Broker
      Within config.txt update the broker_url to the IP address of your MQTT Broker

    Network the devices

    1. Using a managed switch or router, connect the controller via ethernet
    2. On the same network, connect your machine running the MQTT broker
    3. Assign a static IP address to the controller on the same subnet as your MQTT Broker

    Set up the Vfdctl controller device

    P1AM-100ETH

    1. Load the image onto the P1AM-100ETH
    2. Power up the P1AM-100ETH controller via 24V
    3. Clone the git repo to a machine running Arduino IDE
    4. Connect to the P1AM-100ETH controller via micro usb on the machine
    5. Open the app.ino project in Arduino IDE
    6. Select your connected device and download the app to the controller
    7. Load the configuration onto the controller
    8. Within config.txt update the device_mac to your controller’s ethernet MAC address (this can be usually be found on a sticker on the controller or its packaging)
    9. Ensure config.txt is located at the root of the micro SD card
    10. Insert the micro SD card into the controller
    11. Power cycle the controller

    Monitoring Telemetry and Sending Commands

    Vfdctl’s public communications uses MQTT for flexibly communicating to an IOT ingestion engine. Any MQTT 3.1.1 capable client on the network is able to speak to the Vfdctl app. For ease of use, I recommend installing MQTT Explorer to browse topics, publish commands and setup basic data traces. For those unfamiliar with MQTT there is reference material shared within the “Important Resources” section.

    Monitoring device telemetry

    Telemetry is reported as a read-only stream on a topic beginning with dt (device telemetry). It is up to the topic’s consumer to determine the most appropriate way to handle subscribing to topics.
    Telemetry topics follow the pattern below:
    dt/[app]/[device]/[parameter-measured]
    As an example, the topic below is expected to report the values of the current drawn by VFD 1:

    dt/vfdctl/vfd1/amps

    Some possible examples of determining your subscription are:

    dt/vfdctl/vfd1/+

    You are creating an engineering dashboard page per device for a web app, you only care about the currently selected “vfd1” device and want to display all messages in a historian table view
    dt/vfdtl/vfd1/amps ; you’re now on revision 2 of your engineering dashboard page and have added React components with a line chart where you want to display current draw specifically

    dt/vfdctl/+/amps

    You want to use ai to predict your billing costs, so you create a trend of mean current draw across all devices on the network by setting up a listener in Node Red that every minute will reset its value, sum every incoming value and at the end of the next interval divide by the number of samples received before publishing the mean on a new topic called dt/facility1/vfd/amps and inserting the data into a database ; a conveyor you are driving can bind if it gets too worn, so you implement a Node Red listener to send a text message to a technician that VFD1’s conveyor needs maintenance performed before irreversible damage occurs when the value passes an alarm setpoint

    Publishing commands

    Commands are requests for action to occur on another client.
    Command topics follow the pattern below:

    cmd/[app]/[device]/[parameter-name]/[request-type]

    As an example, the topic below contains a request to configure the acceleration time for VFD1:

    cmd/vfdctl/vfd1/acceltime/config

    The message body should contain a json object with a “value” key and an integer value:

    {"value":40}
    

    Publishing the sample object to the sample topic is expected to set the acceleration time of VFD1 to 40 seconds.
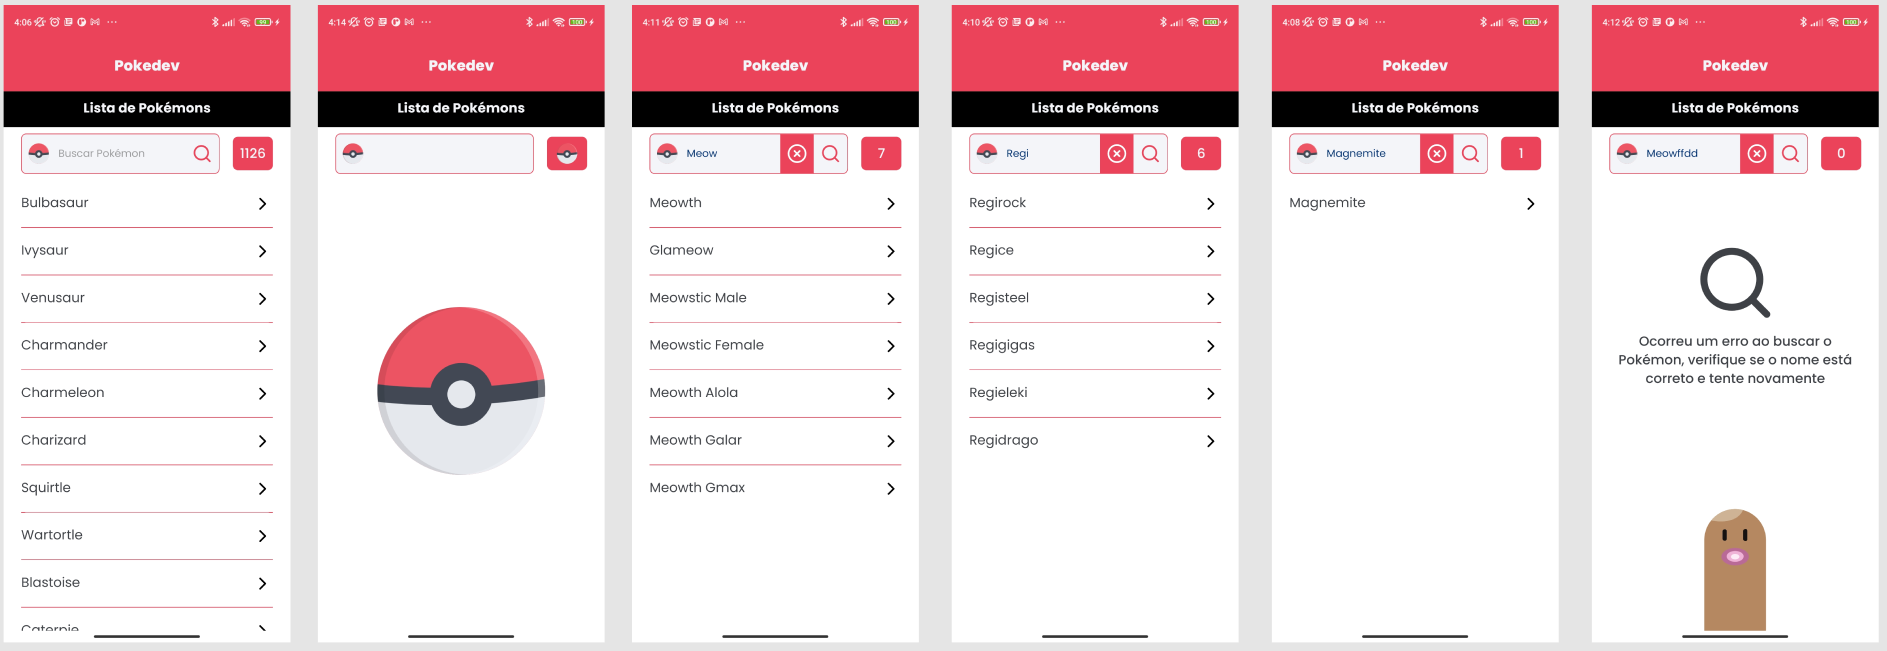
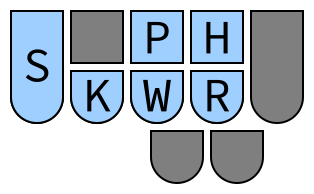
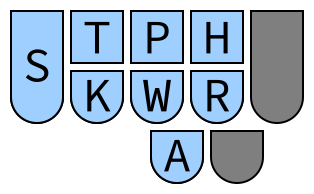
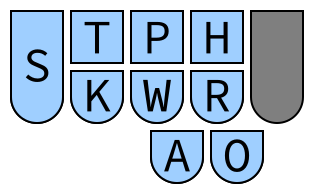
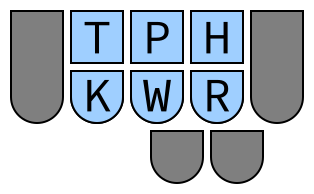
    Example of reading telemetry and publishing commands

    Configuring Parameters

    Controller Configuration

    The controller’s config file contains settings for the controller hardware connection, vfd hardware and MQTT topic mapping. This file is plain text and any notepad or command line software can edit it easily.
    After making edits, see “Setting up the Vfdctl controller device” for load instructions.
    Example of the config.txt, being viewed with VSCode.

    Important Resources

    Platform updates

    Please make sure to bookmark the following pages, as they will provide you with important details on API outages, updates, and other news relevant to developers on the platform.
    Check out our releases to see find the latest or a history of all released binaries
    Visit the Tulsa Software Repositories to find related open-source codebases
    In case of any document conflicts, assume the Vfdctl readme is most accurate

    MQTT reference material

    MQTT is extremely flexible and not as rigidly enforced as communications such as RPC or REST communications. This leaves lots of room for one-off implementations if systems are not intentionally designed. For our communications architecture, we have based our topic and payload structures off of the AWS best practices to ensure ultimate usability.

    • Even if not using AWS IoT cloud communications, their MQTT communication patterns are widely applicable
    • A good client GUI like MQTT Explorer makes troubleshooting your system much easier but any app supporting MQTT 3.1.1 communications will suffice
    • Using a IoT Rules Engine such as Node Red, AWS IoT Core, etc is essential to utilizing data with minimal coupling and maximal scalability

    Still have questions?

    For the questions not covered here or to learn what we’re currently working on, visit the Tulsa Software slack channel to review topics, ask questions, and learn from others.

    Visit original content creator repository

  • Linksy

    Linksy – Open Source Bookmark/Link Manager

    Linksy is an open-source bookmark and link manager that enables users to organize and manage their social media posts and other links. It allows for the creation of folders to store links, the ability to share collections with others, and a search feature to quickly find links. With its seamless integration with various social media platforms, Linksy provides an easy and efficient way to manage links.

    Features

    • Create folders and organize links from different social media platforms
    • Search through your links with ease
    • Share your link collections with others
    • Embed social media posts from platforms like Twitter, Instagram, and more
    • Easy-to-use UI with animations for an enhanced user experience

    Tech Stack

    This project uses the following technologies:

    • Next.js: Framework for both frontend and backend
    • TypeScript: Programming language
    • Better Auth: Authentication library
    • Prisma: ORM for database interactions
    • PostgreSQL: Database management system
    • ShadCN: UI component library
    • Framer Motion: Animation library for smooth transitions
    • React Hot Toast: Toast notifications library
    • Zod: Schema and validation library
    • Zustand: State management library
    • TanStack Query: Data fetching and caching library
    • Axios: HTTP client for making requests
    • Tailwind CSS: Utility-first CSS framework
    • LogLib: Analytics tool for monitoring
    • Ludide React: Icon collection
    • React Icons: Icon collection
    • React Social Media Embed: Embedding library for social media posts
    • Use-Debounce: Debouncing library for improved performance

    Getting Started

    To get started with the project locally, follow these steps:

    Prerequisites

    • Node.js
    • PostgreSQL database
    • GitHub credentials for OAuth authentication

    Setup

    1. Fork the repository to your GitHub account.
    2. Clone the repository

      git clone https://github.com/your-username/linksy.git
      cd linksy

    Install dependencies

    npm install

    • Set up environment variables: Create a .env file at the root of the project and add the following variables:

    DATABASE_URL=your_postgresql_database_url

    GITHUB_CLIENT_ID=your_github_oauth_client_id

    GITHUB_CLIENT_SECRET=your_github_oauth_client_secret

    BETTER_AUTH_SECRET=your_better_auth_secret

    BETTER_AUTH_URL=your_better_auth_url

    Configure authentication client

    - Navigate to /lib/auth-client.ts
    - Change the baseURL to point to your local server (e.g., http://localhost:3000/).
    

    Run the development server

    `npm run dev`
    
    - The application will be available at http://localhost:3000.
    

    How to Contribute

    - Fork the repository to your GitHub account.
    - Clone your fork locally:
    

    git clone https://github.com/your-username/linksy.git

    Create a new branch for your feature or bug fix

    git checkout -b feature/your-feature-name

    Make your changes and commit them

    git add .

    git commit -m "Add your commit message"

    Push your changes to your fork

    `git push origin feature/your-feature-name`
    

    Create a pull request on GitHub from your branch to the main repository.

    Visit original content creator repository

  • simple-RESTful-API-Django

    simple-RESTful-API-Django

    A simple experience about RESTful API with Django.

    If you want to have an experience on RESTful API with Django. This is a full guide for you.First you need to know, I did this project using a youtube video on this link. Also, you can follow steps here and use the code in the repository.

    Start from here

    1. Download python from www.python.org
    2. Download Django web framework from www.djangoproject.com, or using pip (Python built-in package installer).
    3. Create the virtual environment using Terminal: $ python3 -m venv [name]
    4. Goninto the virtual environment using Terminal: $ source [name]/bin/activate
    5. Install Django using Terminal: $ pip install django
    6. Create a project using Terminal: $ django-admin startproject [name]
    7. Go into the folder using Terminal: $ cd [project-name]
    8. Run django using Terminal: $ python manage.py runserver
    9. Create an app in teh project folder using Terminal: $ django-admin startapp [name]
    10. Go to python_api/python_api/setting.py, add the app-name in INSTALLED_APPS. (e.g. ‘myapp’)
    11. In python_api/myapp/models.py add our model. you can copy from this repo.
    12. Convert the model that you made, into a SQL table using Terminal: $ python manage.py makemigrations
    13. Do the same convertation for the app too, using Terminal: $ python manage.py makemigrations myapp
    14. Finish the previous step by run this command on terminal: $ python manage.py migrate
    15. In python_api/python_api/urls.py add our api urls. you can copy from this repo.
    16. In python_api/myapp/views.py add our logic API and codes. you can copy from this repo.
    17. Now, you can test your APIs, just don’t forget to run this command before testing: $ python manage.py runserver

    Notes

    • At the end you will have two folder. the folder that hold our projects code titled as the name that choose for the project, and a folder as virtual environment to hold all of dependencies.
    • The project name in this repo is python_api
    • The app name in this repo is myapp

    Visit original content creator repository

  • PokeDev

    PokeDev

    O projeto PokeDev é um aplicativo mobile que simula uma pokedex do jogos e anime Pokémon.


    ____

    ℹ️ Sobre

    • Uma pokedex seria uma aparelho que teria todas informações sobre os pokémons, os quais os personagens dos jogos e do anime usam para conhecer sobre cada pokémon, ver suas estatísticas, movimentos, habitat, habilidades dentre outras informações. Ou seja, é basicamente uma aplicação Wiki ou Bestiário de pokémon.
    • Para a alimentação dos dados foi usado a PokeAPI, uma API de Pokémon muito bem documentada, livre para usar e popular, segue o link:
    • Para criação das interfaces foi usado React Native em conjunto com TypeScript e diversas bibliotecas disponíveis para React Native como:
    • dentre outras, abaixo, na sessão de Tecnologias estará mais detalhado.
    • Home:
    ________

    ⁉️ Motivo

    Com esse projeto foi posto em prática quase todos os conceitos aprendidos com minha experiência profissional e educacional princpalmente com a Rocketseat.

    1. Home

    – Funcionalidades:
    • Listagem de todos Pokémons e suas variações.

      • Perfomática, por meio da Flatlist.
    • Pesquisa de qualquer Pokémons e suas variações.

      • É feita pelo nome(não existe pokémon com o mesmo nome).
      • Todos Pokémon que contém o nome digitado serão mostrados como resultados garantindo assim mesmo que o usuário não lembre totalmente do nome do Pokémon, consiga encontrá-lo.
        • Exemplo: Pesquisar com a palavra Regi, o resultado será Regigigas, Regice, Regirock, Regidragon, Registeel e Regieleki.
    • Reset de pesquisa.

      • É feito por meio de um botão que é ativado no Input após a pesquisa ou caso ocorra algum erro.
      • Garante melhor usabilidade e praticidade.
    • Número total de Pokémon seja do resultado da pesquisa ou da listagem geral.

      • É mostrado na tela em um componente que se atualiza a cada pesquisa ou listagem.
    • Componente de Loading personalizado para cada componente.

      • Uso da Lottie Animations.
      • Loading interativo no Input
    • Componente de Erro personalizado e animado caso a listagem ou a pesquisa não tenham resultados.

      • Uso da Lottie Animations.
      • Erro interativo no Input.
    • Focus e Submit inteligente no Input de pesquisa.

      • Ao digitar o nome do Pokémon, podemos tanto pesquisar apertando o botão de pesquisa quanto apertar o botão de submit padrão do teclado do dispositivo móvel.
      • Ao apertar em qualquer outra região da tela será retirado o foco do Input.
      • Foi necessário o uso do TouchableWithoutFeedback para que o Input não fique ativado quando o usuário clicar em qualquer outra região da tela em conjunto com o onStartShouldSetResponder para evitar problemas de icompatibilidade com a Flatlist e RectButton.
    • Página de detalhes sobre o Pokémon:
    ________
    1. Página sobre o Pokémon

    • Funcionalidades:

      • Informações sobre o Pokémon.

      • Nome, número, habitat, tipo, habilidades, etc.

      • Todas as informações são mostradas em um componente que se atualiza a cada pesquisa ou listagem.

      • Componente de loading personalizado e animado em todos componentes.

      • Nessa tela foi necessário realizar 2 requisições para obtermos todas informações exibitdas:

        • Uma para obter o nome do Pokémon, tipo, número na national pokedex, peso, altura, habilidades e movimentos.
        • Outra para obter o habitat, raridade e descrição.
        • Para isso houve determinada dificuldade pois uma requisição dependia da outra, ou seja, eram processos assíncronos dependentes fazendo com que houvesse difiluldade em garantir que uma requisção seja feita somente após a outra, ou cudiado no uso de uma variável Estado
      • Modais

      • Há 2 modais que podem ser acessíveis nessa tela:

        • Modal de listando de todos movimentos

          • É acessado ao tocar no botão de todos movimentos.
          • O botão de todos movimentos não é mostrado caso o pokémon não tenha mais de 4 movimentos, ou seja, o modal não é acessível caso todos movimentos do pokémon já estejam sendo mostrado na página de detalhes de pokémon(ate 4).
          • O Modal é deslizável(swipeable) na vertical, pode ser fechado deslizando para baixo ou aperdando nos botões com os ícones indicando para baixo.
        • Modal sobre cada movimento

          • É acessado por meio do modal acima, no caso, ao apertar em algum movimento da listagem acima o modal sobre o movimento é aberto.
          • Assim como o de cima, também é deslizável(swipeable), mas nesse caso na horizontal
          • Nele é feito a requisição para obter as informações exibidas sobre o movimento selecionado.
          • Essa requisição depende da url do movimento selecionado, ou seja, assim como mencionado anteriormente tamém é uma requisição que depende de outra.
          • Nesse caso depende da requisição sobre os detalhes do pokémon feita na página de detalhes do pokémon, um dos parâmetros retornados no objeto da resposta é um vetor de objeto, cada um contendo o nome de todos movimentos daquele pokémon e a url de cada um.
    • Modais
    ____________
    • Funcionalidades em desenvolvimento:

      i. Modal de evolução dos pokémons

      • Não foi possível terminar ainda a parte da impressão no modal e estilização das evoluções de cada pokémon mas a requisição já foi contruída no código assim como o botao de evolução
        • O modal foi desativado para voltar quando a funcionalidade tiver pronta)

      ii. Página de “Meus Pokémon” e salvar pokémon

      • Funcionalidade que permite o usuário salvar/favoritar determinado pokémon e ele ser salvo localmente no dispositivo físico com Assync Storage.
      • Ainda não foi possível realizar essa funcionalidade mais já foi planejada.

      iii. Página sobre o Movimento

      • Uma página com mais inforações sobre o movimento selecionado no modal sobre os movimentos.
      • Teríamos um botão nele que acessaria essa página para detalhar mais informações e uma listagem com todos pokémons que possui aquele movimento.

      iv. Splash Screen

      • Tela de loading inicial da aplicação.

    🎨 Design

    Pokedev

    1. Código:
      • É tentando manter o padrão que é ensinado na Rocketseat para o código mais limpo, organizado de facil entendimento com sua estrutura de pastas também.
      • Em geral foi todo código foi feito com TypeScript de forma a manter sempre uma tipagem/interface para cada elemento que foi usado tanto para facilitar o desenvolvimento e entendimento do código tanto para o dev quanto para o VsCode/IDE, quanto para manter a consistência do código e a IDE possa sugerir correções e recomendações de forma mais efetiva.
    2. Estilização:
      • Toda estilização foi realizada com styled-components, que é uma biblioteca de css que tem como objetivo facilitar a criação de estilos e componentes de forma mais eficiente e similar a web com ReactJS, assim podemos manter o mesmo padrão para web e mobile facilitando o desenvolvimento.
      • Foi criado um tema global com as fontes e cores do projeto que são passadas no Figma.
      • A fonte usada foi a Poppins, que é uma fonte popular e livre para uso, está na biblioteca do Google Fonts. Foi instalada no projeto como fonte externa tanto para o android quanto para o IOS.
      • Para lidar com SVG, JSON, PNG foi necessário realizar uma configuração para que o TypeScript reconheça tais arquivos.
        • Os SVG foram tipados como componentes React(React.FC) em conjunto com a SvgProps da biblioteca react-native-svg.
    3. React Native
      • A estrutura dos componentes foi feita por meio de funções, que são funções que retornam um componente React.
      • A pasta de um componente é composta por um arquivo chamado index.tsx e um arquivo de estilização styles.ts.
      • Foi usado o yarn como gerenciador de pacotes.
      • É utilizado a react-native-gesture-handler para criar os botões da aplicação mantendo assim a consistência do dos efeitos de reação do componente entre as platformas IOS e Android.

    🌱 Requisitos Mínimos

    • Android Studio
    • Celular(Opcional)
    • Node.js
    • React
    • React-Native
    • TypeScript
    • Yarn(ou NPM)

    🚀 Principais Tecnologias Utilizadas

    O projeto foi desenvolvido utilizando as seguintes tecnologias


    📦 Como baixar e executar o projeto

    • Clonar o projeto:
       git clone https://github.com/Aszurar/PokeDev.git
    • É necessário a instalação do yarn de acordo com seu sistema operacional, para isso veja como no site do Yarn
    • Instalação das dependências:
      • Execute o comando abaixo dentro da pasta do projeto
        yarn
    • É necessário a instalação do emulador Android Studios e das tecnologias requesitadas acima no:seedling: Requisitos
    • Também é necessário a instalação/configuração de outras tecnologias, para isso siga os passos indicados nessa página de acordo com seu sistema operacional: Executando uma Aplicação React-Native emulando Windows/Linux/MacOS ou direto no dispositivo mobile Android/IOS
    • Execução –
    • Com o emulador android aberto ou o dispositivo móvel físico conecatdo via USB:
    • Abra a pasta do projeto com alguma IDE(Vscode) ou simplesmente abra o terminal na pasta do projeto e execute o comando abaixo:
         yarn android
    • Caso o metro-bundle não funcione, execute como abaixo:
      1. Executando o metro-bundle:
            yarn start
      2. Executando no android:
            yarn android
    • Caso esteja no IOS, após as configurações faladas anteriormente até no link mencionado acima, então execute o comando abaixo:
          yarn ios

    Desenvolvido por 🌟 Lucas de Lima Martins de Souza.

    Visit original content creator repository
  • Compresssio-GUI

    Streamline/Optimize your Images to save storage space…

    Compresssio:

    The above script uses TinyPNG’s savvy lossy compression methods to reduce the document size of your JPG/PNG files. This is achieved by specifically decreasing the number of colors in the image, therefore lesser number of bytes are required to store the information. The impact of the script is nearly invisible but it makes an exceptionally enormous effect in file size of the image.

    Image Comparison:

    Image 1:

    Image 2:

    Setup (Windows):

    1. Install Python
    2. Clone this repository
    git clone https://github.com/dhhruv/Compresssio-GUI.git
    
    1. Install, create and activate virtual environment. For instance we create a virtual environment named ‘venv’.
    pip install virtualenv
    python -m virtualenv venv
    venv\Scripts\activate.bat
    
    1. Install dependencies
    pip install -r requirements.txt


    How to Get Your API Key !

    You can Find your API Key from the Website https://tinypng.com/developers after Signing Up and save it somewhere on your PC/Laptop.

    How To Use !

    1. Click SELECT INPUT FOLDER Button to select the INPUT FOLDER which contains all the Images to be Compressed/Optimized.
    2. Click SELECT OUTPUT FOLDER Button to select the OUTPUT FOLDER which will contain all the the Compressed/Optimized Images. (After Compression)
    3. Enter Your API Key from TINYPNG Website. If you don’t have one in possession then you can find on this website https://tinypng.com/developers .
    4. Hit the COMPRESS Button and the INPUT FOLDER containing Supported Image Formats will be Compressed and saved in the OUTPUT FOLDER.
    5. Click CLEAR Button to reset the input fields and status bar. (If needed)

    Important Note:

    • The limit you’ll have at first is of 500 images per month on the Free plan. You can change this according to your requirement at https://tinypng.com/developers
    • Recommended to keep INPUT and OUTPUT Folder different for your ease to differentiate between Optimized and Unoptimized Images.
    • This Script is just a Prototype so Metadata is not stored in the Compressed Images from the Original Images.
    • Directory Structure in INPUT and OUTPUT Folders may differ but all Supported Images will be saved according to their directories.
    • The Authors will not be responsible for any kind of loss of data so it is essential to have a Backup of Original Data placed in the Input Folder. Read the LICENSE for more information.

    Contributors:

    Image Credits:

    Visit original content creator repository
  • plover-left-hand-modifiers

    Abby’s Left Hand Modifiers Dictionary

    Table Of Contents

    Design

    This dictionary is inspired by and can essentially be seen as a combination of Emily’s Modifiers and Achim Siebert’s Left Hand Modifier Keys. Essentially, it allows every shortcut to be typed in two strokes and using only the left hand. As such, only the following keys are used:

    Key layout

    In some combinations, the asterisk key is used. This requires the asterisk key to be pressed using the left hand, which should be fine on most hobbyist writers but may be a problem on some professional writers.

    Modifiers

    The first of the two strokes in each combination is used to specify the modifier keys that should be pressed. It is also possible to not press any modifier keys, since some applications have shortcuts that are activated by just a single keypress.

    Single modifier keys

    Patterns for single modifier keys.

    Stroke Modifier Explanation
    Control ControL
    Alt ALT (reversed)
    Shift SHift
    Super (Windows/Command) Purely positional, no phonetic basis

    Modifier key combinations

    Modifier key combinations are made by stacking the chords for individual modifier keys on top of each other, with three exceptions:

    • The Ctrl + Alt + Super combination is given TKPWHRAO, with an additional O due to a conflict with TKPWHRA for Alt + Super.
    • The Ctrl + Shift + Super combination is given SKPWHRO, with an additional O due to a conflict with SKPWHR for Shift + Super.
    • The Ctrl + Alt + Shift + Super combination is given STKPWHRAO, with an additional O due to a conflict with STKPWHRA for Alt + Shift + Super.
    Stroke Modifiers
    Alt + Shift
    Ctrl + Alt
    Ctrl + Shift
    Ctrl + Alt + Shift
    Ctrl + Super
    Alt + Super
    Ctrl + Alt + Super
    Shift + Super
    Ctrl + Shift + Super
    Alt + Shift + Super
    Ctrl + Alt + Shift + Super

    The pattern for no modifier keys is TKPWHR. This presses a key specified in the second stroke without any additional modifier keys.

    Stroke Modifiers
    None

    Keys

    The second of the two strokes in each combination specifies what key to press along with the modifiers (if any) selected above.

    Letters

    The patterns for letter keys are the same as the fingerspelling pattern for that letter (without the asterisk), except for E, I, and U which have been given special patterns so they fit on the left hand. (Using E, EU, and U for E, I, and U still work, but are not shown below.)

    Stroke Letter
    A
    B
    C
    D
    E
    F
    G
    H
    I
    J
    K
    L
    M
    N
    O
    P
    Q
    R
    S
    T
    U
    V
    W
    X
    Y
    Z
    Z (alternate)

    Numbers

    When AO is held, STPH will act as binary number input for numbers 0-9.

    Stroke Number
    0
    1
    2
    3
    4
    5
    6
    7
    8
    9

    Function Keys

    When R is held in addition to the pattern for any number 1-12, the corresponding function key will be used.

    Stroke Function Key
    F1
    F2
    F3
    F4
    F5
    F6
    F7
    F8
    F9
    F10
    F11
    F12

    Numpad

    When * is held in addition to the pattern for any number, the number key on the numpad will instead be used.

    Stroke Number
    0 (numpad)
    1 (numpad)
    2 (numpad)
    3 (numpad)
    4 (numpad)
    5 (numpad)
    6 (numpad)
    7 (numpad)
    8 (numpad)
    9 (numpad)

    Symbol keys

    Stroke Key Explanation
    . PeRiod
    , CoMMa
    / SLash
    \ BackSLash
    ; SemiCoLon
    ' QUOte
    [ Bracket Left
    ] Bracket Right
    - DasH
    = eQUAls
    ˋ GRave

    Navigation keys

    Holding down A (for arrow) will cause PKWR to act as arrow keys.

    Stroke Key
    Up
    Down
    Left
    Right

    Holding down * in addition to the stroke for any arrow key will cause the keys to act as page up, page down, home, and end.

    Stroke Key
    Page Up
    Page Down
    Home
    End

    Other keys

    Stroke Key Explanation
    Caps Lock Caps Lock + asterisk
    Scroll Lock SCroll Lock + asterisk
    Num Lock Num lock + asterisk
    Space SPace
    Return ENTeR
    Tab TaB
    Backspace BackSpace
    Delete DeLete
    Escape eSCApe
    Insert iNSert
    Menu Menu + asterisk
    Print Screen SCreen PRint

    Only modifiers

    The pattern TPHO (“no”) allows only modifier keys to be pressed, with no other keys included.

    Stroke Key
    None

    Cancel

    If you pressed a modifier key pattern on accident, you can use SKPH to cancel it.

    Stroke Key
    Cancel

    Examples

    Strokes Keys Pressed Use

    Ctrl + A Select all (Windows or Linux)

    Super + A Select all (Mac)

    Alt + F4 Close window (Windows or Linux)

    Ctrl + Alt + T Open terminal (Linux)

    Super (Windows key) Open start menu (Windows)

    Print Screen Take screenshot
    Visit original content creator repository
  • Url-Shortner

    Uranium

    Scalable URL Shortner Project Requirement

    Phase I

    Overview

    URL shortening is used to create shorter aliases for long URLs. We call these shortened aliases “short links.” Users are redirected to the original URL when they hit these short links. Short links save a lot of space when displayed, printed, messaged, or tweeted. Additionally, users are less likely to mistype shorter URLs.

    For example, if we shorten the following URL through TinyURL:

    https://babeljs.io/blog/2020/10/15/7.12.0#class-static-blocks-12079httpsgithubcombabelbabelpull12079-12143httpsgithubcombabelbabelpull12143
    

    We would get:

    https://tinyurl.com/y4ned4ep
    

    The shortened URL is nearly one-fifth the size of the actual URL.

    Some of the use cases for URL shortening is to optimise links shared across users, easy tracking of individual links and sometimes hiding the affiliated original URLs.

    If you haven’t used tinyurl.com before, please try creating a new shortened URL and spend some time going through the various options their service offers. This will help you have a little context to the problem we solve through this project.

    Key points

    • Create a group database groupXDatabase. You can clean the db you previously used and reuse that.
    • This time each group should have a single git branch. Coordinate amongst yourselves by ensuring every next person pulls the code last pushed by a team mate. You branch will be checked as part of the demo. Branch name should follow the naming convention project/urlShortnerGroupX
    • Follow the naming conventions exactly as instructed. The backend code will be integrated with the front-end application which means any mismatch in the expected request body will lead to failure in successful integration.

    Models

    • Url Model
    { urlCode: { mandatory, unique, lowercase, trim }, longUrl: {mandatory, valid url}, shortUrl: {mandatory, unique} }
    

    POST /url/shorten

    • Create a short URL for an original url recieved in the request body.
    • The baseUrl must be the application’s baseUrl. Example if the originalUrl is http://abc.com/user/images/name/2 then the shortened url should be http://localhost:3000/xyz
    • Return the shortened unique url. Refer this for the response
    • Ensure the same response is returned for an original url everytime
    • Return HTTP status 400 for an invalid request

    GET /:urlCode

    • Redirect to the original URL corresponding
    • Use a valid HTTP status code meant for a redirection scenario.
    • Return a suitable error for a url not found
    • Return HTTP status 400 for an invalid request

    Testing

    • To test these apis create a new collection in Postman named Project 4 Url Shortner
    • Each api should have a new request in this collection
    • Each request in the collection should be rightly named. Eg Url shorten, Get Url etc
    • Each member of each team should have their tests in running state

    Phase II

    • Use caching while creating the shortened url to minimize db calls.
    • Implement what makes sense to you and we will build understanding over the demo discussion.
    • Figure out if you can also use caching while redirecting to the original url from the shortedned url

    Response

    Successful Response structure

    {
      status: true,
      data: {
    
      }
    }

    Error Response structure

    {
      status: false,
      message: ""
    }

    Response samples

    Url shorten response

    {
      "data": {
        "longUrl": "http://www.abc.com/oneofthelongesturlseverseenbyhumans.com",
        "shortUrl": "http://localhost:3000/ghfgfg",
        "urlCode": "ghfgfg"
      } 
    }
    

    Visit original content creator repository

  • siddhi-io-prometheus

    Siddhi IO Prometheus

    Jenkins Build Status GitHub Release GitHub Release Date GitHub Open Issues GitHub Last Commit License

    The siddhi-io-prometheus extension is an extension to Siddhi that consumes and expose Prometheus metrics from/to Prometheus server.

    For information on Siddhi and it’s features refer Siddhi Documentation.

    Download

    • Versions 2.x and above with group id io.siddhi.extension.* from here.
    • Versions 1.x and lower with group id org.wso2.extension.siddhi.* from here.

    Latest API Docs

    Latest API Docs is 2.1.3.

    Features

    • prometheus (Sink)

      This sink publishes events processed by Siddhi into Prometheus metrics and exposes them to the Prometheus server at the specified URL. The created metrics can be published to Prometheus via ‘server’ or ‘pushGateway’, depending on your preference.
       The metric types that are supported by the Prometheus sink are ‘counter’, ‘gauge’, ‘histogram’, and ‘summary’. The values and labels of the Prometheus metrics can be updated through the events.

    • prometheus (Source)

      This source consumes Prometheus metrics that are exported from a specified URL as Siddhi events by sending HTTP requests to the URL. Based on the source configuration, it analyzes metrics from the text response and sends them as Siddhi events through key-value mapping.The user can retrieve metrics of the ‘including’, ‘counter’, ‘gauge’, ‘histogram’, and ‘summary’ types. The source retrieves the metrics from a text response of the target. Therefore, it is you need to use ‘string’ as the attribute type for the attributes that correspond with the Prometheus metric labels. Further, the Prometheus metric value is passed through the event as ‘value’. This requires you to include an attribute named ‘value’ in the stream definition.
      The supported types for the ‘value’ attribute are ‘INT’, ‘LONG’, ‘FLOAT’, and ‘DOUBLE’.

    Dependencies

    • Prometheus server instance should be started.

    • Prometheus Pushgateway should be started. (optional)

    • Download and copy the prometheus client jars to the Siddhi Class path from https://mvnrepository.com/artifact/io.prometheus

      • simpleclient_common-*.jar
      • simpleclient-*.jar
      • simpleclient_httpserver-*.jar
      • simpleclient_pushgateway-*.jar

    Installation

    For installing this extension on various siddhi execution environments refer Siddhi documentation section on adding extensions.

    Integration Test with Local Docker (Optional)

    • The prometheus sink can be tested with the Docker base integration test framework. The test framework initialize a Docker container with required configuration before execute the test suit.

      To start integration tests,

      1. Install and run Docker

      2. To run the integration tests,

        • navigate to the siddhi-io-prometheus/ directory and issue the following command.
          mvn verify -P local-prometheus
          
    • Prometheus target configurations can be modified at the directory for integration tests :

      siddhi-io-prometheus/component/src/test/resources/prometheus/prometheus.yml

    Support and Contribution

    • We encourage users to ask questions and get support via StackOverflow, make sure to add the siddhi tag to the issue for better response.

    • If you find any issues related to the extension please report them on the issue tracker.

    • For production support and other contribution related information refer Siddhi Community documentation.

    Visit original content creator repository
  • nstu-database-technology

    Лабораторные работы по дисциплине “Технологии баз данных” на факультете ПМИ, НГТУ


    QUERIES

    Запросы к сделанным лабораторным работам и курсовой. Теоретические лабораторные: 1, 2, 3; практические: 4, 5, 8, 9, COURSE.
     

    4. Встроенный SQL

    Запросы из варианта

    1. Выдать число деталей, поставлявшихся для изделий, у которых есть поставки с весом от 5000 до 6000.
    2. Поменять местами вес деталей из Рима и из Парижа, т. е. деталям из Рима установить вес детали из Парижа, а деталям из Парижа установить вес детали из Рима. Если деталей несколько, брать наименьший вес.
    3. Найти детали, имеющие поставки, объем которых не превышает половину максимального объема поставки этой детали поставщиком из Парижа.
    4. Выбрать поставщиков, не поставивших ни одной из деталей, поставляемых для изделий из Парижа.
    5. Выдать полную информацию о деталях, которые поставлялись ТОЛЬКО поставщиками, проживающими в Афинах.

    Условия задачи

    1. Разработать и отладить ESQL/С-программу, реализующую задачу 1 из соответствующего варианта заданий, результатом которой
      является единственная строка.
    2. Разработать и отладить ESQL/С-программу, реализующую задачу 2 из соответствующего варианта заданий и связанную с модификацией
      базы данных.
    3. Изучить синтаксис и правила использования операторов Declare, Open, Fetch, Close, а также особенности работы с курсором.
    4. Разработать и отладить набор ESQL/С-программ, решающих задачи 3–5 из соответствующего варианта заданий с использованием
      аппарата курсоров (последовательного и скроллирующего). Результатом работы программ является набор строк, которые подлежат выводу на
      экран с соответствующими пояснительными заголовками.
       

    5. Динамический SQL

    Запросы из варианта

    1. Получить число поставок для каждого поставщика и найти их среднее.
    2. Для каждого изделия из указанного города найти суммарный объем поставок по каждой детали, для него поставлявшейся. Вывести номер изделия, название изделия, номер детали, название детали, цвет детали, суммарный объем поставок детали для изделия.
    3. Ввести номер детали P*. Найти города, в которые поставлялась деталь P*, и определить, какой процент составляют поставки в каждый город от общего числа поставок детали P*. Вывести город, число поставок деталей в этот город, общее число поставок детали P*, процент.

    Условия задачи

    1. Изучить синтаксис и правила использования операторов Prepare, Execute, а также особенности работы с курсором при выполнении динамического оператора SQL.
    2. Разработать и отладить набор ESQL/С-программ, решающих задачи из соответствующего варианта заданий. Результатом работы программ является одна или несколько строк, которые подлежат выводу на экран с соответствующими пояснительными заголовками.
       

    8. Доступ к базам данных с использованием ADO.NET

    Запросы из варианта

    1. Получить информацию о рекомендованной цене на указанное изделие на заданную дату.
    2. Для изделий, в состав которых входит заданная деталь, сдвинуть на месяц назад дату начала действия последней рекомендованной цены.

    Условия задачи

    Разрабатываемое web-приложение должно удовлетворять следующим требованиям:

    • Содержать форму для ввода параметров запросов и отображения результатов выполнения запросов в соответствии с заданием, а также обработчик (на Visial C#) для доступа к базе данных и выполнения запросов;
    • Ввод параметров задания на форме может быть осуществлен либо путем ввода значений в текстовом виде, либо посредством выбора значений из предлагаемого списка (в случае, когда список может быть сформирован из БД).
       

    9. Технология Activex Data Objects (ADO)

    Запросы из варианта

    1. Для каждого изделия на конец каждого года получить:
      • размер максимальной поставки;
      • сумму, на которую выполнены поставки для изделия;
      • процент этой суммы от общей суммы по всем изделиям за год.
      • Упорядочить по году и проценту. Выделить строки, где процент не меньше 50.
    2. Для указанных изделия и года по каждой поставке вывести:
      • сумму поставки;
      • разницу между ценой детали в поставке и средней ценой детали за год.
    3. Изменить цену детали в поставке.

    Условия задачи

    Разрабатываемое приложение должно удовлетворять следующимтребованиям:

    • Приложение должно включать в себя три формы:
      – модуль данных, содержащий все необходимые компоненты для работы с базой данных;
      – форму для просмотра выборок данных;
      – форму для выполнения запроса модификации данных.
    • Соединение с базой данных должно выполняться через компонент ADOConnection. Для выборки данных использовать ADOQuery.
    • Модификация данных должна выполняться либо серверной функцией, вызываемой из приложения через ADOStoredProc, либо запросом через ADOQuery.
    • Просмотр выборок должен осуществляться через компоненты DBGrid. Просмотр должен быть согласованным (выборка по второму запросу должна выполняться для текущей строки выборки по первому запросу). Строки выборок должны быть отсортированы по указанным в задании столбцам. Названия столбцов должны быть на русском языке. Строки выборок, удовлетворяющие указанным в задании условиям, должны быть выделены (цветом фона и/или цветом/стилем шрифта).
    • Визуализация формы для выполнения запроса на модификацию может вызываться либо нажатием кнопки, либо через контекстное меню.
    • Ввод параметров для модификации данных может быть осуществлен либо путем ввода значений в текстовом виде, либо посредством выбора значений из предлагаемого списка.
    • После модификации данных должно появляться сообщение о том, насколько успешно прошла модификация.
    • В случае возникновения ошибки должно выдаваться соответствующие сообщение.
       

    COURSE. Технологии тиражирования данных

    Условия задачи

    Изучить технологии тиражирования данных.

    В схеме базы данных, с которой ведется работа, создаются несколько таблиц одинаковой структуры и единого содержимого, которые имитируют таблицы, находящиеся в различных базах данных.
    Таблицы могут быть любой структуры, но при этом должны содержать два поля:

    • Поле даты/времени для хранения времени вставки/обновления/удаления строки.
    • Символьное поле, идентифицирующее выполненную операцию (вставка/обновление/удаление) и источник изменений.

    Разработать программное обеспечение, состоящее из трех отдельных программ:

    1. Программа инициализации данных (ИД).
      Записывает данные во все таблицы, участвующие в реализуемой схеме модели репликации:

      • В поле даты/времени заносится текущее время инициализации;
      • В поле идентификации операции заносится значение «Начальная вставка».
        Содержимое таблицы, идентичное во всех условных базах данных, запоминается в журнале содержимого таблиц.
    2. Программа имитации работы системы (ИРС).
      С определенной дискретностью (интервал в несколько секунд) моделирует процесс работы информационной системы, выполняя следующие действия:

      • Случайным образом выбирает одну из условных баз данных.
      • Случайным образом выбирает одну из операций (вставка/обновление/удаление).
      • Если выполняется операция вставки, то в выбранную базу данных вставляется строка, в которой:
        – в поле даты/времени заносится текущее время вставки;
        – в поле идентификации операции заносится значение «Вставка».
        В журнале изменений запоминается:
        – время вставки;
        – база данных, в которую выполняется вставка;
        – вставленная строка.
      • Если выполняется операция обновления, то в выбранной базе данных обновляется строка с минимальным id, в которой:
        – в поле даты/времени заносится текущее время обновления;
        – в поле идентификации операции заносится значение «Обновление».
        В журнале изменений запоминается:
        – время обновления;
        – база данных, в которую выполняется обновление.
      • Если выполняется операция удаления, то в выбранной базе данных удаляется строка с максимальным id.
        Перед удалением в журнале изменений запоминается:
        – время удаления;
        – база данных, из которую выполняется удаление;
        – удаляемая строка.
    3. Программа репликатор данных (РД).
      Работает в соответствии с моделью репликации, определенной условиями (схема репликации, условие запуска репликатора, способ разрешения коллизий).
      После выполнения цикла репликации (переноса данных и обеспечения согласованного состояния таблиц) программа РД фиксирует в журнале содержимого таблиц:

      • Текущее время;
      • Содержимое всех таблиц условных баз данных

    Исходные данные

    Схема репликации Запуск репликатора Разрешение коллизии
    Однонаправленное тиражирование
    «Центр-филиалы»

    Изменение (вставка, модификация, удаление),
    выполненное в одной из периферийных баз данных (ПБД), тиражируется в центральную базу данных (ЦБД)

    После выполнения указанного числа транзакций, задаваемого при запуске программы РД В пользу более позднего обновления


    Visit original content creator repository

  • PathFinder

    Web Path Finder

    Web Path Finder is a Python program that provides information about a website. It retrieves various details such as page title, last updated date, DNS information, subdomains, firewall names, technologies used, certificate information, and more.

    Features and Benefits

    • Retrieve important information about a website
    • Gain insights into the technologies used by a website
    • Identify subdomains and DNS information
    • Check firewall names and certificate details
    • Perform bypass operations for captcha and JavaScript content

    Getting Started

    1. Clone the repository:

      git clone https://github.com/HalilDeniz/PathFinder.git
    2. Install the required packages:

      pip install -r requirements.txt

    This will install all the required modules and their respective versions.

    Usage

    Run the program using the following command:

    ┌──(root💀denizhalil)-[~/MyProjects/]
    └─# python3 pathFinder.py --help                                             
    usage: pathFinder.py [-h] url
    
    Web Information Program
    
    positional arguments:
      url         Enter the site URL
    
    options:
      -h, --help  show this help message and exit

    Replace <url> with the URL of the website you want to explore.

    Example Output

    Here is an example output of running the program:

    ┌──(root💀denizhalil)-[~/MyProjects/]
    └─# python3 pathFinder.py https://www.facebook.com/
        Site Information:
        Title:  Facebook - Login or Register
        Last Updated Date:  None
        First Creation Date:  1997-03-29 05:00:00
        Dns Information:  []
        Sub Branches:  ['157']
        Firewall Names:  []
        Technologies Used:  javascript, php, css, html, react
        Certificate Information:
        Certificate Issuer: US
        Certificate Start Date: 2023-02-07 00:00:00
        Certificate Expiration Date: 2023-05-08 23:59:59
        Certificate Validity Period (Days): 90
        Bypassed JavaScript content:  

    Contributing

    Contributions are welcome! To contribute to PathFinder, follow these steps:

    1. Fork the repository.
    2. Create a new branch for your feature or bug fix.
    3. Make your changes and commit them.
    4. Push your changes to your forked repository.
    5. Open a pull request in the main repository.

    Thanks

    • Thank you my friend Varol

    License

    This project is licensed under the MIT License – see the LICENSE file for details.

    Contact

    For any inquiries or further information, you can reach me through the following channels:

    Visit original content creator repository