az ad app create –reply-urls https://$SERVER_APP_NAME –display-name $SERVER_APP_NAME –password $SERVER_APP_PASSWORD
SERVER_APP_ID=$(az ad app list –output json | jq -r –arg appname $SERVER_APP_NAME ‘.[]| select(.displayName==$appname) |.appId’)
az ad app update –id $SERVER_APP_ID –set groupMembershipClaims=All
az ad app permission add –id $SERVER_APP_ID –api $MICROSOFT_GRAPH_GUID –api-permissions $USER_READ_ALL_DELEGATED=$AAD_SCOPE $DIRECTORY_READ_ALL_DELEGATED=$AAD_SCOPE $DIRECTORY_READ_ALL_APPLICATION=$AAD_ROLE
az ad app permission admin-consent –id $SERVER_APP_ID
#Client Application
CLIENT_APP_ID=$(az ad app create –display-name “${SERVER_APP_NAME}-Client” –native-app –reply-urls “https://${SERVER_APP_NAME}-Client” –query appId -o tsv)
SERVER_OAUTH_PERMISSION_ID=$(az ad app show –id $SERVER_APP_ID –query “oauth2Permissions[0].id” -o tsv)
az ad app permission add –id $CLIENT_APP_ID –api $SERVER_APP_ID –api-permissions $SERVER_OAUTH_PERMISSION_ID=Scope
#az ad app permission grant –id $CLIENT_APP_ID –api $SERVER_APP_ID
az ad app permission admin-consent –id $CLIENT_APP_ID
You may need to change the execution policy to run the script. To do this you have a few options:
Change the Execution Policy Temporarily
You can change the execution policy for the current PowerShell session only, without affecting the system-wide execution policy:
Set-ExecutionPolicy -Scope Process -ExecutionPolicy Bypass
Change the Execution Policy Permanently
You can change the execution policy permanently for all PowerShell sessions. Open a PowerShell window with “Run as Administrator” option and run:
Set-ExecutionPolicy RemoteSigned
This will allow running unsigned scripts that you write on your local computer and signed scripts from the Internet. Please note that this changes the policy permanently. If you want to change it back to the default, run:
Set-ExecutionPolicy Restricted
Bypass Execution Policy at Run-time
You can also bypass the execution policy at run-time with this command:
To get started with component, install the latest version of the Serverless Framework:
$ npm install -g serverless
After installation, make sure you connect your AWS account by setting a provider in the org setting page on the Serverless Dashboard.
2. Initialize
The easiest way to start using the aws-dynamodb component is by initializing the aws-dynamodb-starter template. Just run this command:
$ serverless init aws-dynamodb-starter
$ cd aws-dynamodb-starter
3. Deploy
Once you have the directory set up, you’re now ready to deploy. Just run the following command from within the directory containing the serverless.yml file:
$ serverless deploy
Your first deployment might take a little while, but subsequent deployment would just take few seconds. For more information on what’s going on during deployment, you could specify the --debug flag, which would view deployment logs in realtime:
$ serverless deploy --debug
4. Configure
The aws-dynamodb component requires minimal configuration with built-in sane defaults. Here’s a complete reference of the serverless.yml file for the aws-dynamodb component:
component: aws-dynamodb # (required) name of the component. In that case, it's aws-dynamodb.name: my-table # (required) name of your instance.org: serverlessinc # (optional) serverless dashboard org. default is the first org you created during signup.app: myApp # (optional) serverless dashboard app. default is the same as the name property.stage: dev # (optional) serverless dashboard stage. default is dev.inputs:
name: my-tableattributeDefinitions:
- AttributeName: idAttributeType: S
- AttributeName: attribute1AttributeType: NkeySchema:
- AttributeName: idKeyType: HASH
- AttributeName: attribute1KeyType: RANGElocalSecondaryIndexes:
- IndexName: 'myLocalSecondaryIndex'KeySchema:
- AttributeName: idKeyType: HASH
- AttributeName: attribute2KeyType: RANGEProjection:
ProjectionType: 'KEYS_ONLY'globalSecondaryIndexes:
- IndexName: 'myGlobalSecondaryIndex'KeySchema:
- AttributeName: attribute2KeyType: HASHProjection:
ProjectionType: 'ALL'region: us-east-1
Once you’ve chosen your configuration, run serverless deploy again (or simply just serverless) to deploy your changes. Please keep in mind that localSecondaryIndexes cannot be updated after first deployment. This is an AWS limitation. Also note that this component exclusively uses the Pay Per Request pricing, which scales on demand like any serverless offering.
5. Develop
Instead of having to run serverless deploy everytime you make changes you wanna test, you could enable dev mode, which allows the CLI to watch for changes in your configuration file, and deploy instantly on save.
To enable dev mode, just run the following command:
$ serverless dev
6. Monitor
Anytime you need to know more about your running aws-dynamodb instance, you can run the following command to view the most critical info.
$ serverless info
This is especially helpful when you want to know the outputs of your instances so that you can reference them in another instance. It also shows you the status of your instance, when it was last deployed, and how many times it was deployed. You will also see a url where you’ll be able to view more info about your instance on the Serverless Dashboard.
To digg even deeper, you can pass the --debug flag to view the state of your component instance in case the deployment failed for any reason.
$ serverless info --debug
7. Remove
If you wanna tear down your entire aws-dynamodb infrastructure that was created during deployment, just run the following command in the directory containing the serverless.yml file.
$ serverless remove
The aws-dynamodb component will then use all the data it needs from the built-in state storage system to delete only the relavent cloud resources that it created. Just like deployment, you could also specify a --debug flag for realtime logs from the website component running in the cloud.
Diagnose 14 pathologies on Chest X-Ray using Deep Learning. Perform diagnostic interpretation using GradCAM Method
Project Description
This project is a complilation of several sub-projects from Coursera 3-course IA for Medical Specialization. The objective is to use a deep learning model to diagnose pathologies from Chest X-Rays.
The project uses a pretrained DenseNet-121 model able to diagnose 14 labels such as Cardiomegaly, Mass, Pneumothorax or Edema. In other words, this single model can provide binary classification predictions for each of the 14 labeled pathologies.
Weight normalization is performed to offset the low prevalence of the abnormalities among the dataset of X-Rays (class imbalance).
Finally the GradCAM technique is used to highlight and visualize where the model is looking, which area of interest is used to make the prediction. This is a tool which can be helpful for discovery of markers, error analysis, training and even in deployment.
Dataset
The project uses chest x-ray images taken from the public ChestX-ray8 dataset. This dataset contains 108,948 frontal-view X-ray images of 32,717 unique patients. Each image in the data set contains multiple text-mined labels identifying 14 different pathological conditions.
These in turn can be used by physicians to diagnose 8 different diseases.
For the project we have been working with a ~1000 image subset of the images.
875 images to be used for training.
109 images to be used for validation.
420 images to be used for testing.
The dataset includes a CSV file that provides the ground truth labels for each X-ray.
Regardless of the architectural designs of these networks, they all try to create channels for information to flow between the initial layers and the final layers. DenseNet, with the same objective, create paths between the layers of the network. Parts of this summary are can be found in this review.
DenseNet key novelty:
Densenet is a convolutional network where each layer is connected to all other layers that are deeper in the network
The first layer is connected to the 2nd, 3rd, 4th etc.
The second layer is connected to the 3rd, 4th, 5th etc.
Each layer in a dense block receives feature maps from all the preceding layers, and passes its output to all subsequent layers. Feature maps received from other layers are fused through concatenation, and not through summation (like in ResNets). Extracted feature maps are continuously added together with previous ones which avoids redundant and duplicate work.
This allows the network to re-use learned information and be more efficient. Such networks require fewer layers. State of the art results are achieved with as low as 12 channel feature maps. This also means the network has fewer parameters to learn and is therefore easier to train.
Amongst all variants, DenseNet-121 is the standard one.
Key contributions of the DenseNet architecture:
Alleviates vanishing gradient problem ( as networks get deeper, gradients aren’t back-propagated sufficiently to the initial layers of the network. The gradients keep getting smaller as they move backwards into the network and as a result, the initial layers lose their capacity to learn the basic low-level features)
Stronger feature propagation
Feature re-use
Reduced parameter count
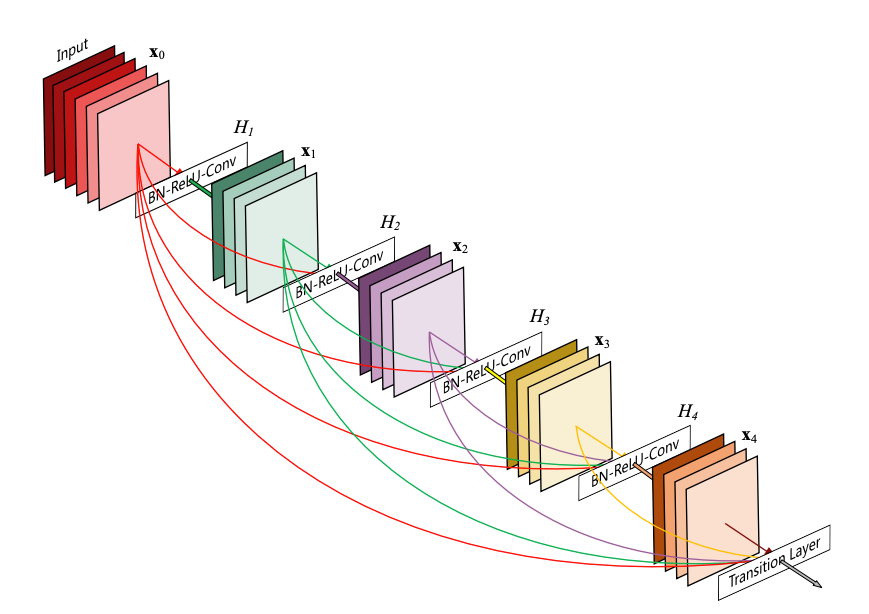
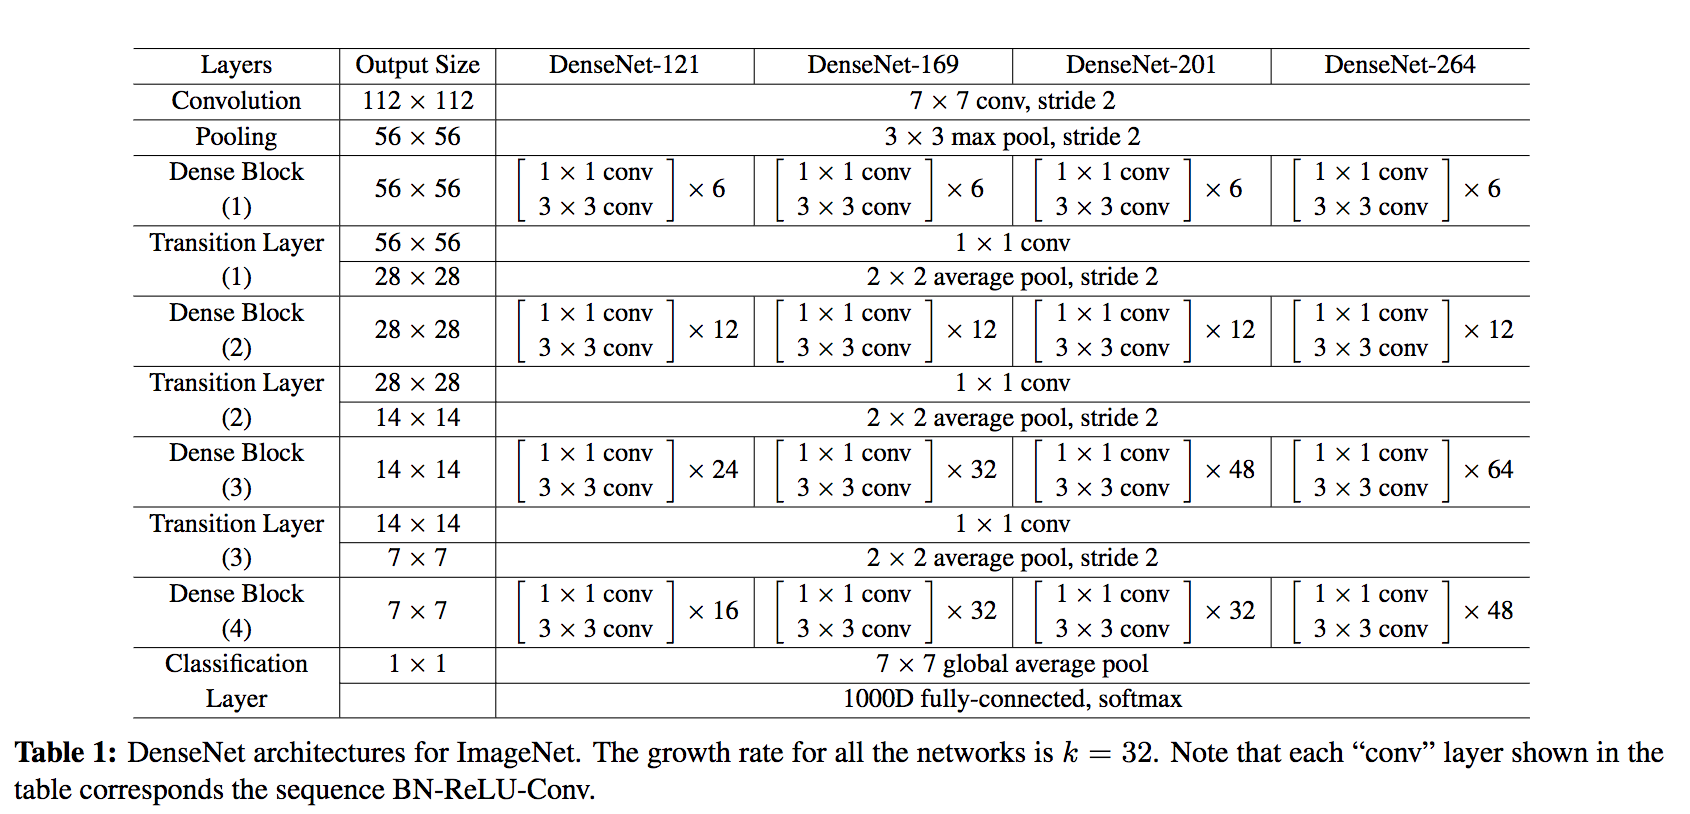
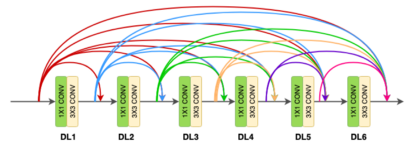
DenseNet architecture
DenseNet is composed of Dense blocks. In those blocks, the layers are densely connected together: Each layer receive in input all previous layers output feature maps. The DenseNet-121 comprises 4 dense blocks, which themselves comprise 6 to 24 dense layers.
Dense block:
A dense block comprises n dense layers. These dense layers are connected such that each dense layer receives feature maps from all preceding layers and passes it’s feature maps to all subsequent layers. The dimensions of the features (width, height) stay the same in a dense block.
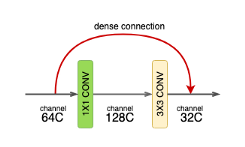
Dense layer:
Each dense-layer consists of 2 convolutional operations.
1 X 1 CONV (conventional conv operation for extracting features)
3 X 3 CONV (bringing down the feature depth/channel count)
The CONV layer corresponds to the sequence BatchNorm->ReLU->Conv. A layer has each sequence repeated twice, the first with 1×1 Convolution bottleneck producing: grow rate x 4 feature maps, the second with 3×3 convolution. The authors found that the pre-activation mode (BN and ReLU before the Conv) was more efficient than the usual post-activation mode.
The growth rate (k= 32 for DenseNet-121) defines the number of output feature maps of a layer. Basically the layers output 32 feature maps which are added to a number of 32 feature maps from previous layers. While the depth increases continuously, each layer bring back the depth to 32.
Transition layer:
In between dense blocks, you find Transition layer. Instead of summing the residual like in ResNet, DenseNet concatenates all the feature maps.
A transition layer is made of: Batch Normalization -> 1×1 Convolution -> Average pooling.
Transition layers between two dense blocks ensure the down-sampling role (x and y dimensions halved), essential to CNN. Transition layers also compress the feature map and reduce the channels by half. This contributes to the compactness of the network.
Although Concatenating generates a lot of input channels, DenseNet’s convolution generates a low number of feature maps (The authors recommend 32 for optimal performance but world-class performance was achieved with only 12 output channels).
Key benefits:
Compactness. DenseNet-201 with 20M parameters yields similar validation error as a 101-layer ResNet with 45M parameters.
The learned features are non-redundant as they are all shared through a common knowledge.
Easier to train because the gradient is flowing back more easily thanks to the short connections.
Model settings
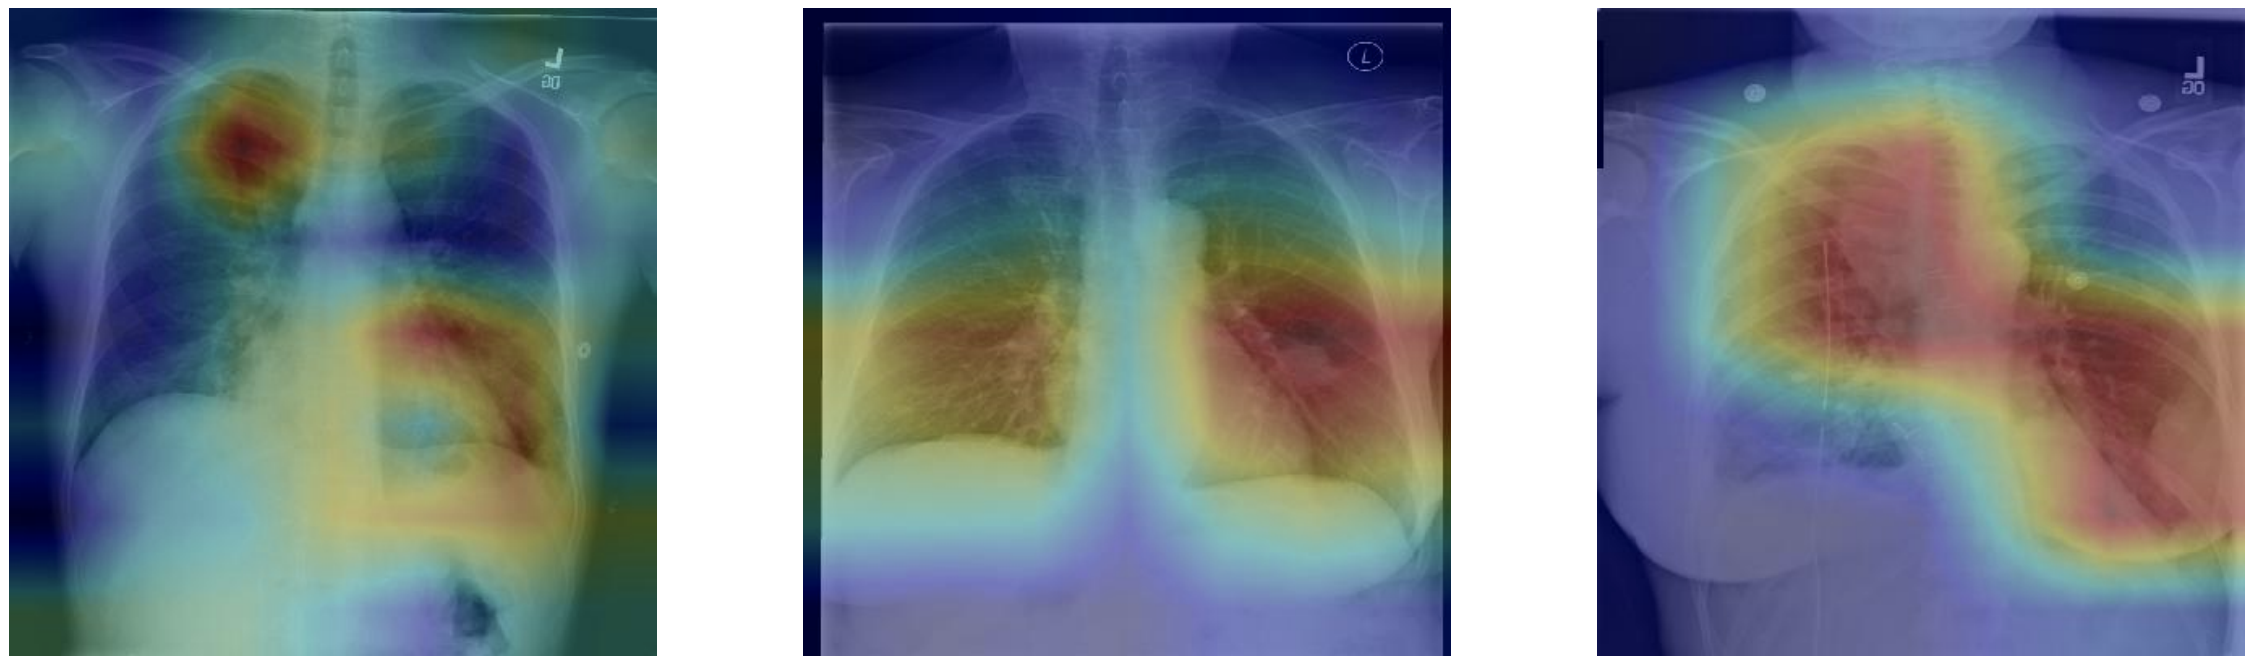
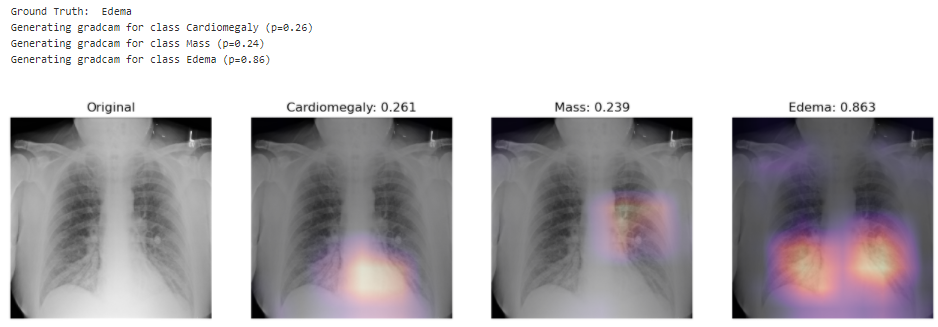
In this project, the model uses 320 x 320 X-Rays images and outputs predictions for each of the 14 pathologies as illustrated below on a sample image.
Environment and dependencies
In order to run the model, I used an environment with tensorflow 1.15.0 and Keras 2.1.6. Model weights are provided in the repo.
Results
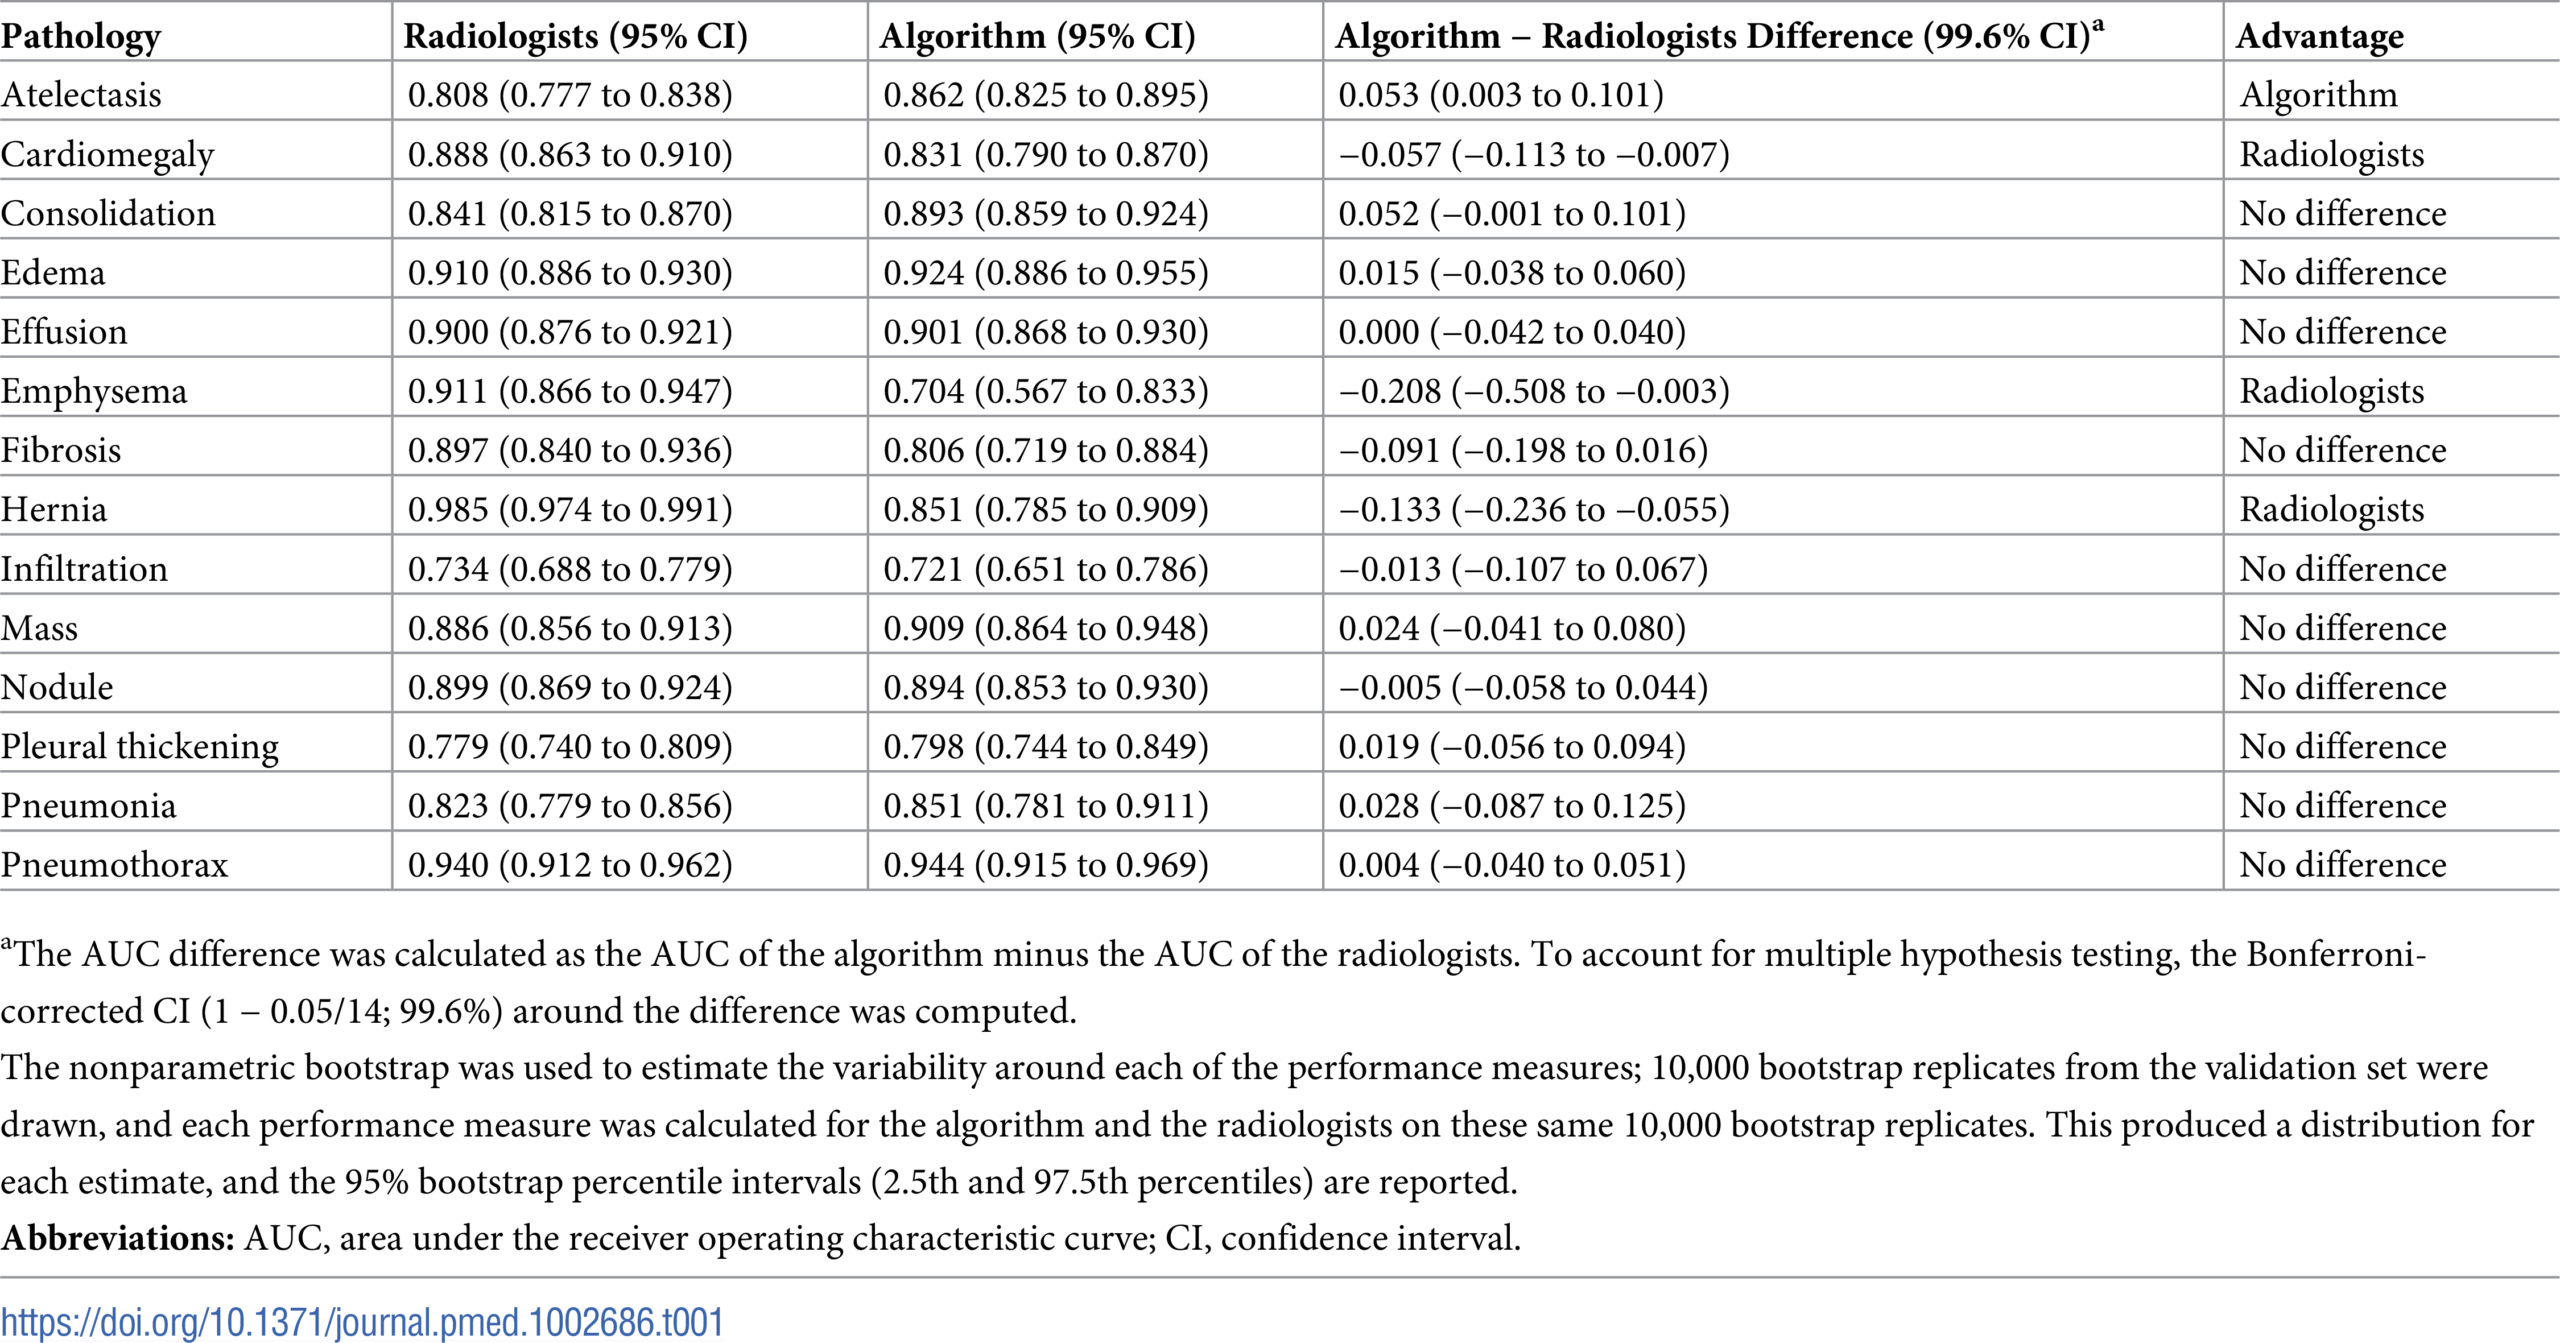
I used a pre-trained model which performance can be evaluated using the ROC curve shown at the bottom. The best results are achieved for Cardiomegaly (0.9 AUC), Edema (0.86) and Mass (0.82). Ideally we want to be significantly closer to 1. You can check out below the performance from the ChexNeXt paper and their model as well as radiologists on this dataset.
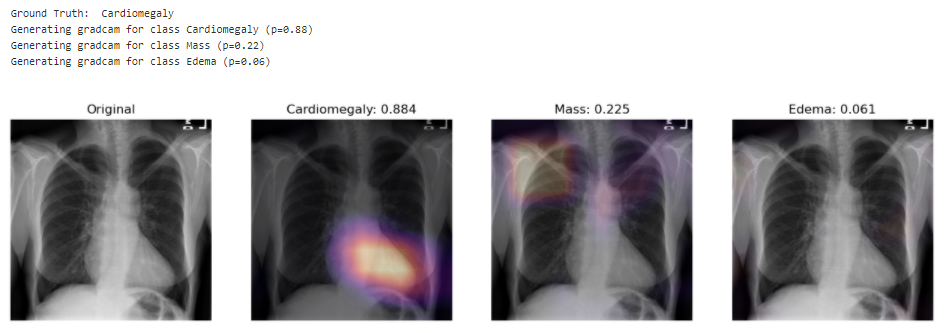
Looking at unseen X-Rays, the model correctly predicts the predominant pathology, generating a somehow accurate diagnotic, highlighting the key region underlying its predictions. In addition to the main diagnostic (highest prediction), the model also predicts secondary issues similarly to what a radiologist would comment as part of his analysis. This can be either false positive from noise captured in the X-rays or cumulated pathologies.
The model correctly predicts Cardiomegaly and absence of mass or edema. The probability for mass is higher, and we can see that it may be influenced by the shapes in the middle of the chest cavity, as well as around the shoulder.
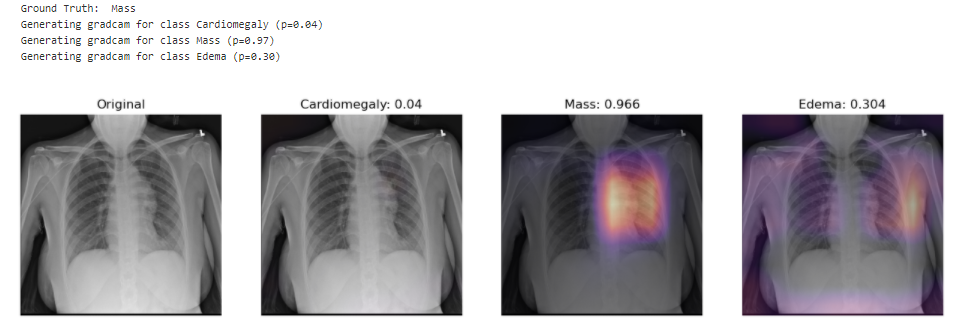
The model picks up the mass near the center of the chest cavity on the right. Edema has a high score for this image, though the ground truth doesn’t mention it.
Here the model correctly picks up the signs of edema near the bottom of the chest cavity. We can also notice that Cardiomegaly has a high score for this image, though the ground truth doesn’t include it. This visualization might be helpful for error analysis; for example, we can notice that the model is indeed looking at the expected area to make the prediction.
Performance from the ChexNeXt paper (model as well as radiologists):
Unless you explicitly state otherwise, any contribution intentionally submitted for inclusion in the work by you, as defined in the Apache-2.0 license, shall be dual licensed as above, without any additional terms or conditions.
Este es un repositorio donde encontrarás todos los códigos usados para generar las animaciones de la lista de reproducción Calcanim de nuestro canal de YouTube Animathica. Las animaciones están hechas con Manim.
¡Te invitamos a descargar y modificar nuestros archivos! Para que puedas generar tus videos después de modificar un archivo, será necesario que tengas una instalación completa y estable de Manim. Te recomendamos los siguientes tutoriales:
Para que nuestros archivos se puedan ejecutar bien, es necesario que instales la última versión de Manim. Además, en el archivo tex_template.tex en la carpeta manimlib, debes modificar el paquete babel de english a spanish.
Si lo prefieres, puedes usar esta aplicación en línea que te permitirá generar tus videos: https://eulertour.com/gallery
Runs the app in the development mode.
Open http://localhost:3000 to view it in the browser.
The page will reload if you make edits.
You will also see any lint errors in the console.
yarn test
Launches the test runner in the interactive watch mode.
See the section about running tests for more information.
yarn build
Builds the app for production to the build folder.
It correctly bundles React in production mode and optimizes the build for the best performance.
The build is minified and the filenames include the hashes.
Your app is ready to be deployed!
See the section about deployment for more information.
yarn eject
Note: this is a one-way operation. Once you eject, you can’t go back!
If you aren’t satisfied with the build tool and configuration choices, you can eject at any time. This command will remove the single build dependency from your project.
Instead, it will copy all the configuration files and the transitive dependencies (webpack, Babel, ESLint, etc) right into your project so you have full control over them. All of the commands except eject will still work, but they will point to the copied scripts so you can tweak them. At this point you’re on your own.
You don’t have to ever use eject. The curated feature set is suitable for small and middle deployments, and you shouldn’t feel obligated to use this feature. However we understand that this tool wouldn’t be useful if you couldn’t customize it when you are ready for it.
About App
This app is mainly created in admiration of the learning of context component of the reactJs.
React’s context allows you to share information to any components, without any help of props.
Context provides a way to pass data through the component tree without having to pass props down manually at every level.
Create file of context.jsx in root path
context component:
constContext=React.createContext();
There are two export component :
class Provider
For adding in root file App.js
Changing state by using the dispatch redux property
exportclassProviderextendsComponent{state={data:[]dispatch:action=>this.setState(state=>reducer(state,action))// you have to define or use this element in other file with the same 'type' component in it and after that help of payload we can change the state.};componentDidMound(){//if you want ot change state in file by 'setState'}render(){return(<Context.Providervalue={this.state}>{this.props.childern}</Context.Provider>);}}
reducer component:
constreducer=(state,action)=>{switch(action.type){case'objcet_in_type':
return{
...state,data: action.payload// payload is the change data that comes from the another file where the 'Consumer' used.};default:
returnstate;}};
const Consumer
For adding in file where we can use the states or values that provide by the provider.
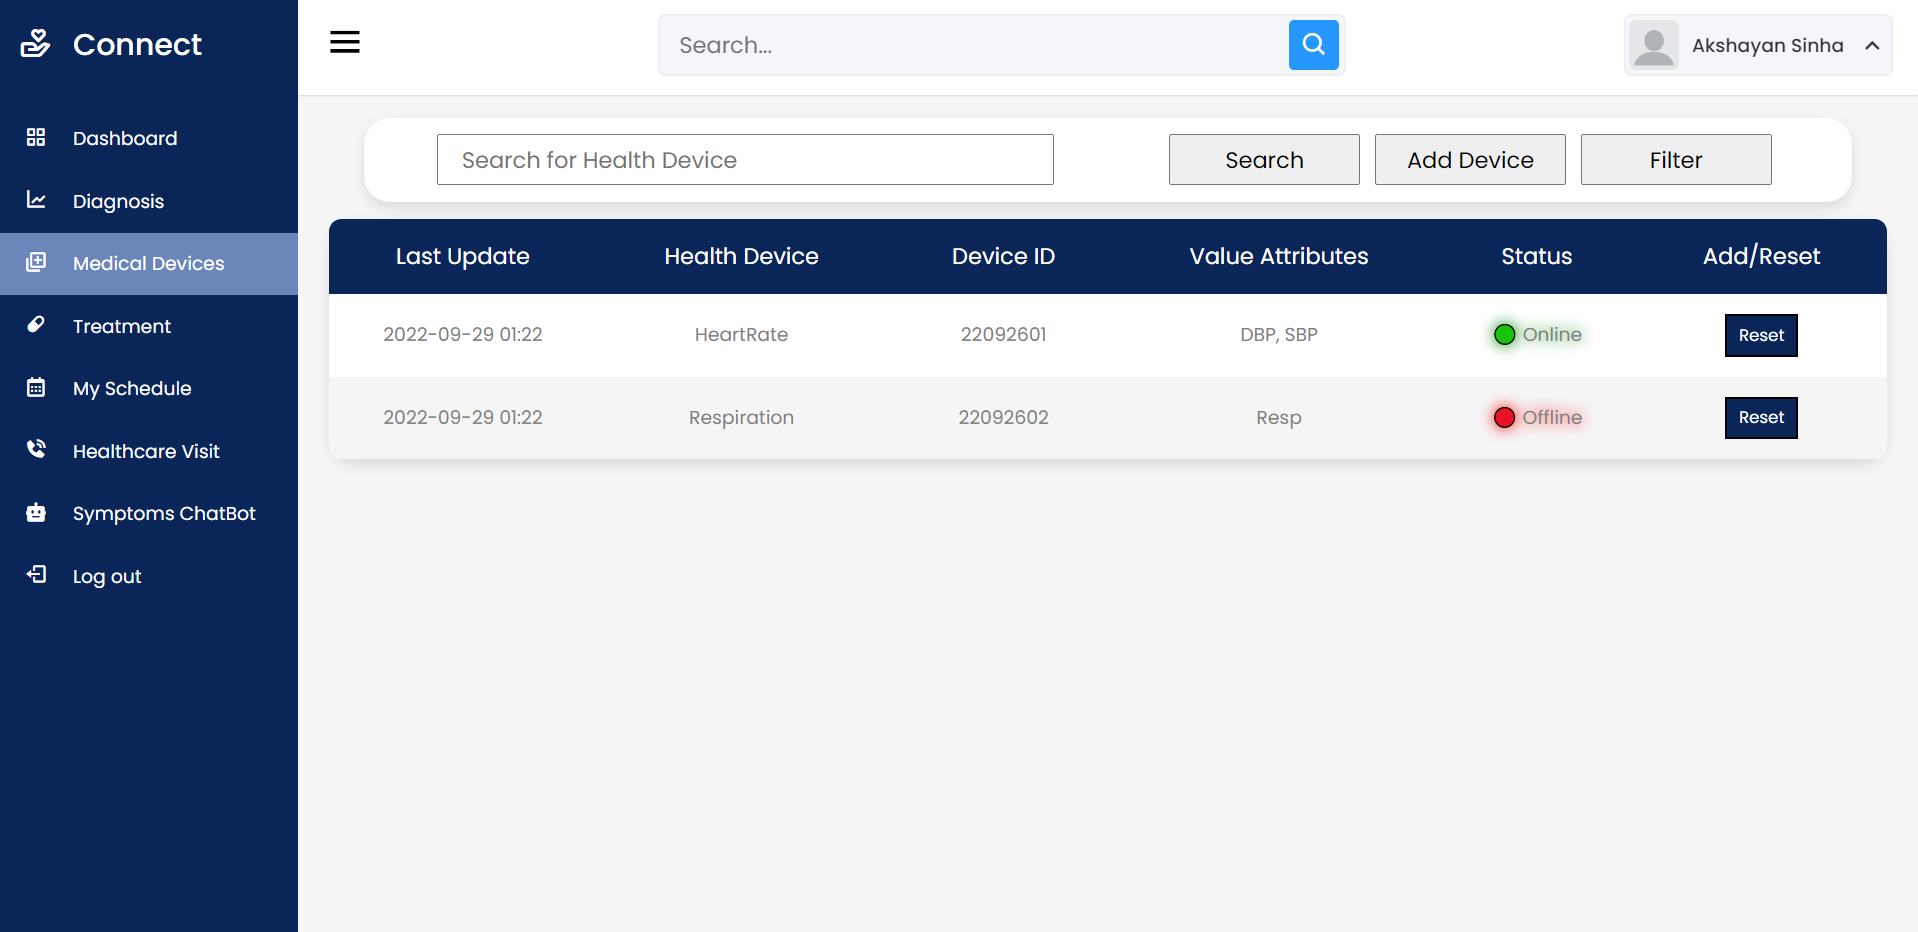
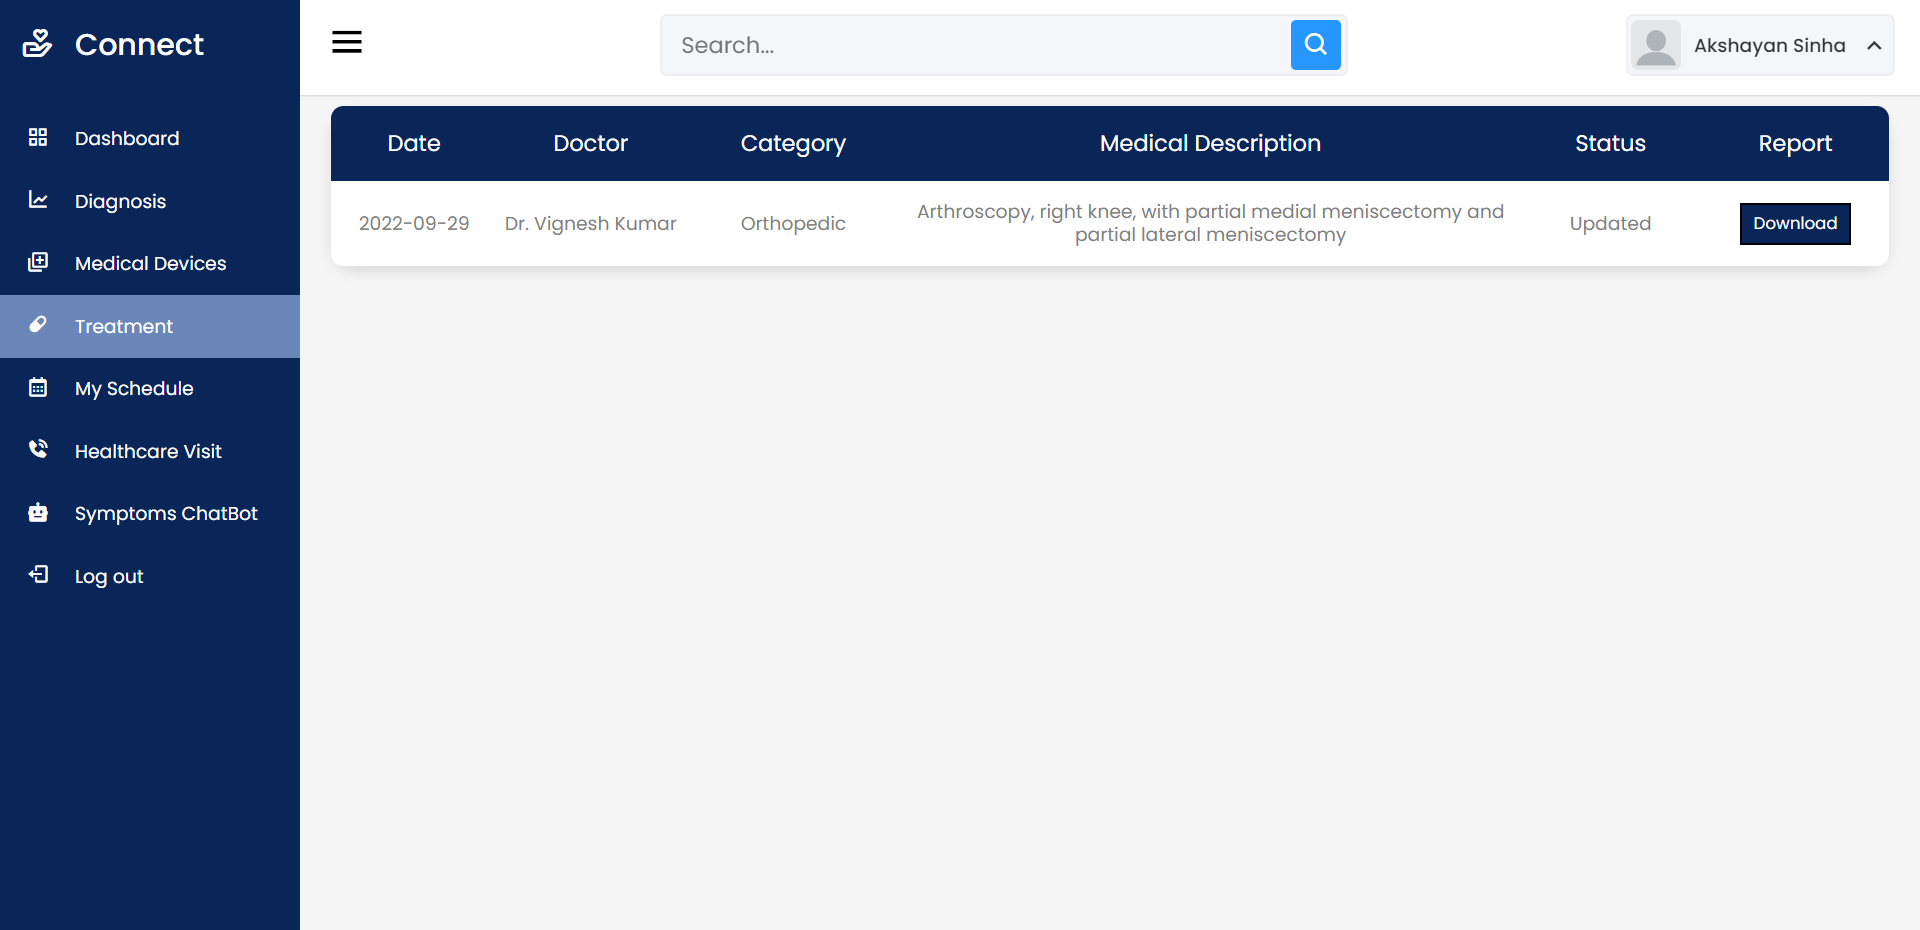
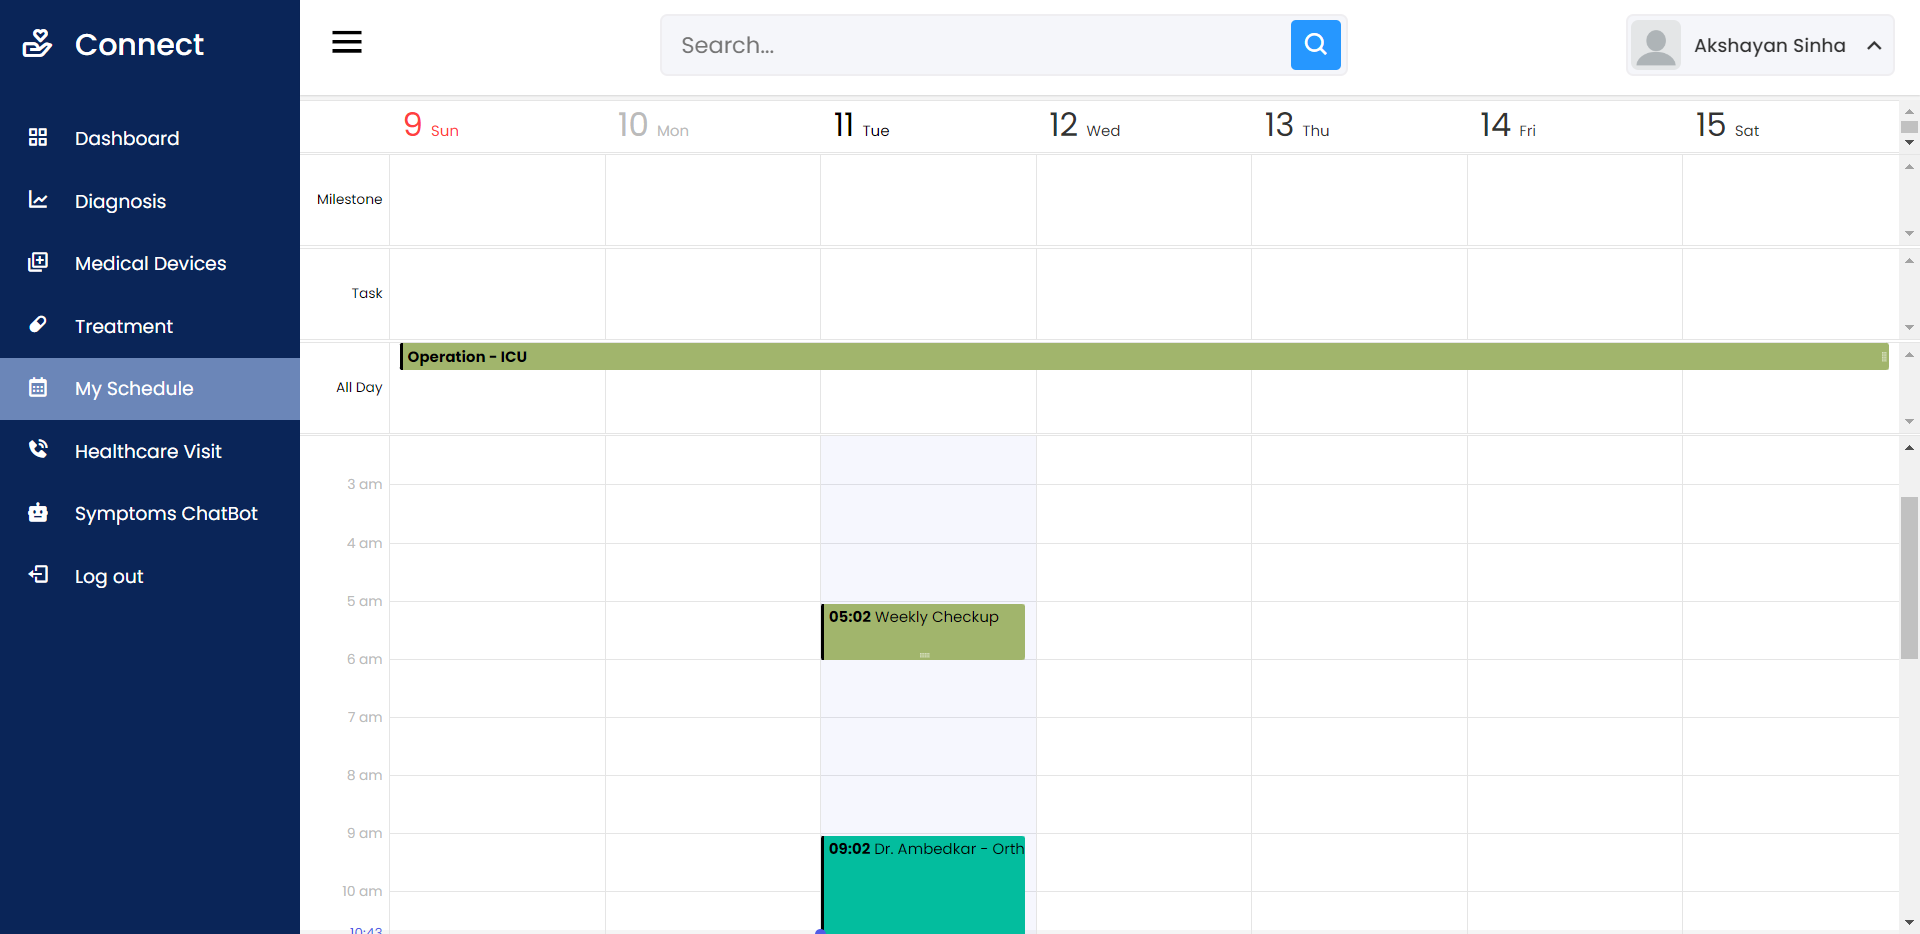
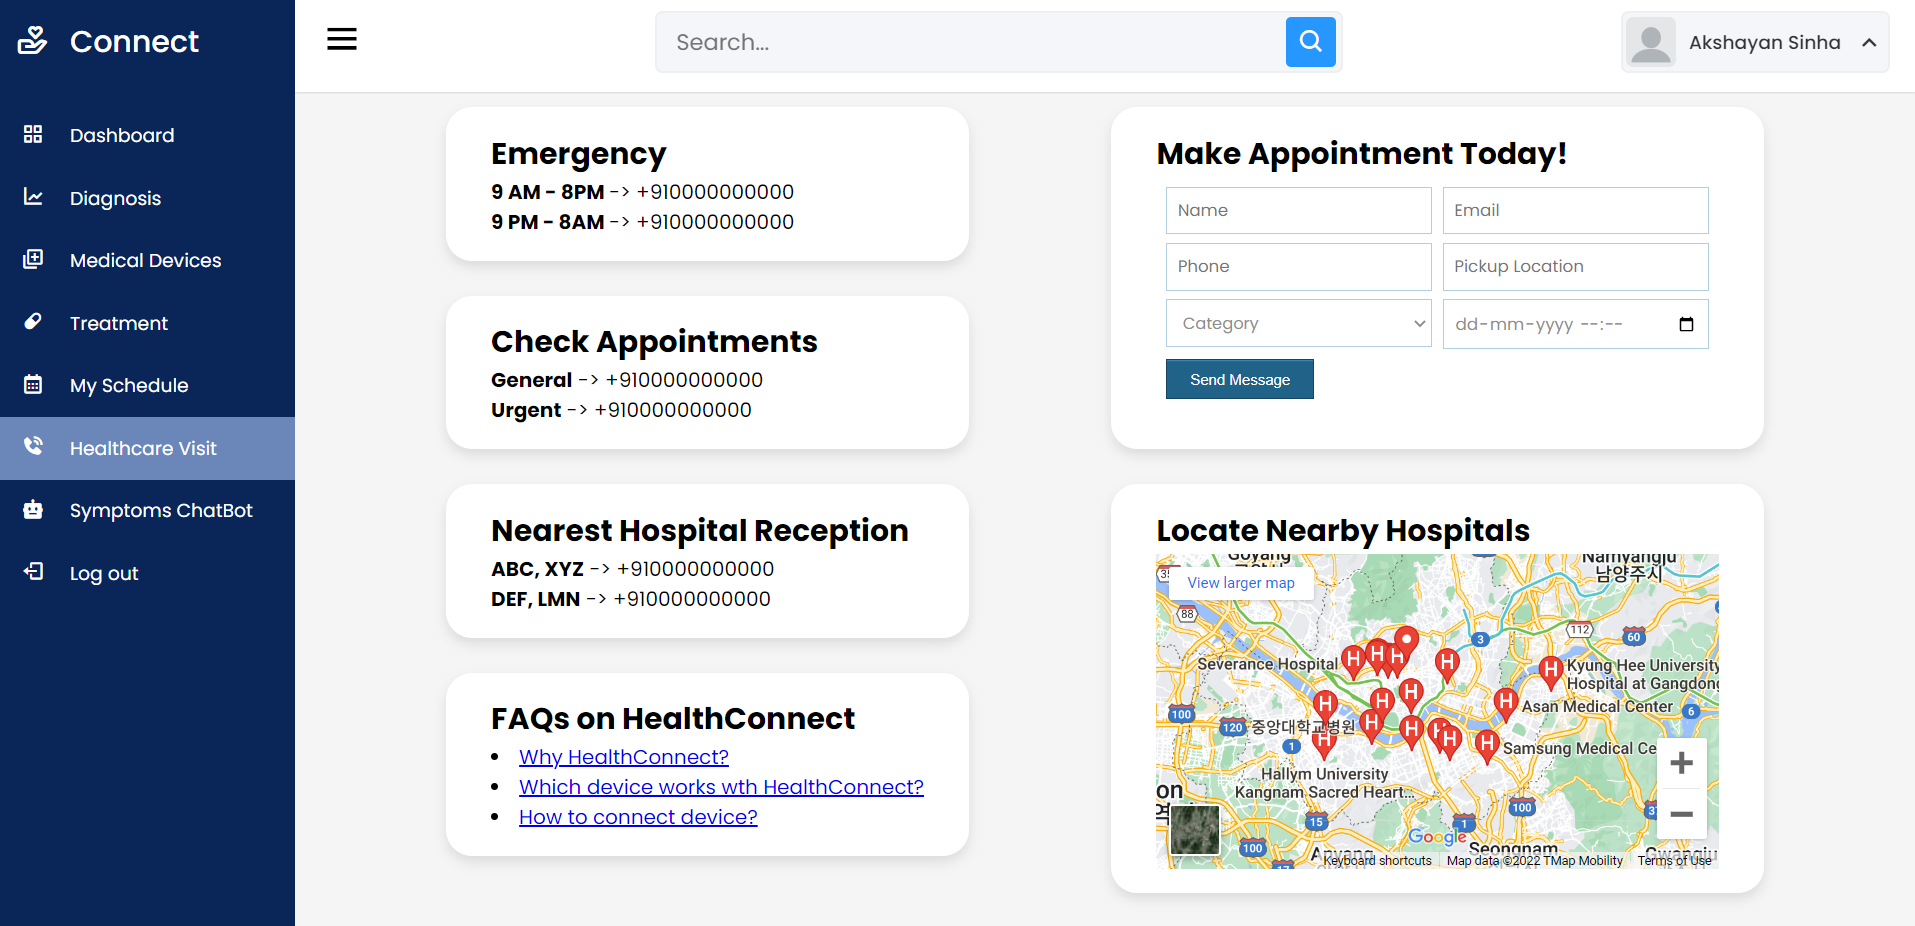
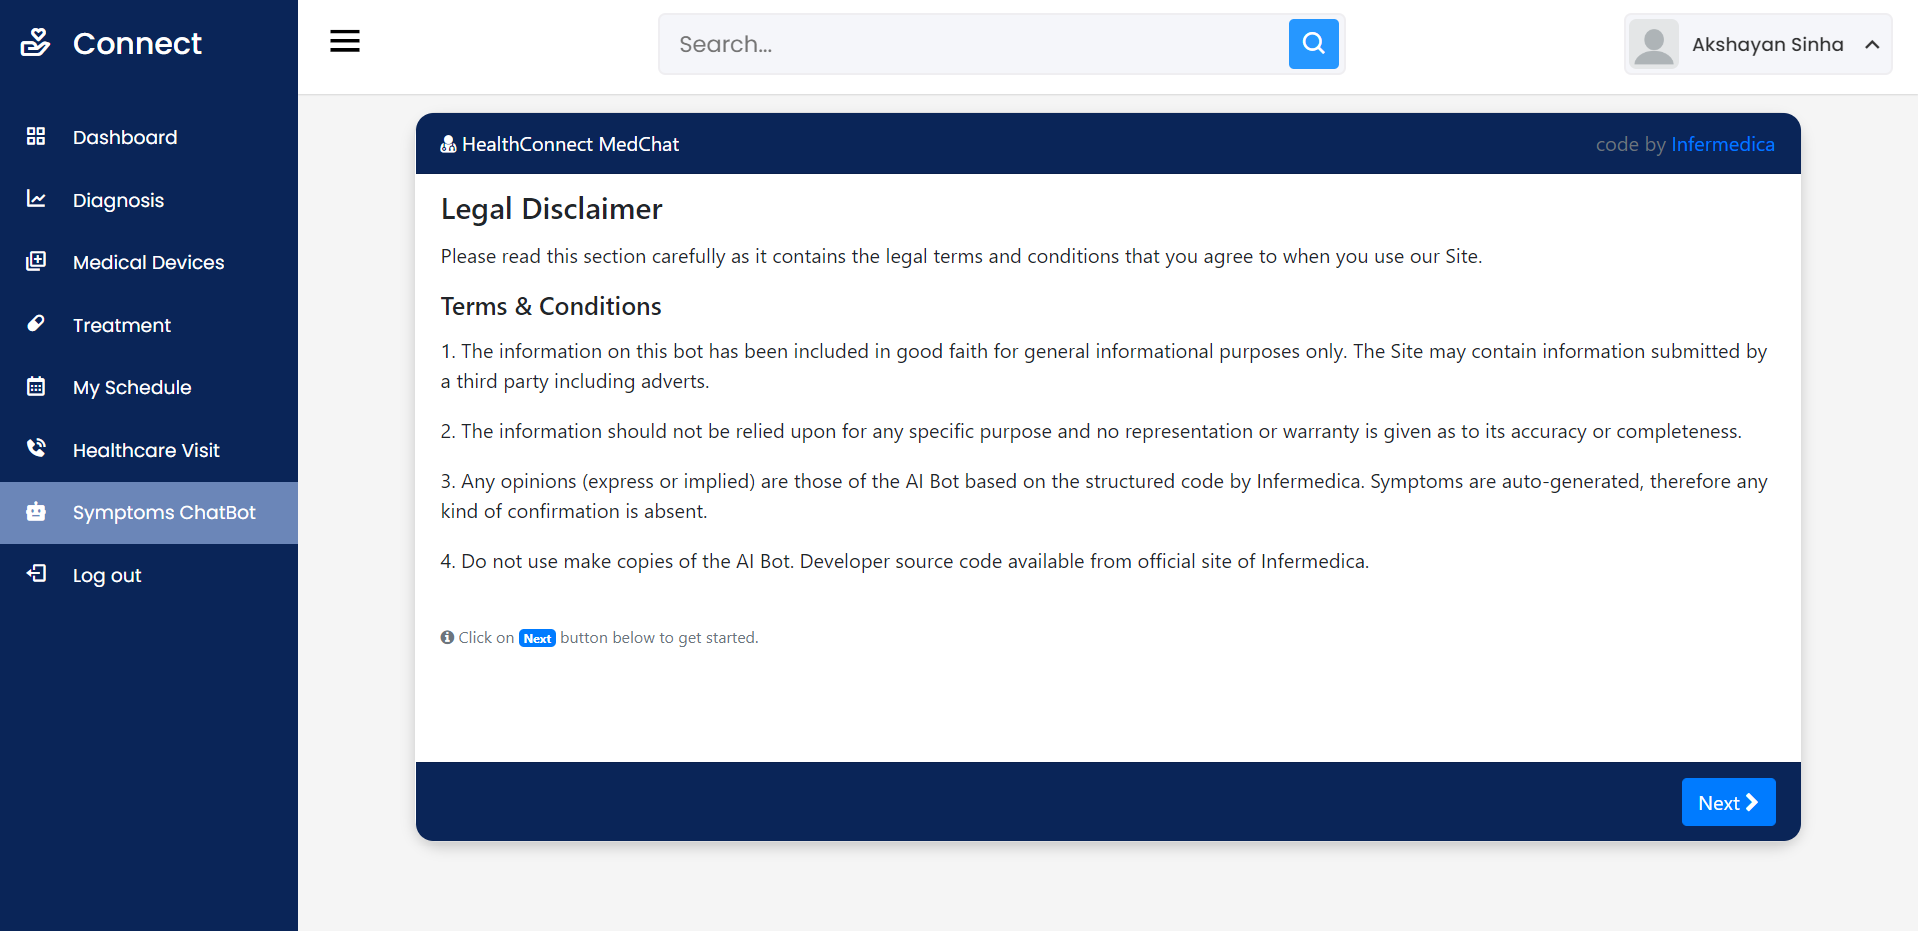
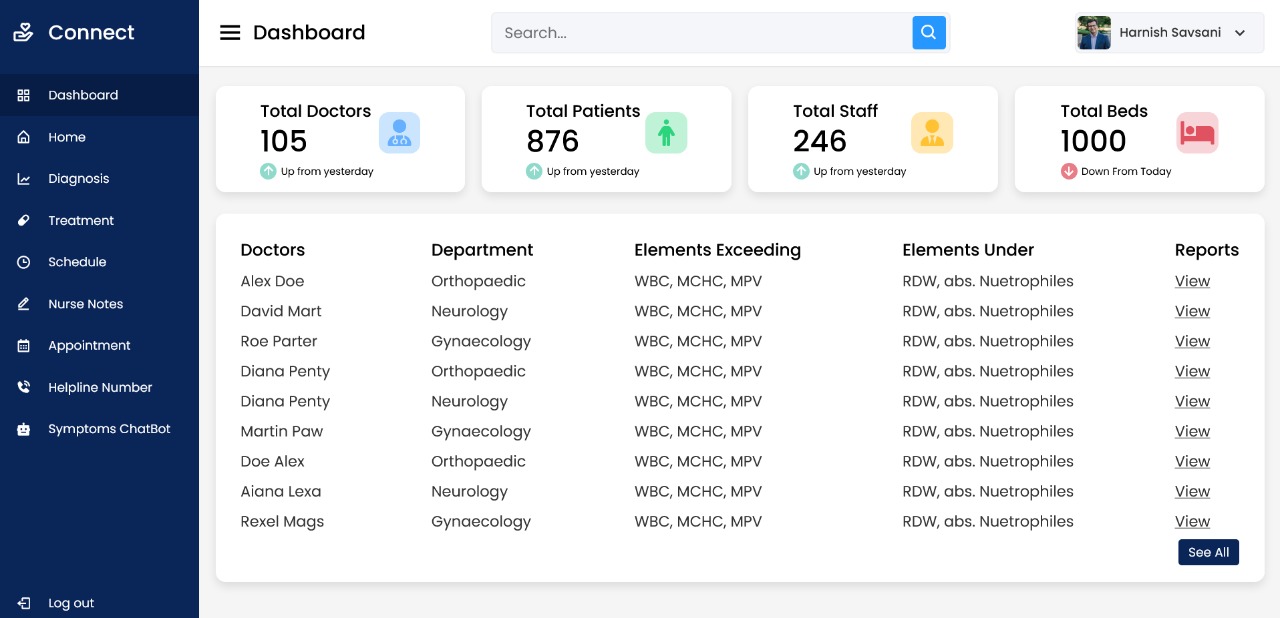
Open Source Medical IoT Application. Use any device – ESP32/ESP8266 Dev Board, Raspberry Pi, Smart Phone – connect the sensors and add your device on your account. Then view your medical sensor data sent to the cloud in REAL TIME.
Ability to access Patient Data remotely (Dashboard)
Digital Multi Para Monitor
Schedule appointments based on Doctor’s calendar
AI Symptom Checking ChatBot for quick queries
Order medicines according to Doctor’s consultancy
Use digital notes provided by nurse/doctor as instructions related to health.
Quick updated helpline numbers to access nearest Hospital/Ambulance
From this Project, we are trying to analyze the problems faced by people while performing their tests and finding a diagnostics solution for it after the results of the lab tests are given.
All these tests need not be taken in the hospitals, an IoT device, whose prototype that we have built can track and upload the data to the cloud. This data can be analyzed on a Machine learning Algorithm and cross-reference to find the accurate anomalies in the patient’s body.
These could include infection, disorders, diseases, or any health condition which is unlikely in usual cases.
The focus is on having a portable ICU, with which the medical help can be reached to the people remotely.
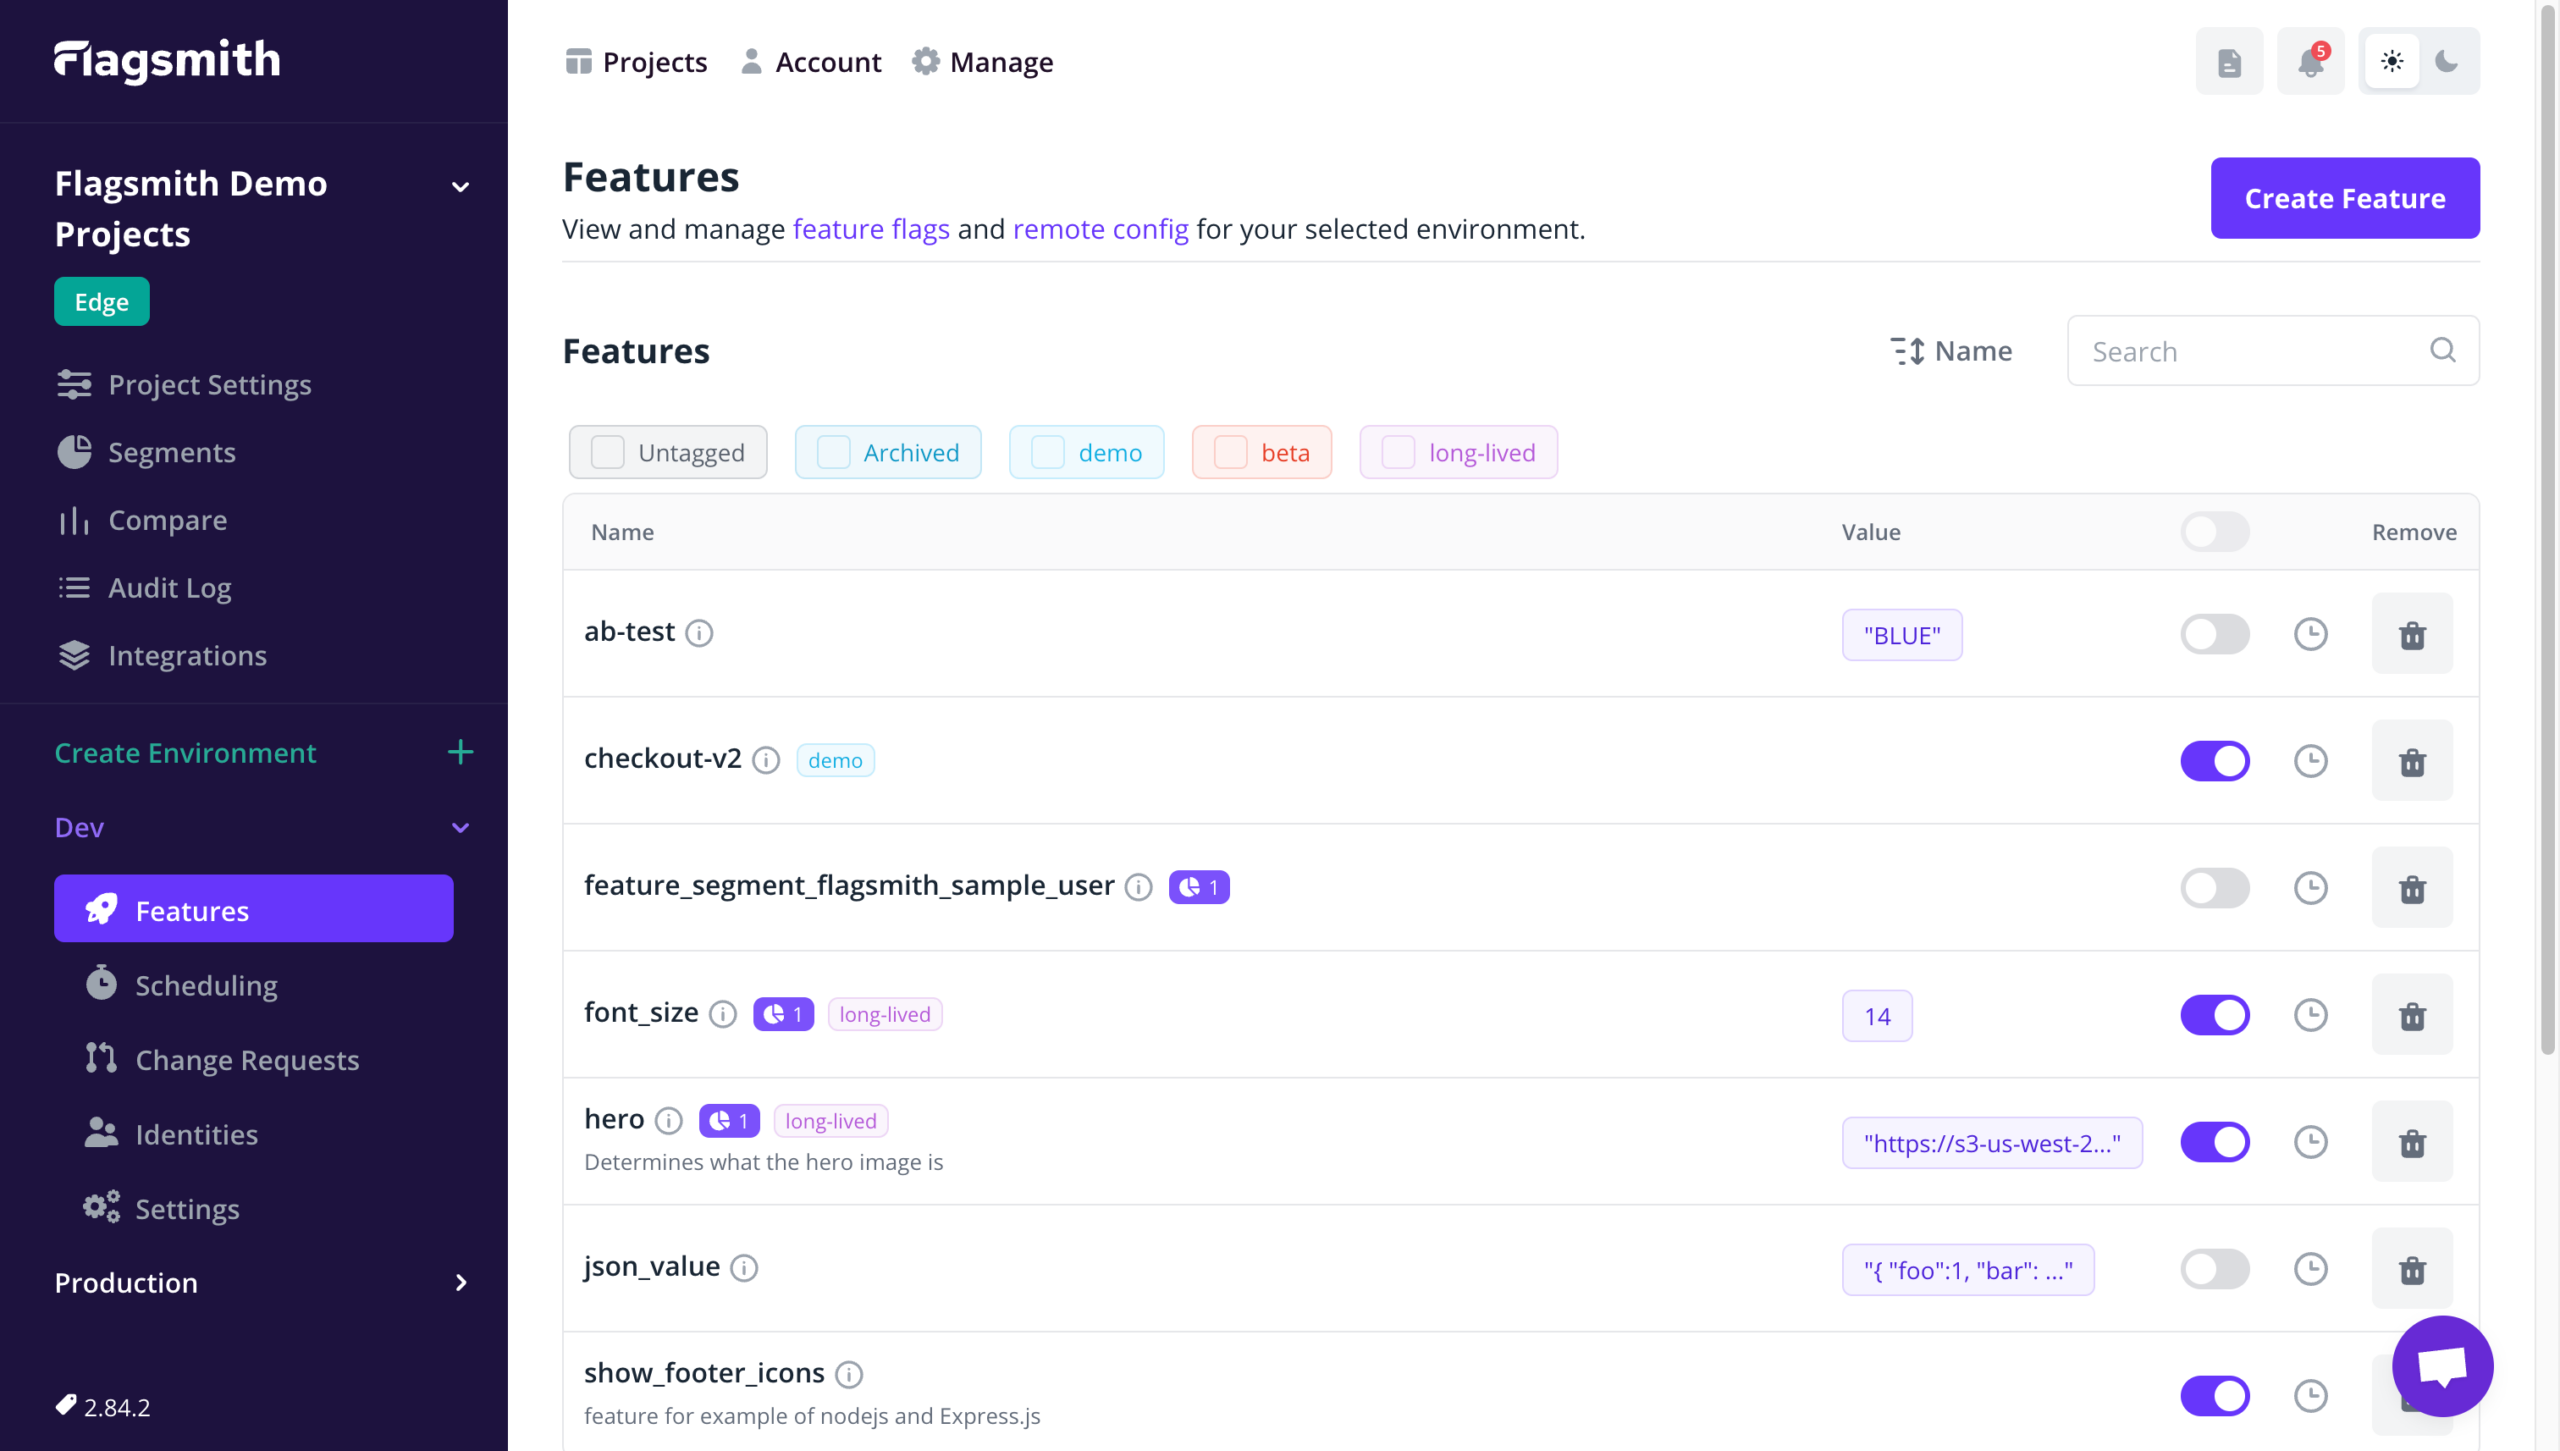
Flagsmith is an Open-Source Feature Flagging Tool to Ship Faster & Control Releases
Change the way your team releases software. Roll out, segment, and optimise—with granular control. Stay secure with on-premise and private cloud hosting.
Feature flags: Release features behind the safety of a feature flag
Make changes remotely: Easily toggle individual features on and off, and make changes without deploying new code
A/B testing: Use segments to run A/B and multivariate tests on new features
Segments: Release features to beta testers, collect feedback, and iterate
Organisation management: Stay organised with orgs, projects, and roles for team members
SDKs & frameworks: Choose from 15+ popular languages like Typescript, .NET, Java, and more. Integrate with any framework, including React, Next.js, and more
Integrations: Use your favourite tools with Flagsmith
Flagsmith makes it easy to create and manage feature flags across web, mobile, and server side applications. Just wrap
a section of code with a flag, and then use Flagsmith to toggle that feature on or off for different environments, users
or user segments.
Get up and running in less than a minute:
curl -o docker-compose.yml https://raw.githubusercontent.com/Flagsmith/flagsmith/main/docker-compose.yml
docker-compose -f docker-compose.yml up
The application will bootstrap an admin user, organisation, and project for you. You’ll find a link to set your password
in your Compose logs:
Superuser "admin@example.com" created successfully.
Please go to the following page and choose a password: http://localhost:8000/password-reset/confirm/.../...
If you need help getting up and running, please get in touch
We love contributions from the community and are always looking to improve! Here are our contribution guidelines.
Open Source Philosophy
The majority of our platform is open source under the BSD-3-Clause license. A small number of repositories are under the MIT license.
We built Flagsmith as the open source feature flag tool we needed but couldn’t find on GitHub. Our core functionality stays open, always. Read our open letter to developers.
Open Source vs Paid
With our core functionality being open, you can use our open-source feature flag and remote config management platform no matter what. Enterprise-level governance and management features are available with a valid Flagsmith Enterprise license.
Parse and generate GPX files easily on iOS, watchOS & macOS.
What is CoreGPX?
CoreGPX is a port of iOS-GPX-Framework to Swift language.
CoreGPX currently supports all GPX tags listed in GPX v1.1 schema, along with the recent addition of GPX v1.0 support. It can generate and parse GPX compliant files on iOS, macOS and watchOS.
As it makes use of XMLParser for parsing GPX files, CoreGPX is fully dependent on the Foundation API only.
Features
Successfully outputs string that can be packaged into a GPX file
Parses GPX files using native XMLParser
Support for iOS, macOS & watchOS
Supports Codable in essential classes
Enhanced full support for GPXExtensions for both parsing and creating.
Lossy GPX compression. Check out GPXCompressor for an implementation of this new feature.
You can read the documentation here, which documents most of the important features that will be used for parsing and creating of GPX files.
Installation
CoreGPX supports CocoaPods, Carthage, as well as Swift Package Manager, such that you can install it, any way you want.
To install using CocoaPods, simply add the following line to your Podfile:
pod'CoreGPX'
CoreGPX works with Carthage as well, simply add the following line to your Cartfile:
github "vincentneo/CoreGPX"
How to use?
Check out the wiki page for some basic walkthroughs of how to use this library.
Alternatively, you may check out the Example app, by cloning the repo, pod install and running the Example project.
To know in-depth of how CoreGPX can be used in a true production setting, please refer to awesome projects like iOS-Open-GPX-Tracker or Avenue GPX Viewer, both of which, uses CoreGPX.
Extras
Check out the Extras folder for some extra helper codes that may help you with using CoreGPX.
Simply drag and drop it into your project to use.
GPX+CLLocation.swift: Converting CLLocation type to GPXWaypoint, GPXTrackPoint and more.
Contributing
Contributions to this project will be more than welcomed. Feel free to add a pull request or open an issue.
If you require a feature that has yet to be available, do open an issue, describing why and what the feature could bring and how it would help you!