Blog

  • matrix-meetings

    NeoDateFix

    Build Matrix

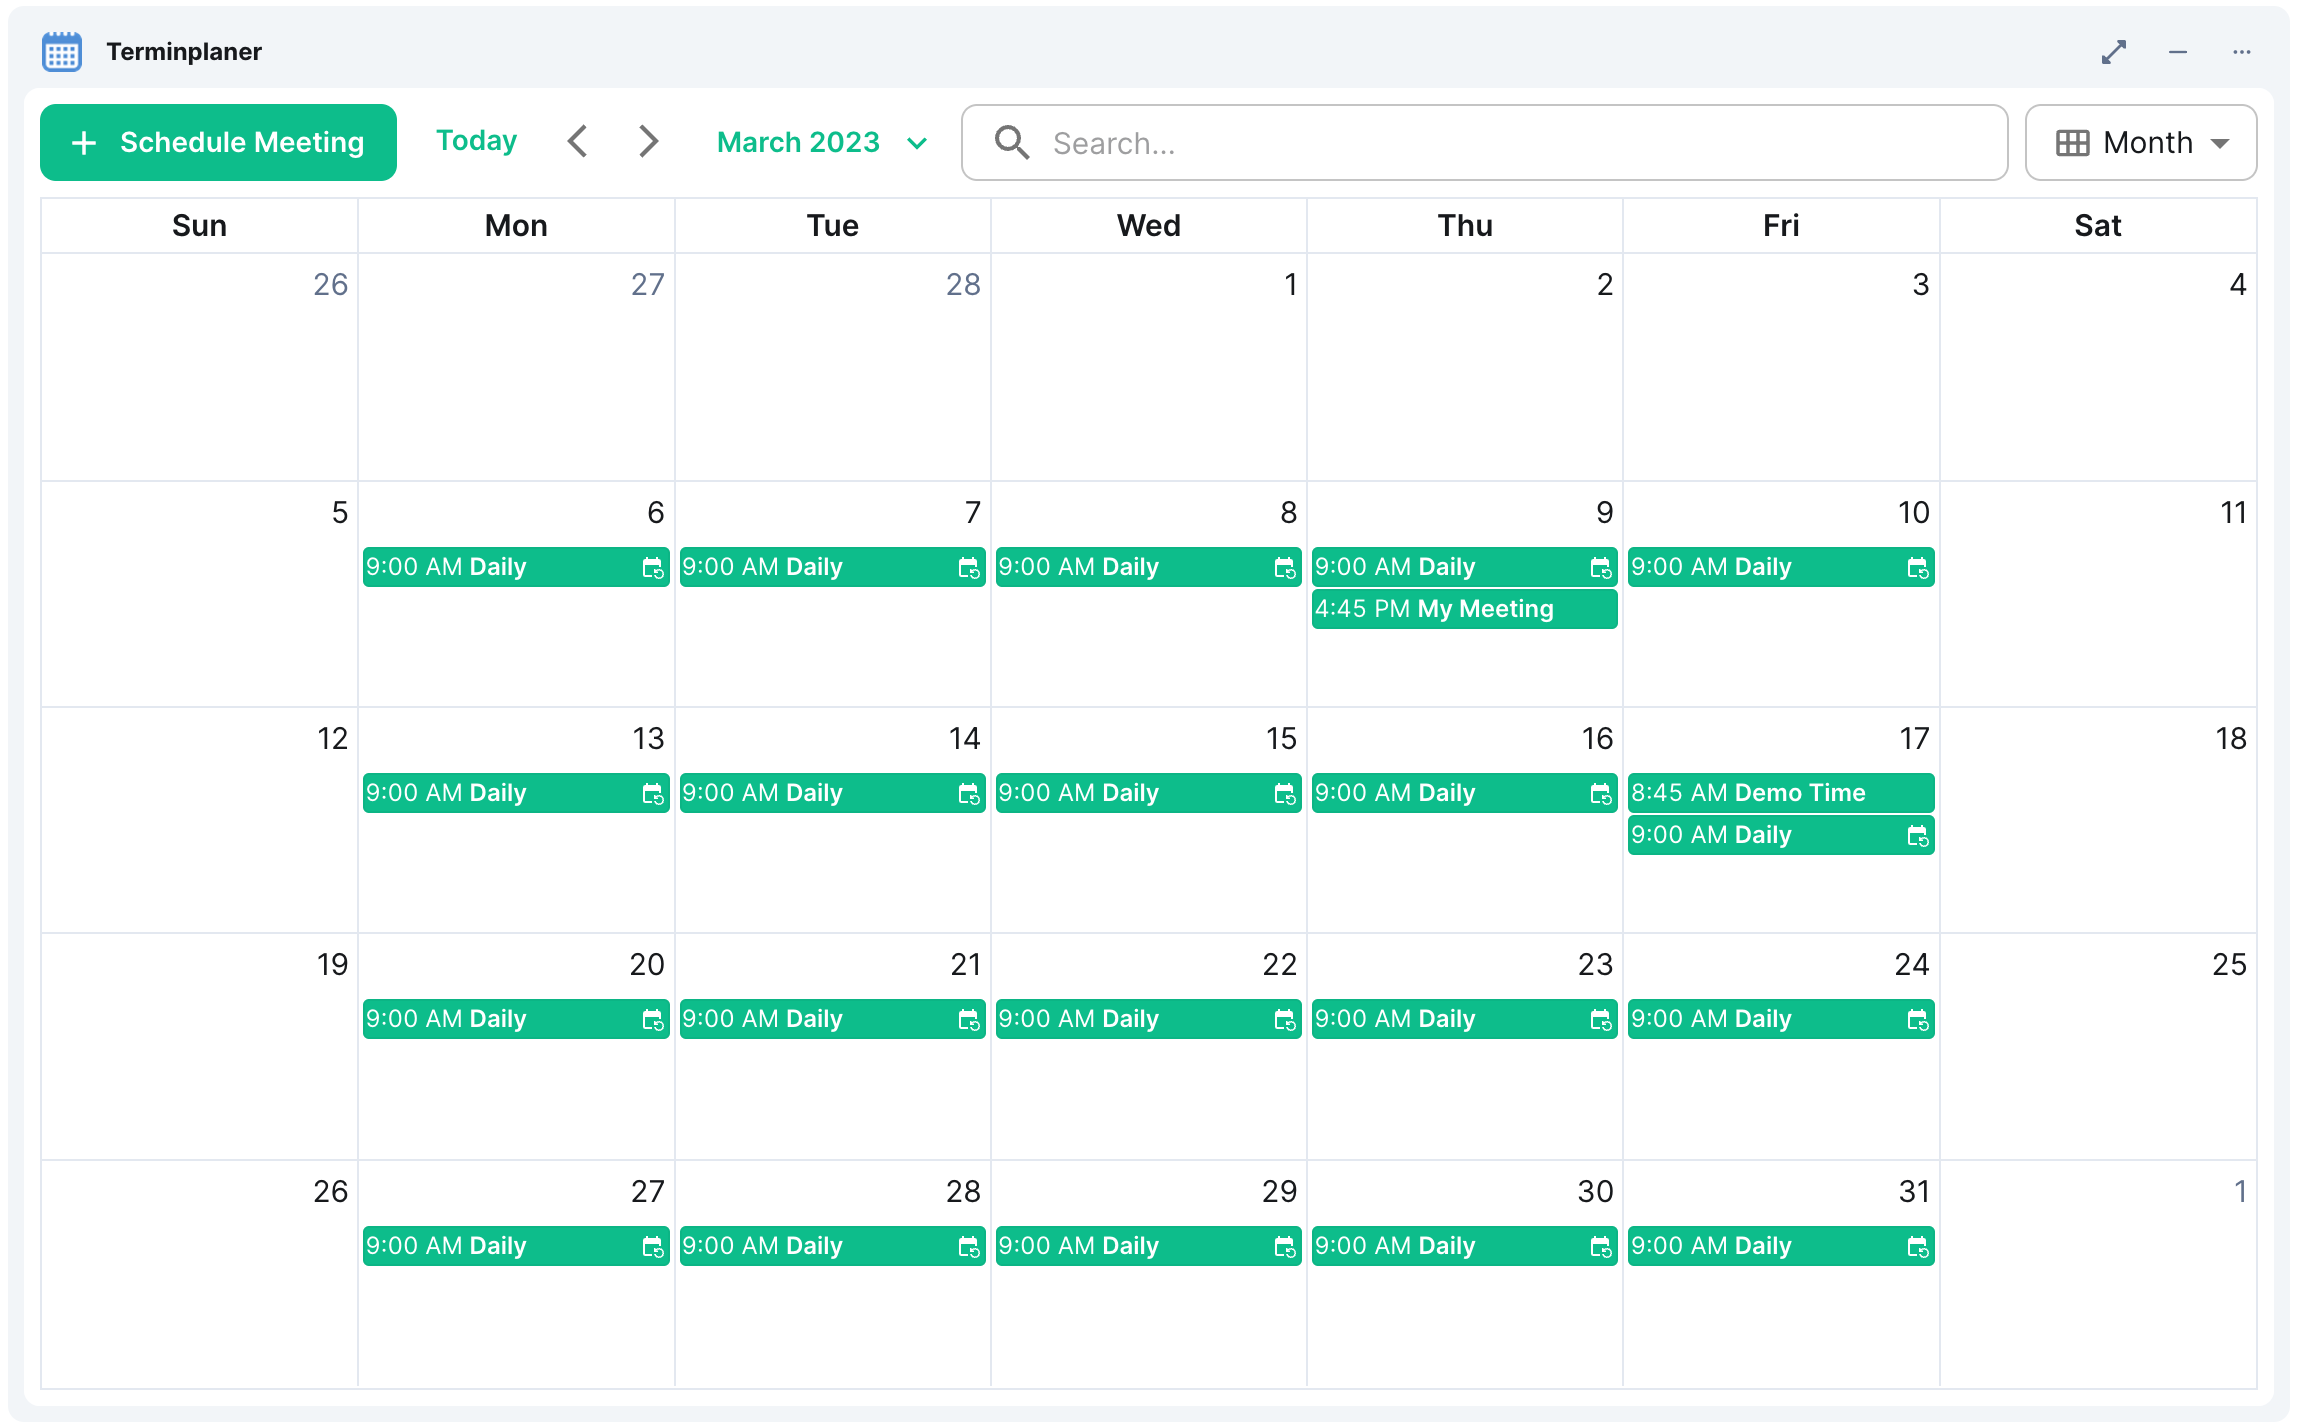
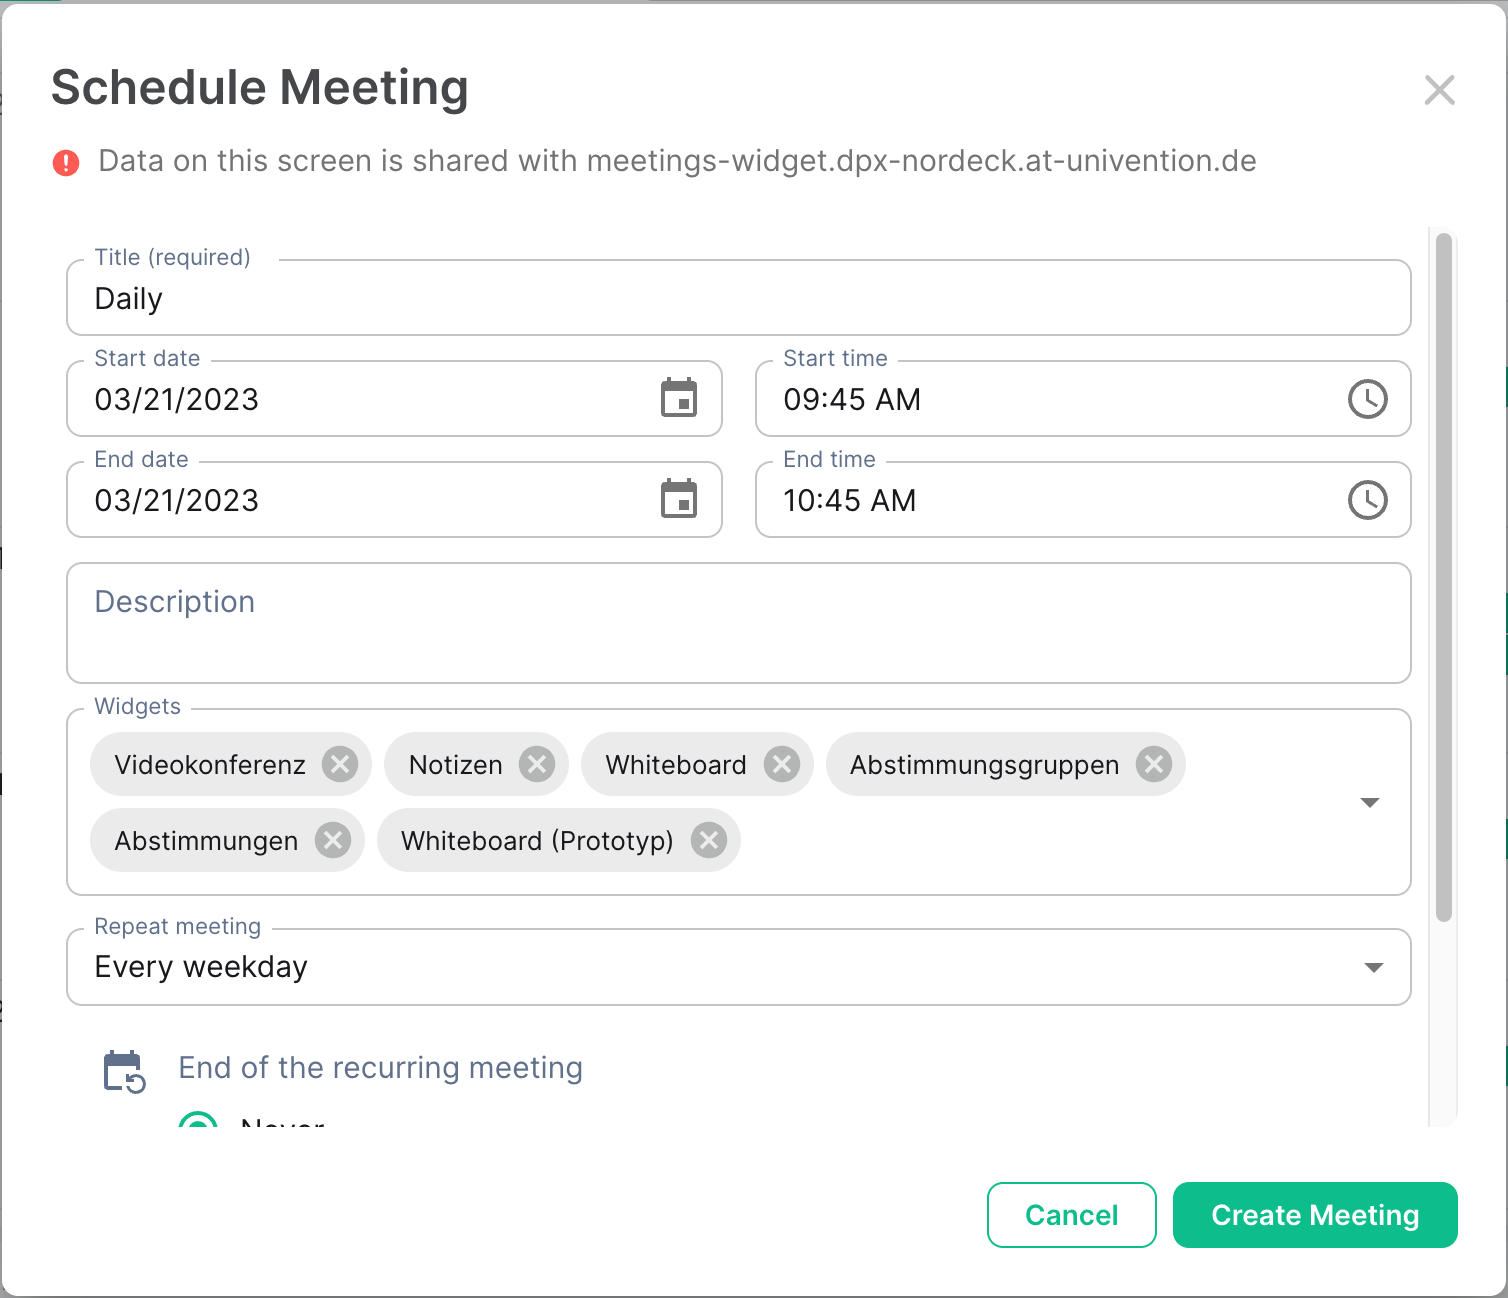
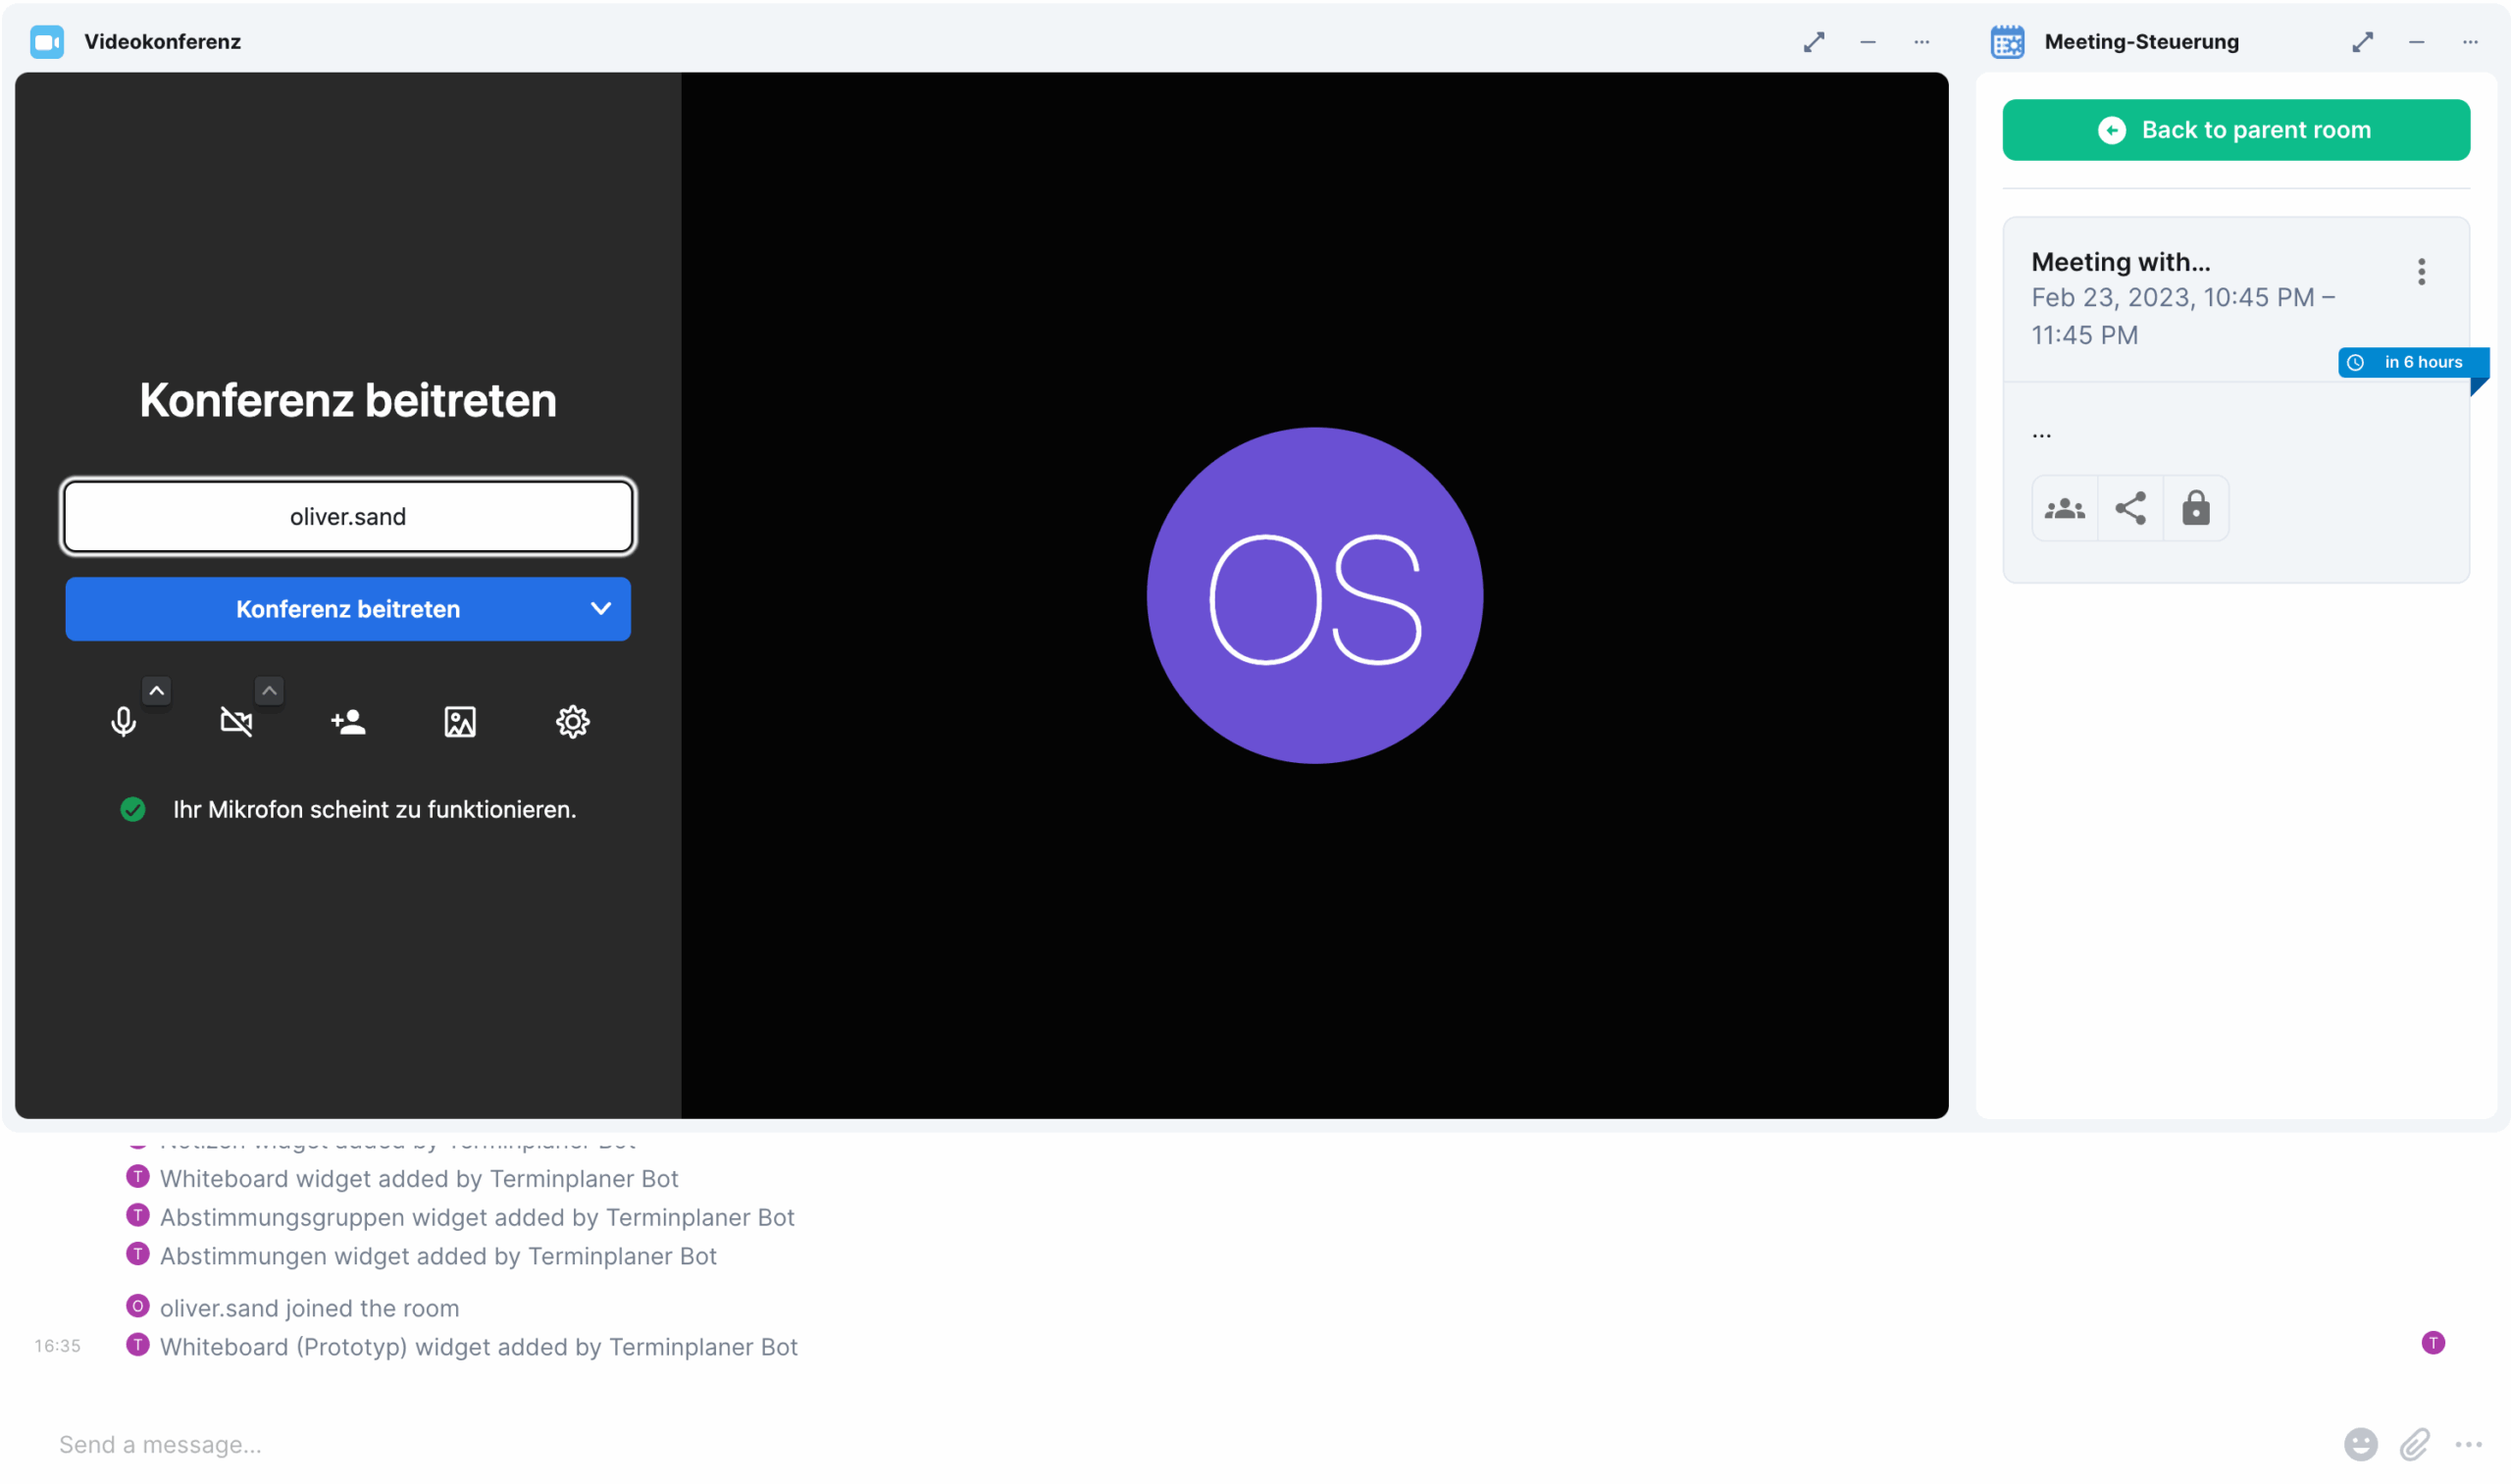
    A solution to organizing meetings in Matrix chat rooms and video conferences. Users can plan meetings, configure options like widgets for meeting rooms, invite participants, perform breakout sessions, and see their calendar. Meeting metadata is stored in Matrix rooms. It also provides an API to create meetings from third party services, like Open-Xchange.

    Calendar List Calendar Month Create Meeting Conference

    The widgets has multiple parts:
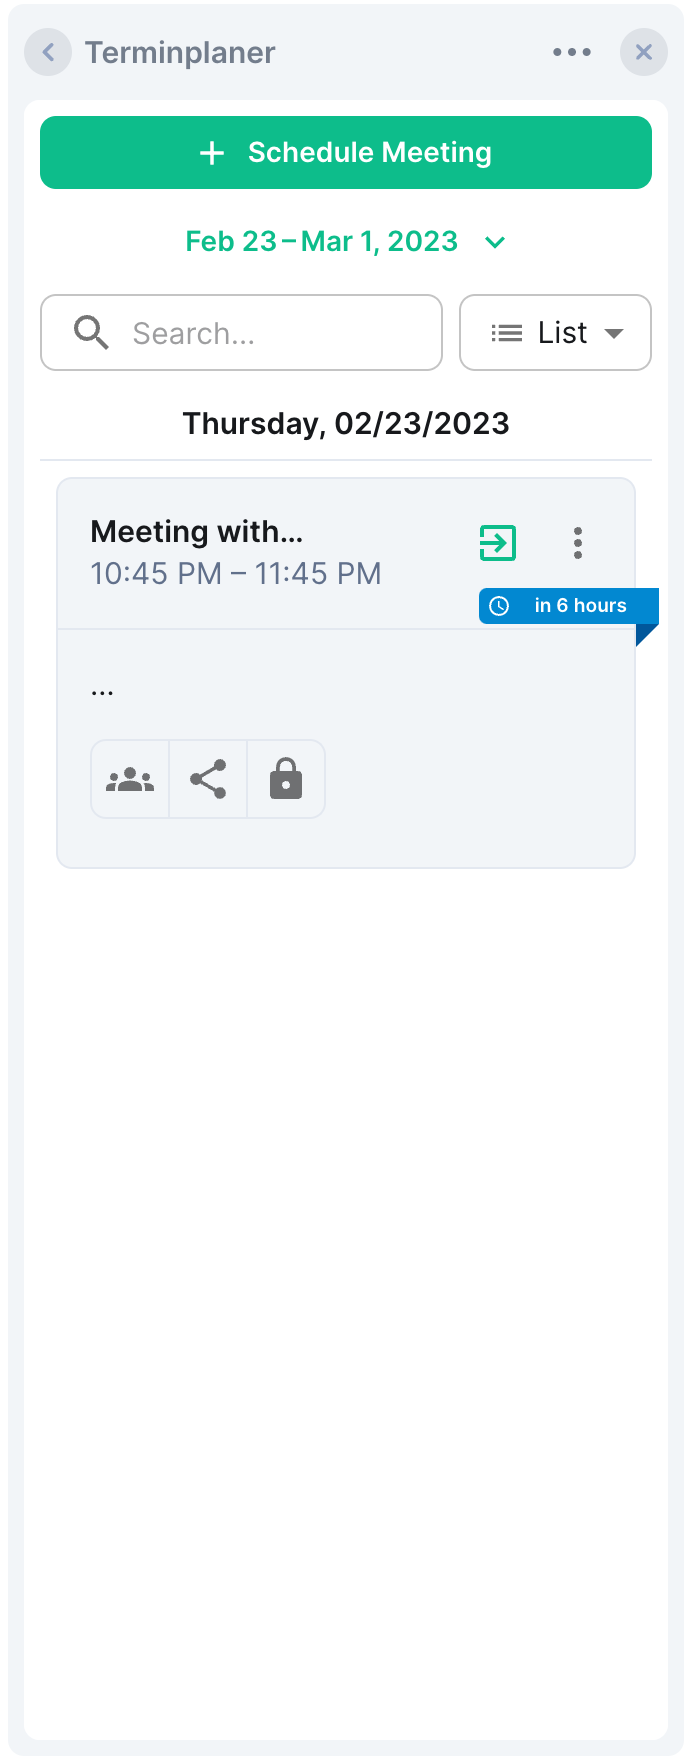
    Getting Started

    Development on the widget happens at GitHub.

    How to Contribute

    Please take a look at our Contribution Guidelines.

    Check the following section on how to setup a development environment for the widget:

    Requirements

    You need to install Node.js (>= 20.0.0, prefer using an LTS version) and run yarn to work on this package. The minimal Element version to use this widget is 1.11.29.

    Installation

    After checkout, run yarn install to download the required dependencies

    Warning Do not use npm install when working with this package.

    Configuration

    Rename the provided .env.local.default to .env.local in the widget or bot folder and fill it with your configuration. For a list of available options, see Configuration.

    Running the Widget Locally

    Follow the instructions to run the widget locally.

    Once running, you can visit the widget URL (http(s)://localhost:3000/) and follow the instructions on how to add it to a room within Element Web.

    Available Scripts

    In the project directory, you can run:

    • yarn dev: Start the widget for development.
    • yarn start: Start the widget for development with a self-signed HTTPS certificate.
    • yarn build: Run the build step in all projects.
    • yarn test: Watch all files for changes and run tests of the widget.
    • yarn lint: Run eslint in all projects.
    • yarn prettier:write: Run prettier on all files to format them.
    • yarn depcheck: Check for missing or unused dependencies.
    • yarn generate-disclaimer: Generates license disclaimer and include it in the build output.
    • yarn deduplicate: Deduplicate dependencies in the yarn.lock file.
    • yarn changeset: Generate a changeset that provides a description of a change.
    • yarn docker:build: Builds all containers from the output of yarn build and yarn generate-disclaimer.
    • yarn e2e: Runs the end-to-end tests in a single browser. Pass --debug to enable the debug UI. Run yarn docker:build first.

    Running the bot locally

    Follow the instructions in the README.md file of the matrix-meetings-bot folder.

    Versioning

    This package uses automated versioning. Each change should be accompanied by a specification of the impact (patch, minor, or major) and a description of the change. Use yarn changeset to generate a new changeset for a pull request. Learn more in the .changeset folder.

    Once the change is merged to main, a “Version Packages” pull request will be created. As soon as the project maintainers merged it, the package will be released and the container is published.

    Architecture Decision Records

    We use Architecture Decision Records (ADR)s to document decisions for our software. You can find them at /docs/adrs.

    Deployment

    You can run the widget using Docker:

    docker run --rm -p 8080:8080 ghcr.io/nordeck/matrix-meetings-widget:latest

    Be sure, that you also read the security notes in the base image @matrix-widget-toolkit/widget-server docs.

    Our docker image supports customizing the nginx config by supplying additional config files. For example, this allows running the image in an IPv4-only environment, as demonstrated at https://github.com/nordeck/matrix-widget-toolkit/tree/main/containers/widget-server#custom-listen-directive

    You can run the bot using Docker:

    docker run --rm -p 3000:3000 ghcr.io/nordeck/matrix-meetings-bot:latest

    We also provide HELM charts.

    Supply Chain Security

    To ensure transparency and security in our software supply chain, we provide comprehensive Software Bill of Materials (SBOM) reports for this project and signed container images.

    SBOM Reports

    We provide SBOM reports within the widget container and as a release artifact.

    • The generated SBOM report is available alongside the hosted widget assets, and can be found at <DEPLOYMENT-URL>/sbom.spdx.json, or via the filesystem at /usr/share/nginx/html/sbom.spdx.json
    • For the bot container, you will find the SBOM at /usr/local/share/doc/matrix-meetings-bot.sbom.spdx.json
    • Each GitHub release has a corresponding image SBOM scan report file attached as a release asset

    Signed Container Images

    The container images releases are signed by cosign using identity-based (“keyless”) signing and transparency. Execute the following command to verify the signature of the container images:

    cosign verify \
    --certificate-identity-regexp https://github.com/nordeck/matrix-meetings/.github/workflows/publish-release-bot.yml@refs/tags/@nordeck/matrix-meetings-bot \
    --certificate-oidc-issuer https://token.actions.githubusercontent.com \
    ghcr.io/nordeck/matrix-meetings-bot:<version> | jq
    cosign verify \
    --certificate-identity-regexp https://github.com/nordeck/matrix-meetings/.github/workflows/publish-release-widget.yml@refs/tags/@nordeck/matrix-meetings-widget \
    --certificate-oidc-issuer https://token.actions.githubusercontent.com \
    ghcr.io/nordeck/matrix-meetings-widget:<version> | jq

    Matrix Room Upgrades

    It may be necessary to upgrade meeting rooms to a different Matrix room version, for example to use room version 12. You can learn more about Matrix room upgrades in general on the Matrix.org website.

    Rooms used with NeoDateFix have special attributes. These rooms cannot simply be upgraded, as this will not keep the widget-specific events and will make the state stored in the meetings inconsistent.

    The recommended way to “upgrade” instead is to recreate the rooms that were created or modified by the bot. All the necessary content must be exported from these rooms.

    This applies to all the rooms: one-to-one chat with the bot, calendar room with meetings widget, meetings rooms, and breakout session rooms.

    • In the case of one-to-one chat: the user has to leave the room and interact with the bot anew using a direct message.
    • In the case of calendar room: the user has to leave the room, create a new one and invite the bot to the new room.
    • In the case of meeting rooms and breakout rooms: the meeting creator should export any widget contents in the old meeting room and then has to delete their meetings via the meetings widget UI and create new meetings.

    A new room gets the default room version from the Matrix server. This applies to the bot: new meeting rooms will use the default room version.

    The widget and the bot are supported to work with multiple different room versions. It is not required to have the same room version for all bot rooms.

    Room version 12 is supported from widget version 1.7.2 and bot version 2.8.4.

    License

    This project is licensed under Apache 2.0 license.

    The disclaimer for other OSS components can be accessed via the /NOTICE.txt endpoint. The list of dependencies and their licenses are also available in a machine readable format at /usr/share/nginx/html/licenses.json in the container image.

    Sponsors

    dPhoenixSuite      Dataport      openDesk      Nordeck

    This project is part of the dPhoenixSuite by Dataport and the openDesk Sovereign Workplace by BMI/ZenDiS.

    Visit original content creator repository https://github.com/nordeck/matrix-meetings
  • zapconfig

    zapconfig

    😄 zap logger configurations

    go.dev reference License GitHub release Docker Metrics Made by Manfred Touron

    Go Release PR GolangCI codecov Go Report Card CodeFactor

    Usage

    import (
    	"go.uber.org/zap/zapcore"
    
    	"moul.io/zapconfig"
    )
    
    func Example() {
    	logger := zapconfig.Configurator{}.MustBuild()
    	logger.Info("hello!")
    }
    
    func Example_configuration() {
    	logger := zapconfig.New().
    		EnableStacktrace().
    		SetLevel(zapcore.DebugLevel).
    		SetOutputPath("stderr").
    		SetOutputPaths([]string{"stderr", "stdout", "./path/to/log.txt"}).
    		SetPreset("light-console").
    		MustBuild()
    	logger.Info("hello!")
    }

    Install

    Using go

    $ go get moul.io/zapconfig

    Releases

    See https://github.com/moul/zapconfig/releases

    Contribute

    Contribute <3

    I really welcome contributions. Your input is the most precious material. I’m well aware of that and I thank you in advance. Everyone is encouraged to look at what they can do on their own scale; no effort is too small.

    Everything on contribution is sum up here: CONTRIBUTING.md

    Contributors ✨

    All Contributors

    Thanks goes to these wonderful people (emoji key):


    Manfred Touron

    🚧 📖 ⚠️ 💻

    moul-bot

    🚧

    This project follows the all-contributors specification. Contributions of any kind welcome!

    Stargazers over time

    Stargazers over time

    License

    © 2020 Manfred Touron

    Licensed under the Apache License, Version 2.0 (LICENSE-APACHE) or the MIT license (LICENSE-MIT), at your option. See the COPYRIGHT file for more details.

    SPDX-License-Identifier: (Apache-2.0 OR MIT)

    Visit original content creator repository https://github.com/moul/zapconfig
  • aem-stubs

    WTT logo

    GitHub tag (latest SemVer) GitHub All Releases Check Apache License, Version 2.0, January 2004

    AEM Stubs


    🚧 Deprecation 🚧

    We’d like to inform you that AEM Stubs is now deprecated, as its functionality has been integrated into a larger tool.

    As a better alternative we recommend checking out AEM Content Manager.

    No worries, your familiar workflow and features remain intact in ACM.


    Tool for providing sample data for AEM applications in a simple and flexible way.

    Simply install ready-to-use CRX package on AEM instance and start stubbing!

    AEM Stubs Screenshot

    AdaptTo 2020 Live Demo – https://adapt.to/2020/en/schedule/lightning-talks/aem-stubs.html

    Main concepts of AEM Stubs tool are:

    • Simplicity
      • Creating stubs should be as much simple as it is possible,
    • Reactivity
      • Trivial tool deployment – installable on AEM via all-in-one CRX package in the time when stubs are actually needed,
      • Trivial stubs deployment – reloading stubs tied to regular AEM application deployment.

    Installation

    The ready-to-install AEM packages are available on GitHub releases.

    There are two ways to install AEM Stubs on your AEM instances:

    1. Using the ‘all’ package:
      • Recommended for fresh AEM instances.
      • This package will also install AEM Groovy Console and AEM Stubs examples.
    2. Using the ‘minimal’ package:
      • Recommended for AEM instances that already contain some dependencies shared with other tools.
      • This package does not include Groovy bundles, which can be provided by other tools like AEM Easy Content Upgrade (AECU) or AEM Groovy Console.

    Post installation steps

    Remember that using AEM Stubs on AEM Publish instances through AEM Dispatcher may require an additional configuration.

    Simply ensure that AEM Stubs Filter prefix /stubs (configured in AEM Stubs HTTP Filter is not filtered by AEM Dispatcher configuration. Alternatively, by creating OSGi configuration, update that path prefix (or regex pattern) to the something which is already accessible.

    Compatibility

    AEM Stubs AEM Java Groovy
    1.0.0, 1.0.1 6.4, 6.5 8 2.x
    >= 1.0.2 6.3, 6.4, 6.5 8 2.x
    2.0.0 6.3, 6.4, 6.5 11 2.x
    2.0.1 6.3, 6.4, 6.5 8, 11 2.x
    3.0.0 6.3, 6.4, 6.5 8, 11 4.x
    4.0.0 6.5, cloud 11 4.x

    Note that AEM Stubs is using Groovy scripts concept. However it is not using AEM Groovy Console. It is done intentionally, because Groovy Console has close dependencies to concrete AEM version. AEM Stubs tool is implemented in a AEM version agnostic way, to make it more universal and more fault-tolerant when AEM version is changing. It is compatible with AEM Groovy Console – simply install one of AEM Stubs distributions without Groovy console OSGi bundle included as it is usually provided by Groovy Console AEM package.

    From AEM Stubs 3.x onwards, Groovy has been upgraded to version 4.x. Groovy has stopped providing a groovy-all ‘uber’ bundle. In this package, only the groovy ‘core’ bundle is included. It is possible to add extra Groovy modules in your own project. A list of groovy subprojects can be found here at the Groovy GitHub Project

    Documentation

    Basics

    Stubs could be provided by:

    • Groovy Scripts (*.stub.groovy) so called stub scripts e.g file named my-feature.stub.groovy.

    For example, when decided to choose WireMock framework, then these files should be put into AEM under path /conf/stubs/wiremock/* via CRX package with corresponding Vault workspace filter:

    <?xml version="1.0" encoding="UTF-8"?>
    <workspaceFilter version="1.0">
        <filter root="/apps/mysite"/>
        <filter root="/conf/stubs/mysite"/>
    </workspaceFilter>

    OSGi configuration

    AEM Stubs HTTP Filter AEM Stubs Repository

    Stub script API

    Pre-defined variables:

    • resourceResolver – for accessing AEM repository,
    • log – SLF4j logger connected to script being run.
    • template – Template engine-based rendering
    • repository – Easy access to AEM repository
    • faker – Data Faker library for generating random data

    Other tools

    There are no other dedicated tools for stubbing data available for AEM and it was main purpose to create AEM Stubs tool.

    Authors

    Contributing

    Issues reported or pull requests created will be very appreciated.

    1. Fork plugin source code using a dedicated GitHub button.
    2. Do code changes on a feature branch created from main branch.
    3. Create a pull request with a base of main branch.

    Building

    To build all the modules run in the project root directory the following command with Maven 3:

    mvn clean install
    

    To build all the modules and deploy the all package to a local instance of AEM, run in the project root directory the following command:

    mvn clean install -PautoInstallSinglePackage
    

    Or to deploy it to a publish instance, run

    mvn clean install -PautoInstallSinglePackagePublish
    

    Or alternatively

    mvn clean install -PautoInstallSinglePackage -Daem.port=4503
    

    Or to deploy only the bundle to the author, run

    mvn clean install -PautoInstallBundle
    

    Or to deploy only a single content package, run in the sub-module directory (i.e ui.apps)

    mvn clean install -PautoInstallPackage
    

    License

    AEM Stubs is licensed under the Apache License, Version 2.0 (the “License”)

    Visit original content creator repository https://github.com/wttech/aem-stubs
  • ProtPlot.jl

    ProtPlot

    Dev Dev Build Status Coverage

    ProtPlot is a Julia package for rendering 3D protein ribbon and other miscellaneous protein-related plots using Makie.jl.

    Examples

    Ribbon plots are constructed from vectors of protein backbones represented as 3x3xL arrays. For convenience, argument conversion methods are defined, and the ribbon constructors can take:

    • a 3x3xL array of residue backbone atom coordinates (N, Ca, C), or a vector of these for each chain.
    • a BioStructures.MolecularStructure or BioStructures.Chain.
    • a PDB file path.
    using GLMakie # use the GLMakie backend
    using ProtPlot
    
    # Create and display a ribbon plot in an interactive window
    ribbon_scene("test/data/1ASS.pdb", backgroundcolor=:black, colormap=:jet)

    plain gradient

    Customizing colors

    Use the colors keyword argument to customize colors at the residue level. This argument should be a vector of vectors, where each vector contains either:

    • values between 0 and 1, representing the colors of each residue in their respective chains according to the colormap.
    • a list of Colorants, one per residue. For example, RGBA(1, 0, 0, 0.5) for a 50% transparent red. Load the ColorTypes or Colors package to create such Colorants.
    # Load protein data from a PDB file
    chains = readpdb("test/data/1ASS.pdb")
    
    colors = rand.(length.(chains))
    
    ribbon_scene(chains, colors=colors, colormap=:hsv)

    random colors

    Chains can be colored by chain using something like:

    colormap = [:royalblue, :violet, :limegreen, :chocolate1]
    colors = [fill(i-1, l) / (length(colormap)-1) for (i, l) in enumerate(length.(struc))]
    ribbon!(scene, chains; colors, colormap)

    and then you might get something like:

    Camera controls

    Makie allows programmatic control over the camera. Use the camcontrols keyword to control the initial view in a ribbon_scene call:

    ribbon_scene("test/data/1ASS.pdb", camcontrols=(; lookat=Vec3f(30, 0, 60), eyeposition=Vec3f(160, -75, 0), upvector=Vec3f(0, 0, 1)))

    camera

    See also

    Visit original content creator repository https://github.com/MurrellGroup/ProtPlot.jl
  • prowler-permissions-templates-public

    ProwlerPro SaaS Permission Templates

    This repo holds the templates that creates the required permissions in a customer’s account to be scanned by ProwlerPro SaaS:

    Templates Description

    • The above templates creates a role named ProwlerProSaaSScanRole and will be assumed from our account having as principal the roles used by ProwlerPro.

    Deployment using CloudFormation

    For the CFN deployment we have the following Quick Links:

    https://eu-west-1.console.aws.amazon.com/cloudformation/home?region=eu-west-1#/stacks/create/review?templateURL=https://s3.eu-west-1.amazonaws.com/prowler-pro-saas-pro-artifacts/templates/prowler-pro-scan-role.yaml&stackName=ProwlerProSaaSScanRole&param_ExternalId=YourExternalIDHere

    Deployment using Terraform

    To deploy the ProwlerPro SaaS Role in order to allow to scan you AWS account, please run the following commands in your terminal:

    1. terraform init
    2. terraform plan
    3. terraform apply

    During the terraform plan and terraform apply steps you will be asked for your AWS External ID.
    Note that Terraform will use the AWS credentials of your default profile.

    Visit original content creator repository
    https://github.com/prowler-cloud/prowler-permissions-templates-public

  • shopslot

    shopslot

    Shoplot aims to be a quick ticketing solution for supermarkets (following COVID-19 situation in 2020).
    Released as open source on Github.

    In short, since COVID-19 lockdowns and supermarkets’ queues overflowing with people which increases risks of contagion and waiting time, this project can be used by e.g. supermarkets to allow the public to obtain a ticket for a timeslot at the supermarket. This hopefully can help to allow presence of a maximum number of people in the supermarket during one timeslot.

    Main features:

    • Enable the public to select a shop, select a timeslot, book and confirm the timeslot
    • Generate a ticket for the public which contains a QR code which can be used to verify the ticket’s validity with a QR scanner
    • Cron jobs to initialise a shop’s timeslots for a week, deactivate and delete expired timeslot

    To setup:

    • Checkout the project in a directory on the web server
    • Create your database using the sql file structure
    • Run a composer install
    • Add a line for your shop/supermarket in table Shop leaving email_verified as 0
      e.g. # id, name, address, comments, email, max_per_slot, mon_alpha_csv, tue_alpha_csv, wed_alpha_csv, thu_alpha_csv, fri_alpha_csv, sat_alpha_csv, sun_alpha_csv, open_time, close_time, key, email_verified, slot_duration_min
      ‘1’, ‘Winners Rose Belle’, ‘Rose Belle’, ”, ‘w@gmail.com‘, ’30’, ‘A,B,C,D,E,F,G,H’, ‘I,J,K,L,M,N,O,P’, ‘Q,R,S,T,U,V,W,X,Y,Z’, ‘A,B,C,D,E,F,G,H’, ‘I,J,K,L,M,N,O,P’, ‘Q,R,S,T,U,V,W,X,Y,Z’, ”, ’09:00:00′, ’17:00:00′, ‘IUHDjsdhnlkfjhsoifuw9a8e70593849iu43u8rt894h304’, ‘0’, ’30’
    • Configure config/*php files
    • Configure database, email account, timezone, email smtp settings
    • Point domain or subdomain to the root directory/web dir
    • Configure cron job in commands directory as
      0 0 * * * /usr/local/bin/php /home/whereyourrootdiris/shoppingslot/yii cron/generate-next-timeslots >/dev/null 2>&1
      Refer to the comments in the commands directory.

    Project has been developed with Yii2 PHP Framework.

    Kind Regards and be safe,
    Dharvin from Mauritius.

    Visit original content creator repository
    https://github.com/dharvind/shopslot

  • randomstring

    Random String Generator

    This library assists in generating random strings based on specific characteristics. You can create random strings consisting of alphanumeric characters, letters only, digits only, special characters, or even a custom character set.

    Features

    • Generate strings with alphanumeric, letters only, digits only, or special characters.
    • Ability to disable uppercase, lowercase, or numeric characters.
    • Option to use a custom character set.

    Installation

    go get -u github.com/necmettindev/randomstring

    Usage

    Below are different scenarios demonstrating how to use the randomstring package:

    Basic Usage

    Generate a string of length 10 using the default alphanumeric characters:

    package main
    
    import (
    "fmt"
    "github.com/necmettindev/randomstring"
    )
    
    func main() {
        opts := randomstring.GenerationOptions{
            Length: 10,
        }
    
        result, _ := randomstring.GenerateString(opts)
    
        fmt.Println(result)
    }

    Disabling Features

    For instance, to generate a string containing letters only:

        opts := randomstring.GenerationOptions{
            Length: 10,
            DisableNumeric: true,
        }
    
        result, _ := randomstring.GenerateString(opts)
        fmt.Println(result)

    Using Special Characters

    Generate a string with enabled special characters:

        opts := randomstring.GenerationOptions{
            Length: 15,
            EnableSpecialCharacter: true,
        }
    
        result, _ := randomstring.GenerateString(opts)
        fmt.Println(result)

    Using a Custom Character Set

    Generate a string with your own custom character set:

        opts := randomstring.GenerationOptions{
            Length: 12,
            CustomCharset: "abcXYZ789",
        }
    
        result, _ := randomstring.GenerateString(opts)
        fmt.Println(result) // Produces a string consisting only of 'a', 'b', 'c', 'X', 'Y', 'Z', '7', '8', '9'.

    Contributing

    If you wish to contribute to this project, please first open an issue or pick up an existing one. Then make your contribution and submit a pull request.

    License

    This project is licensed under the MIT License.

    Visit original content creator repository
    https://github.com/necmettindev/randomstring

  • DimensAdjuster

    DimensAdjuster

    基于Smallest Width的屏幕适配插件

    引入

    在顶级build.gradle 加入classpath

    buildscript {
    
        dependencies {
            classpath 'com.helloyuyu:dimens-adjuster:1.1.1'
        }
    }

    在module build.gradle中引用插件

    apply plugin: 'com.helloyuyu.dimensadjuster'

    项目全局参数配置顶级build.gradle中

    ext {
        //全局参数设置
        adjustArgsGlobal = [
                //基准的SmallestWidth
                'basicSW'         : 360,
                //要适配的SmallestWidth列表
                'adjustSWs'       : [320, 360, 390, 410],
                //是否开启
                'adjustEnable'    : true,
                //排除的dimen
                'excludes'        : ['sp18'],
                //计算时候遇到浮点数是否四舍五入
                'dimenValueHalfUp': false,
        ]
    }

    全局的参数设置是可选的

    Module中如果全局参数没有配置或则想要复写全局的配置的参数设置

    android{
    //...
    }
    adjustArgs {
        //基准的SmallestWidth
        basicSW 400
        //基准的SmallestWidth对应的dimens.xml文件路径 只有在sourceSet改变了默认路径才需要设置 默认已经赋值了的
        basicDimensXmlFilePath new File("$project.projectDir/src/main/res/values/dimens.xml").getAbsolutePath()
        //要适配的SmallestWidth列表
        adjustSWs = [320, 360, 390, 410]
        //要排除的dimen
        excludes = ['sp18','dp36']
        //编译时候是否开启
        adjustEnable = true
    }

    最终文件生成

    图片

    参数说明

    • basicDimensXmlFilePath 基准的SmallestWidth对应的dimens.xml文件路径 默认值new File("$project.projectDir/src/main/res/values/dimens.xml").getAbsolutePath() 一般只有在sourceSet改变了默认路径才需要设置
    • basicSW 基准的SmallestWidth
    • adjustSWs 要适配的SmallestWidth列表 这部分暂时只是在测试平台上代码反馈统计,没有找到很好的数据统计来源 有多少奇葩SW的值不能确定 Android的碎片化你懂得,以上只是一些些,实际项目中可以选择 10~20dp梯度列表 如果小伙伴有统计数据请在 issue中补上不胜感激
    • excludes 要排除的dimen列表 例如要排除 <dimen name="dp36">36dp</dimen> 则在excludes中加上‘dp36’
    • adjustEnable 编译的时候是否需要生成适配文件
    • dimenValueHalfUp 在计算的时候dimen数值出现浮点是否四舍五入

    Email

    jsxie1024@163.com

    Visit original content creator repository https://github.com/helloyuyu/DimensAdjuster